The post Two Ingredients Creamy Cauliflower Mayonnaise Spread Simple Recipe appeared first on The World Is an Oyster.
]]>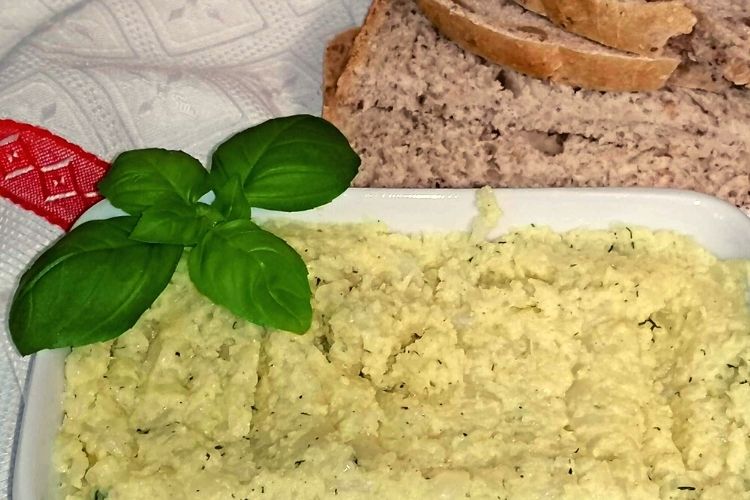
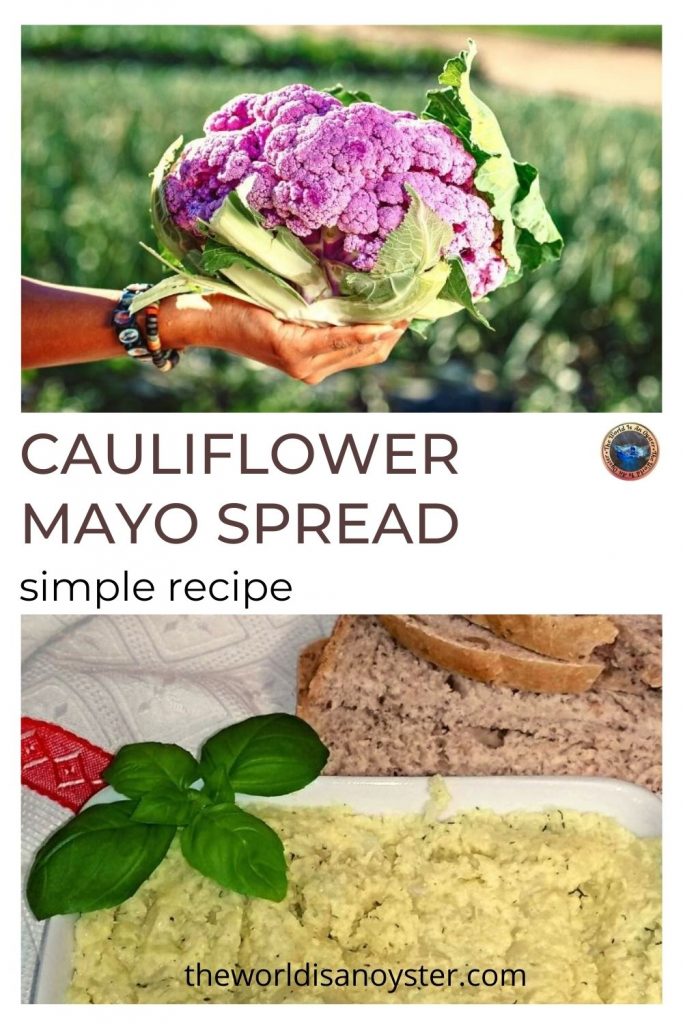
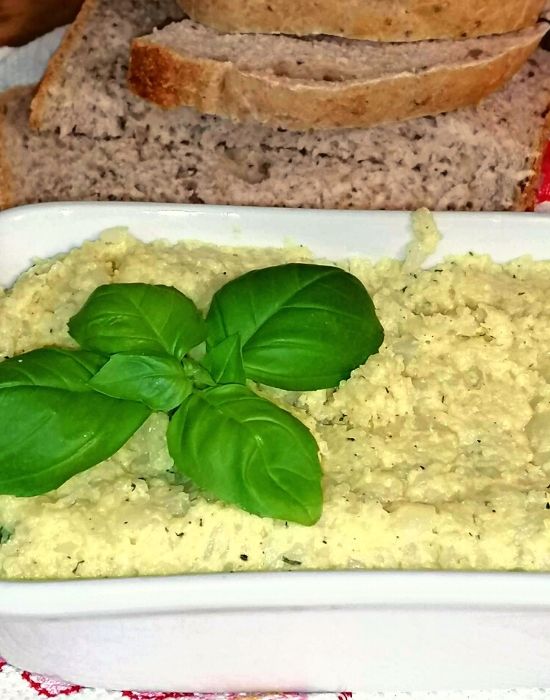
Creamy cauliflower mayonnaise spread or cauliflower salad (salată de conopidă) is a Romanian appetiser that is easy to make, light in calories and tasty. The Romanians would call it ‘salad’ although technically it is a spread because we spread it on bread slices and seldom dip a piece of bread into the bowl – therefore not a dip either.
This post may contain affiliate links, which means I will receive a commission if you purchase through my links at no extra cost to you. Please read the full disclosure for more information. Thank you!
The version I am making today is the simple one, containing two basic ingredients (cauliflower and mayonnaise) plus a handful of spices.

There are many alternations and variations for a creamy cauliflower mayonnaise spread according to your tastes. If you prefer a tangy bite, you can add freshly squeezed lemon juice. For a more robust flavour, you can add smashed garlic.
I have heard of feta cheese, yoghurt, tuna or chicken combinations but never tried any. I prefer my creamy cauliflower mayonnaise spread or cauliflower salad simple. Any meat addition would transform it into a different dish and pile up on the calories.
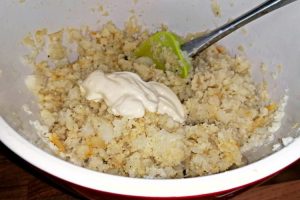
The mayonnaise in this recipe serves as a glueing agent that would confer the creamy texture. Preferably, homemade mayonnaise is the better option, but a store-bought organic one works well for busy cooks.
Why Cauliflower?
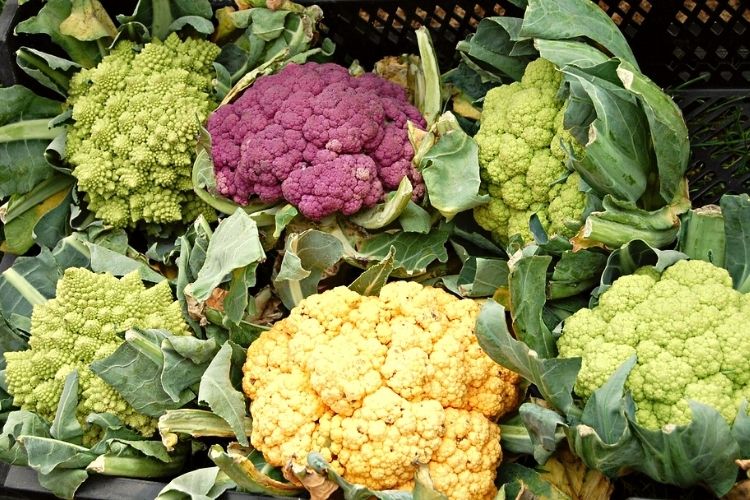
Not everybody’s cup of tea, cauliflower is a cruciferous vegetable, good cousin with broccoli, cabbage or kale – all low caloric high fibre superfoods packed with vitamins and minerals.
Some affections require caution in the amount of cauliflower consumed. It could interfere with iodine absorption (for thyroid sufferers), cause bloating (associated with Crohn’s disease), or affect blood-thinning medication because it contains high levels of vitamin K.
All that in mind, cauliflower is an excellent antioxidant that has a significant role in brain development, immunity, preventing heart disease, deactivating carcinogens and thus reducing cancer risk.

The smell of boiling cauliflower seems to be the most significant deterrent to cooking it, but this recipe requires minimal boiling or steaming time.
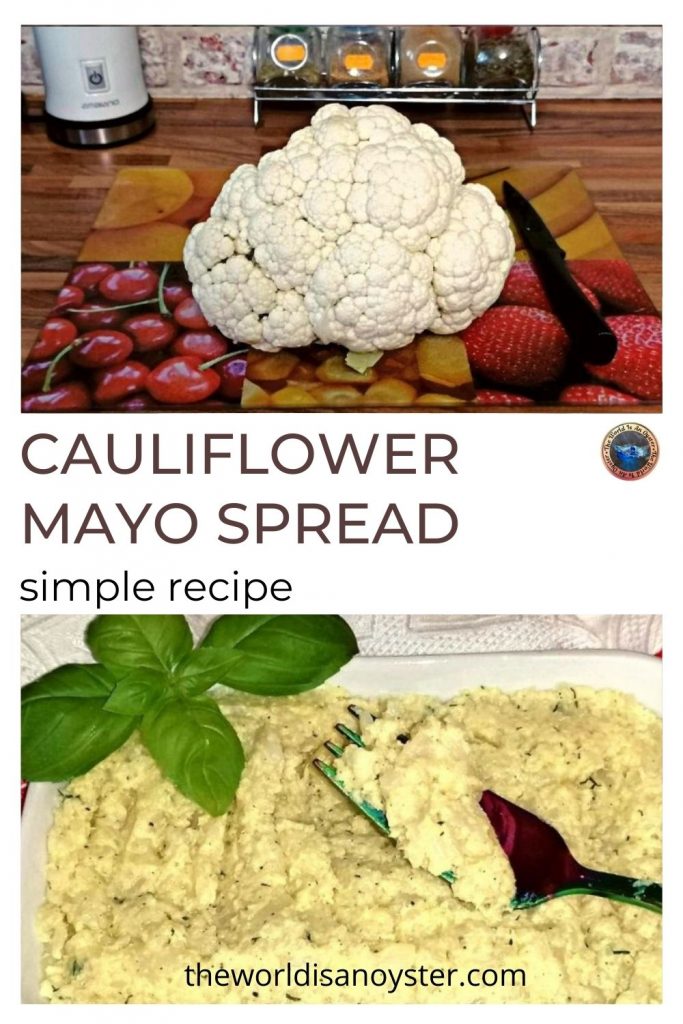
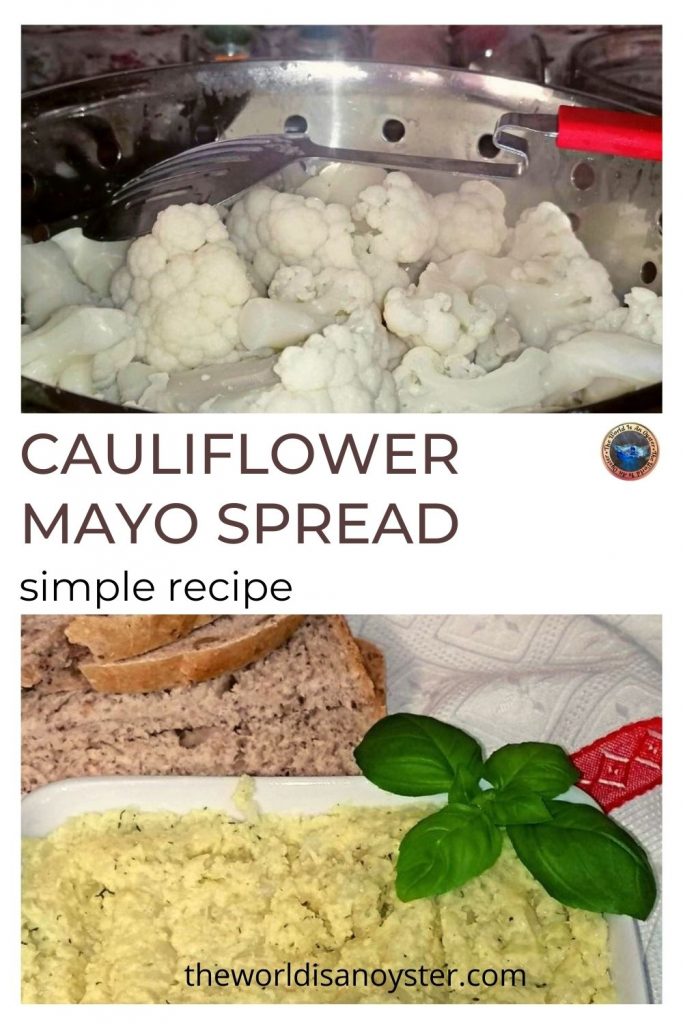
Ingredients for Creamy Cauliflower Mayonnaise Spread
One large cauliflower
Mayonnaise
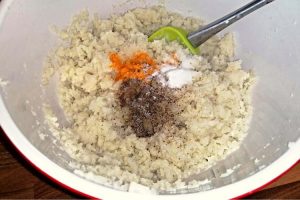
Salt
Pepper
Paprika or turmeric for colour (optional)
Method
Place water in a large pot and bring it to the boiling point.
Wash the cauliflower and remove the leaves. Cut or separate it into small florets.
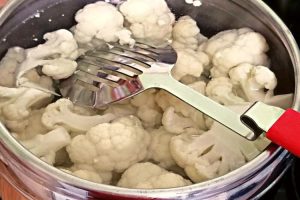
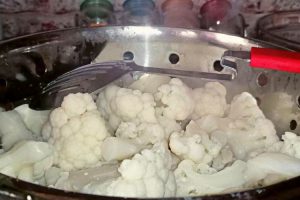
When the water boils, place all florets into the pot and cook them over medium heat for 3 minutes. Turn the heating down and transfer the florets into a colander. Allow them to drain and cool completely.
Place the florets in a large ceramic or glass mixing bowl when cooled. Use a potato masher to mash the cauliflower florets and stems into tiny pieces.
Add salt, pepper and paprika/turmeric and mix using a large spatula or wooden spoon. Add mayonnaise and mix until the texture becomes creamy.

Transfer the desired amount of creamy cauliflower mayonnaise spread into a serving dish, sprinkle freshly cut dill (optional, for colour variation) and serve with homemade bread or pita bread.
Enjoy!
Two Ingredients Creamy Cauliflower Mayonnaise Spread (Salad)
Ingredients
- 1 piece organic cauliflower large
- 1-2 tbsp organic mayonnaise light
- ¼ tsp black pepper ground
- ½ tsp salt sea/rock
- ¼ tsp paprika or turmeric optional
Instructions
- Fill ⅔ of a large pot with water and bring it to the boiling point.

- Wash and remove the leaves of the cauliflower. Separate/cut the florets.
- Add the florets to the boiling water and cook for 3 minutes over medium heat. Do not overcook, as the cauliflower needs to remain crisp. If overboiled, the cauliflower will become soggy and lose all the nutrients in the process.
- When ready, transfer the florets into a colander. Allow the cauliflower to drain and cool completely before the next step.
- Place the cooled florets in a large ceramic or glass mixing bowl.
- Use a potato masher to mash the cauliflower into tiny pieces.
- Add salt, pepper and paprika or turmeric (or both) and mix gently with a spatula or a large wooden spoon.
- Add the mayonnaise and mix until the texture becomes creamy.
- Optionally, sprinkle freshly-cut dill to offer colour.
- Fill serving dishes with the desired amount and place them on the table next to sliced bread.
Notes
Two Ingredients Creamy Cauliflower Mayonnaise Spread Simple Recipe
The post Two Ingredients Creamy Cauliflower Mayonnaise Spread Simple Recipe appeared first on The World Is an Oyster.
]]>The post How to Make a Creative Charcuterie Platter for Any Occasion appeared first on The World Is an Oyster.
]]>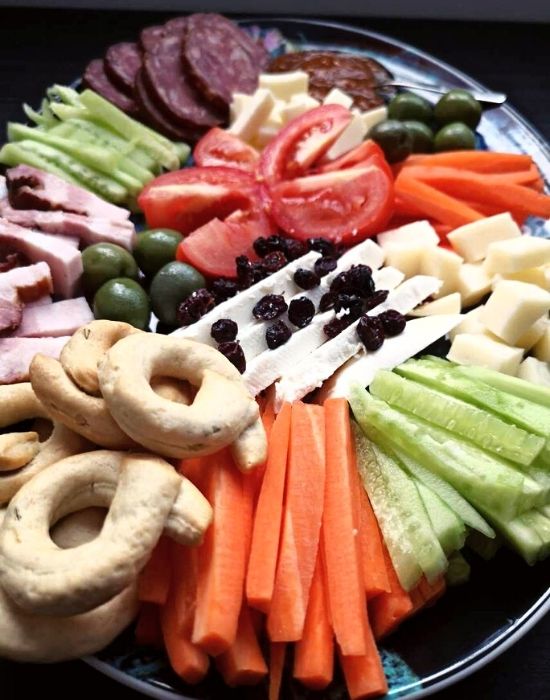
Making a DYI creative charcuterie platter is easier than it seems, not to mention the cost is a fraction of ready-made ones. All you need is a bit of imagination and research into the beneficiary’s tastes.
Select various flavours, textures and colours for your platter or board that will satisfy even the fussiest eaters.
This post may contain affiliate links, which means I will receive a commission if you purchase through my links at no extra cost to you. Please read the full disclosure for more information. Thank you!
The beauty of a creative charcuterie platter is that it looks impressive and appetizing, so it should sort out fussiness. You also have the choice to include all groups of foods you desire, according to your lifestyle or specific diets.
Besides, it can make the centrepiece on any festive dinner table, be it Christmas or New Year’s, Easter, Mother’s Day, Father’s Day, International Children’s Day, birthday and any other important day, not to mention a romantic Valentine’s Day dinner for two or a house party.
Anything goes, even a fancy weekday dinner when you don’t know what to cook and storm the fridge for open packs (still in date!) of cheese and meats.
Although humans have eaten cured meats for tens of thousands of years, the art of charcuterie is more related to Renaissance France. In modern times, charcuterie became increasingly popular worldwide because of its pleasant visual presentation and the fact that it permits using a large variety of ingredients at once.
What Type of Dish is Best For a Creative Charcuterie Platter?
A large round or oval porcelain platter or a bamboo board will do. A fancy board with accessories will make a better impression, of course, but a platter stored for ages somewhere in the cupboard it’s just fine for the job, too.
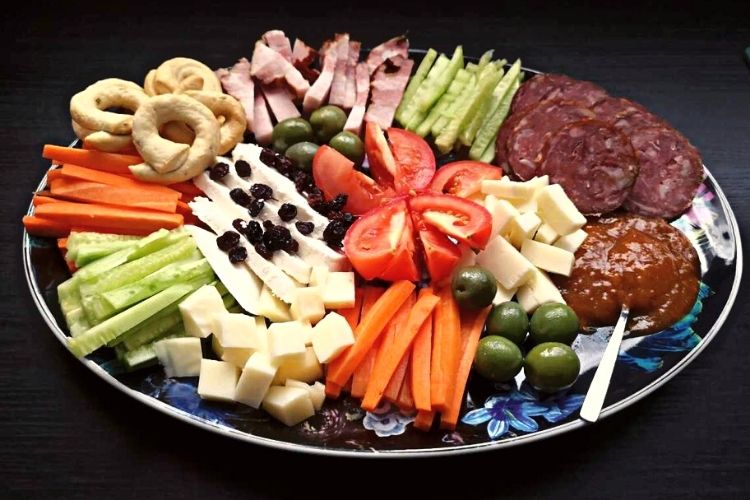
The porcelain platter I typically use is oval and 40 cm/16″ long. That counts as a “large” board that, when filled with goodies, sells for about £150, yet you can make it with under £10, and none will be the wiser!
A large platter easily feeds four people. Of course, you will need a few of them for parties, depending on how many guests you expect.
Ingredients for a Basic Board
Any charcuterie platter or board should contain a few essential ingredients you can work with to create a culinary masterpiece:


- bread/crackers/breadsticks
- cheese – include an assortment of flavours (salty, sweet, spicy, savoury) and textures (creamy, chewy, brittle, dense)
- meats – cured, cooked, smoked, paper-thin slices (prosciutto, ham) or thick slices (salamis)
- raw vegetables – include several colours and textures
- fruits and nuts – fresh/dried fruits; any nuts (check for nut allergy!)
- dips and spreads – jam, humous etc
- treats/sweets (optional) – depending on the occasion
What you choose to include on your charcuterie platter is as important as the presentation.
Firstly, I recommend using organic products from a source you trust or homemade (jam, humous, sausages).
For packed foods, check the expiring date. If the packs were already opened, make sure they still are in the recommended time frame for safe consumption.
How to Assemble Creatively the Charcuterie Platter

Use a clean, dry platter or board. Make sure you have enough room on the worktop for all the ingredients.
Start with washing, peeling and chopping the vegetables. Prepare the other ingredients that are okay at room temperature for longer (olives, nuts, fruits).
Always use labelled chopping boards when cutting foods to avoid cross-contamination.
Use the right slicer for the vegetables, according to the style you choose to cut them. For a skilled cook, a professional knife can sort it. For more design options and speed, I recommend using a multi-blade cutter.
Combine and position the basic ingredients to make them easily accessible to everybody at the table.
Given the plethora of tastes and textures, perhaps it is good to use flavour-free bread/crackers. I used fennel Taralli for this platter because I wanted to finish an open bag before it became soggy (moisture affects food quality, especially in a humid climate.) The combination of flavours was interesting, enhanced by the warm, sweet aroma of fennel seeds.
When you finish placing the vegetables and crackers on the platter, bring the cheese out of the fridge, slice or cut it into cubes and put it among the rest of the ingredients.
Continue with the meats. Use a meat labelled chopping board to slice or cut them as preferred and place them on the platter in an eye-pleasing manner.
Sprinkle dried fruits and chopped nuts over the platter. Optionally, add sweet treats that can make a dessert for this meal.
Serve immediately, paired with a wine of choice or cover the platter with cling film and keep it in the fridge if your guests haven’t arrived yet.
Use kitchen tongs or toothpicks (children, especially, would find it fun!) to fill your plate and enjoy!

Your creative charcuterie board looks epic and guaranteed will impress anyone partaking! Pair it with a glass of wine and bon appetite!


Creative Charcuterie Platter
Equipment
- Labelled chopping boards
- Chef knife
- Slicer
- Large porcelain platter
- Serving plates
Ingredients
- 1 carrot organic, large
- 1 cucumber organic, large (or two small)
- 1 tomato organic, large
- 1½ bell pepper organic, optional
- 1 handful Nocellara olives or any other type
- 1 handful savoury Taralli or bread sticks, crackers, bread
- 150 g smoked bacon (kaiser ham) or any other ham
- 150 g spicy chorizo or any other sausage/salami
- 50 g cow cheese
- 50 g dense goat cheese
- 50 g sheep cheese
- 50 g soft cheese
- 2 tbsp apricot or strawberry jam organic
- 1 tbsp medium-hot mustard for meats optional
- 1 handful dried cranberries or any other dried/fresh fruit
- 1 handful chopped walnuts or any other nut
Instructions
- Wash, peel and slice the vegetables. Use labelled boards for each ingredient group to avoid cross-contamination. For creativity, use a slicer with various blades.

- Combine and position the basic ingredients to make them easily accessible to everybody at the table.
- Bring the cheeses out of the fridge, cut/slice and add them creatively among the other ingredients.
- Slice the meats using a meat-labelled chopping board.
- For an eye-pleasing effect, either roll the slices or use a glass to create a flower-like salami (place overlapping slices on the rim, push the middle into the glass, then turn it upside-down and remove the piece gently to keep the shape)
- Sprinkle dried or fresh fruits and chopped nuts over the platter.

Notes
Cover photo credits Tye Doring, Unsplash.
How to Make a Creative Charcuterie Platter for Any Occasion
The post How to Make a Creative Charcuterie Platter for Any Occasion appeared first on The World Is an Oyster.
]]>The post How to Make Poached Egg Avocado on Toast appeared first on The World Is an Oyster.
]]>
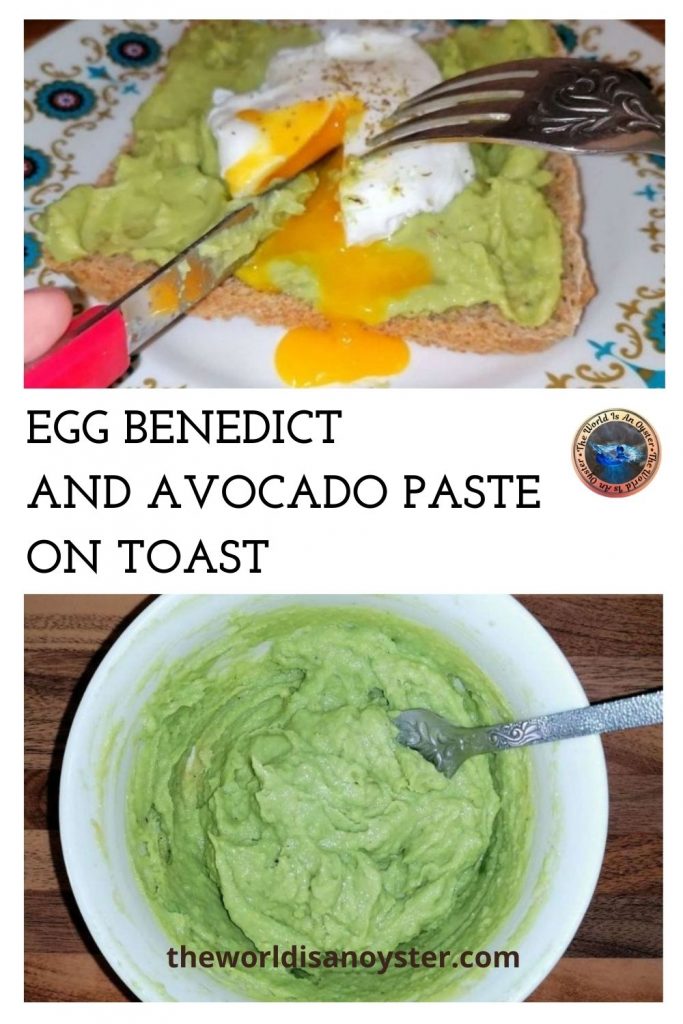
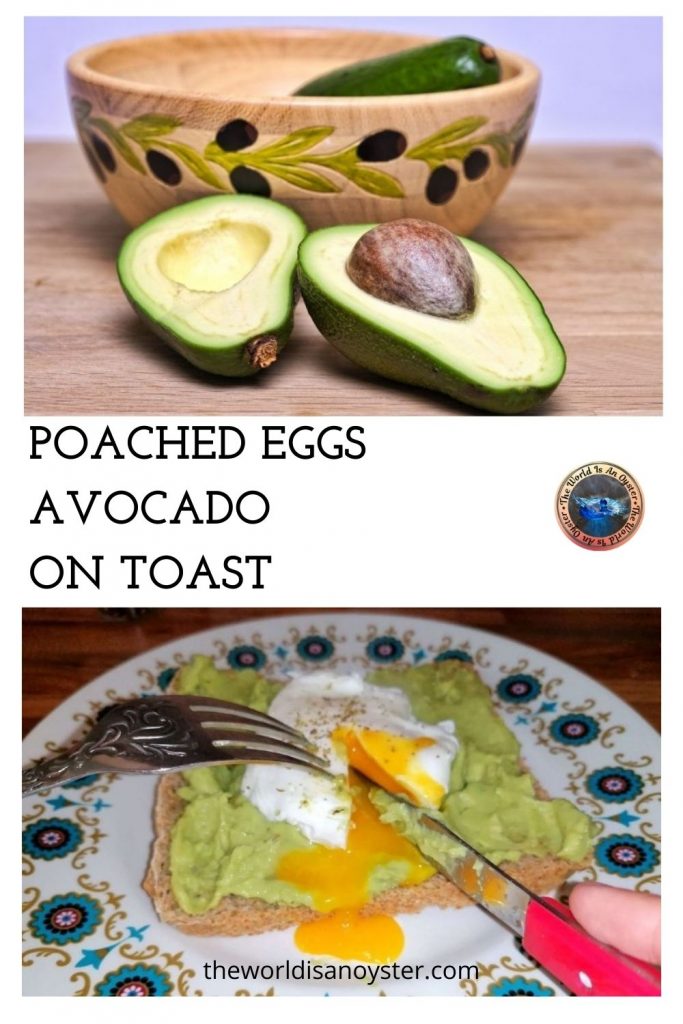
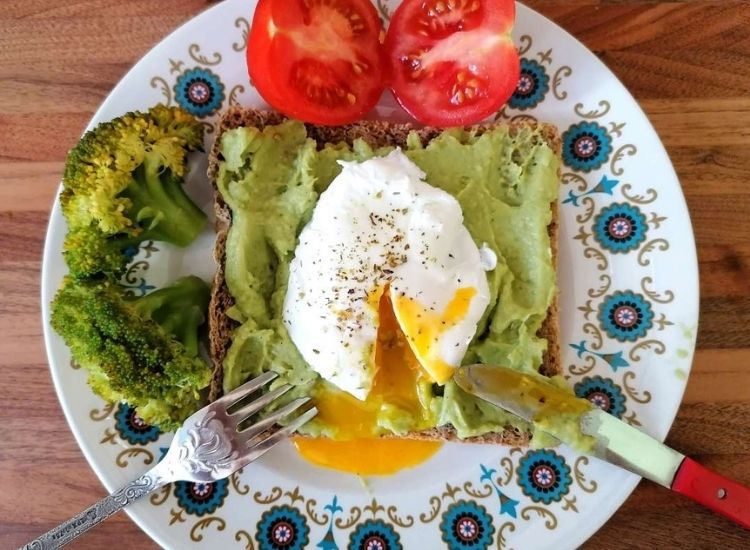
Poached egg and smashed avocado on toast is not only a healthy way to start and energise for the day, but it is also easy to make, and it takes a few minutes to prepare. If you wanted to give it more weight, you could name it eggs benedict on avocado since poached eggs are essentially egg benedict without the hollandaise sauce!
This post may contain affiliate links, which means I will receive a commission if you purchase through my links at no extra cost to you. Please read the full disclosure for more information. Thank you!
Avocado is part of the berry family of fruits and requires a warm climate for cultivation. In Mexico, smashed avocado makes the famous guacamole, a versatile dip or spread easily prepared with a handful of ingredients.
Because the star of the recipe is avocado, here are a few health facts about this fruit and reasons why it should be part of a balanced diet:
- improves digestion and vision
- reduced depression
- protects agaist cancer, osteoporosys, heart desease
- contains nutrients and healthy fats that regulates blood sugar levels
- makes you feel fuller for longer between meals
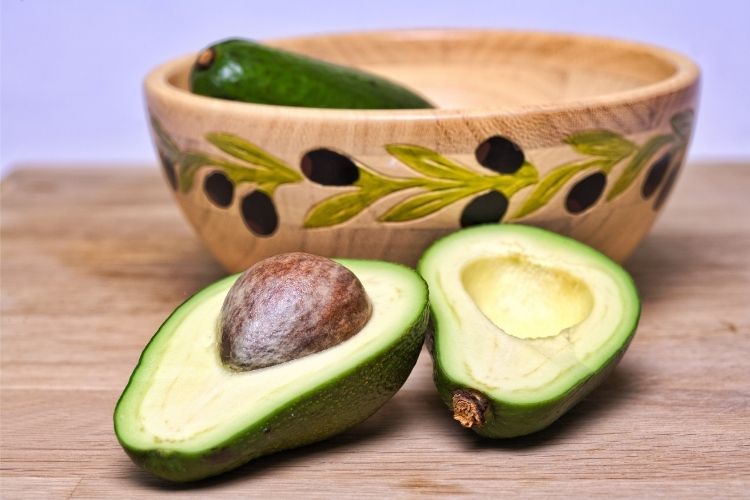
The soft avocadoes are suitable for guacamole, but if you prefer to slice and add them to the dish, they need to be firm, and the skin has to be green, not brown.
For this poached egg avocado on toast recipe, ripe avocadoes are the best because they are easy to peel, core and smash.
Eggs have been part of the human diet for millennia for good reasons: they are highly nutritious, contain good cholesterol and antioxidants, and are pretty much the most perfect food created by nature. This applies to organic eggs, of course. Any human intervention and “help” a hen grow bigger, better and faster results in unhealthy products that guaranteed will cause more harm than necessary, all for the sake of quick profit.
A poached egg and avocado on toast breakfast is the perfect way to start the day and can be efficiently introduced in a morning routine at least a couple of days a week as a variation to porridge or cereals.
For toast, as always, I encourage everybody to use homemade bread. Investing in a bread maker is the best thing one can do. It takes a couple of minutes to add the ingredients, and it requires no effort or time on your part. The result is a beautiful, much healthier and way better bread than a store-bought one. Did I mention that the bread maker is also suitable for making desserts, such as a fluffy Panettone?
Ingredients for poached egg avocado on toast
Ripen avocados
Eggs
Hot mustard
Salt and pepper, dried oregano (optional)
Bread
Salad
Method
Cut the avocados in two, stab the seed and wriggle gently to remove.
Use a large spoon to scoop the fruit out of the peel, careful not to break it if you intend to slice it.
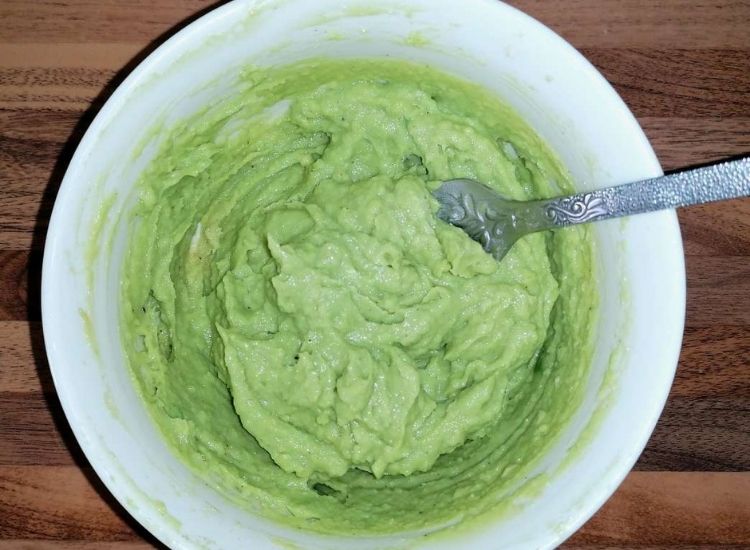
Use a potato masher to mash the avocados in a medium bowl. Add salt and pepper to taste and a teaspoon of hot mustard. I prefer horseradish mustard, but any hot one will do (it gives the paste a smooth texture and improves its taste.)
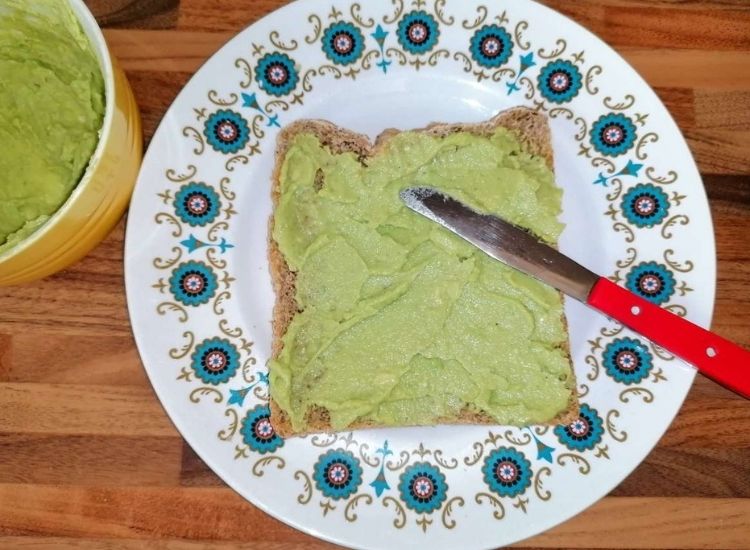
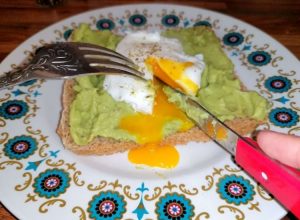
Slice and toast the bread. Spread the avocado paste and place it on a plate.
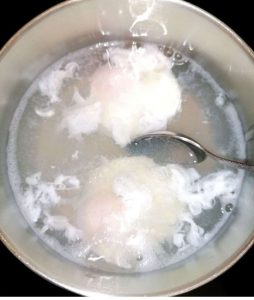
To make the poached eggs, fill 2/3 of a saucepan with water and bring to boil. Add a tablespoon of vinegar and a pinch of salt. Have a skimmer spoon at the ready.
Crack an egg and drop it gently into the water when it boils. Use the skimmer spoon to round the white around the yolk (it will tend to spread into the boiling water). Repeat the movement a few times until the white begins to harden. Poach each egg separately for 2-3 minutes.
Using the skimmer spoon, gently remove the egg from the pan, allow the excess water to drip, then place it on the prepared slice of bread.

Repeat the process for each egg until all bread slices contain at least one poached egg.
If you have silicone egg poacher or any other kitchen help for this purpose that is safe to use in boiling water (always check any plastic product is BPA free), it might make the process faster.
If the bread slices are larger, you might need two poached eggs for each.
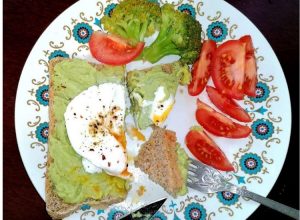
Sprinkle some dried oregano over the eggs, decorate the dish with salad and serve immediately.
Bon appetite!
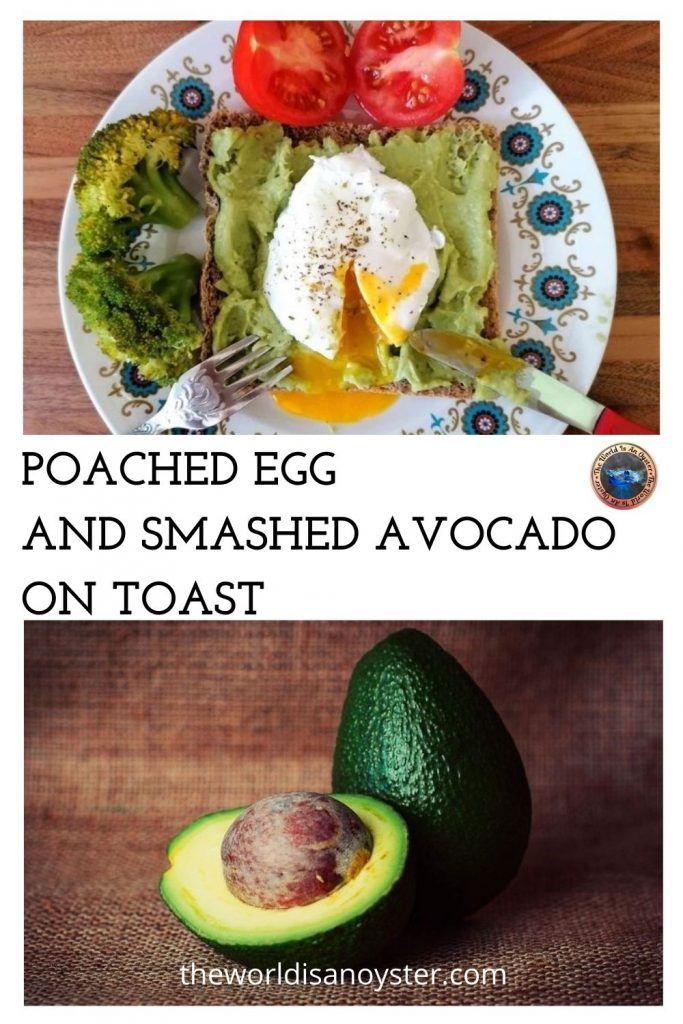
Poached Egg Avocado on Toast
Equipment
- Mixing bowl
- Saucepan
- Skimmer spoon
- Serving plates and cutlery
Ingredients
- 3 avocados organic, ripen, medium size
- 3 eggs organic, large
- 3 slices bread preferably homemade
- 1 tsp mustard any hot mustard/horseradish mustard
- pinch sea/rock salt, black ground pepper, dried oregano
- salad to decorate the plate
Instructions
- Mash the avocados in a medium bowl, add salt and pepper to taste and a teaspoon of hot mustard. I prefer horseradish mustard, but any hot one will do (it gives the paste a smooth texture and improves its taste.)

- Slice and toast the bread (medium-thick slices). Spread the avocado paste and place it on a plate.
- To make the poached eggs, fill 2/3 of a saucepan with water and bring to boil. Add a tablespoon of vinegar and a pinch of salt. Have a skimmer spoon at the ready.
- Crack an egg and drop it gently into the water when it boils. Use the skimmer spoon to round the white around the yolk (it will tend to spread into the boiling water.)
- Repeat the movement a few times until the white begins to harden. Poach each egg separately for 2-3 minutes. The yolk must remain runny, as in soft boiled eggs.
- Using the skimmer spoon, gently remove the egg from the pan, allow the excess water to drip, then place it on the prepared slice of bread.
- Repeat the process for each egg until all bread slices contain at least one poached egg (you might need two eggs for larger bread slices.)
- Sprinkle some dried oregano over the eggs, decorate the dish with a salad of your choice or steamed vegetables and serve immediately.
Notes
How to Make Poached Egg Avocado on Toast

The post How to Make Poached Egg Avocado on Toast appeared first on The World Is an Oyster.
]]>The post Walnut Meringue Crescent Cookies Easy Recipe appeared first on The World Is an Oyster.
]]>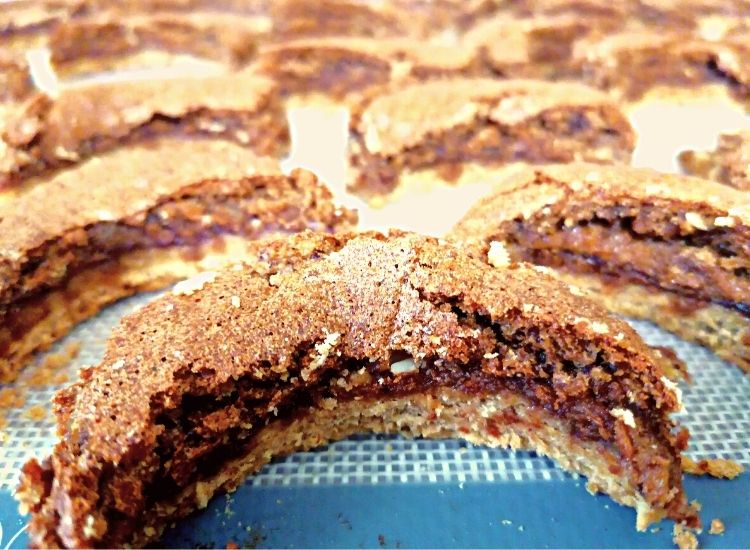
Walnut meringue crescent moon cookies were always the best delight mom baked for holidays. It is a dessert easy to make but so flavourful, with a tender base, a jam layer and a creamy, nutty top – precisely what we loved to munch on often in-between meal times.
This post may contain affiliate links, which means I will receive a commission if you purchase through my links at no extra cost to you. Please read the full disclosure for more information. Thank you!
We would sneak into the pantry where mom kept the massive trays will all the goodies she’d baked for Christmas or Easter (of which the fluffy cozonac was always the centrepiece!) and pinch moon cookies from the beautiful stack so that she would not see (so we thought!) how many were missing by the big day!
It was not long until I started making them with my younger sister and repeated the recipe mainly around Christmas time.
This year, I had the precious helping hand of Santa’s little helper contributing to baking mom’s traditional walnut and meringue crescent moon cookies, and the fun we had in the kitchen was delightful!
Of course, witty Santa’s helper (England born and bred) reading an old recipe handwritten in Romanian was hilarious. Still, I was there to provide the correct translation, and we did not use any alien ingredients on this occasion!
What was incredibly touching to see was how the little helper managed perfectly well with very little intervention on my part. I watched and reminisced how I did the same, around the same age, if not older, in mom’s kitchen back home in Romania.
I am glad to write this and forever remember the generation switch moment as it happened, keeping an old tradition and using the same old (and a tad grease-stained in places) recipe book that mom took the time and patience to write.
It feels emotional now that I’m writing down the recipe. But when we baked the walnut meringue crescent moons, it was fun and pure joy to see how different ingredients transform when mixed and create a delightful dessert.
We agreed on something we both have a passion for – baking is biochemistry, and the kitchen is the lab!
Mom used whatever ingredients she could buy during a difficult time, when communist rule meant restrictions of all sorts, including food.
Today, I am trying to educate my kid to understand the difference the temperature brings to various ingredients and how to use healthier versions and combine them in a way that keeps the flavour but reduces the harm to our body. Mom’s recipe mentioned margarine; we use organic coconut oil or organic butter.
For a self-proclaimed future scientist, I am delighted to see how such a young person understands what excessive refining does to sugar and why that is harmful to our health or how the human digestive system does not have the right enzyme to process cow milk and how healthier substitutes not only help personal health but have a role in the massive chain reaction that affects the environment.
Back to our fun baking for a couple of hours, it was the best time spent away from the computer, and I can’t wait until next time it happens again!
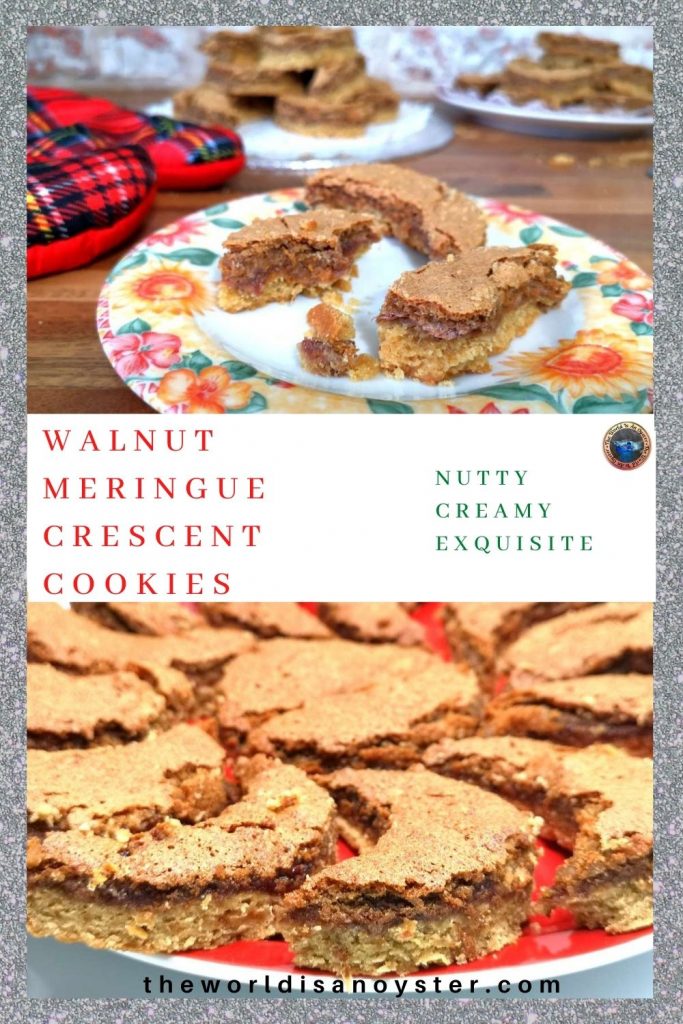
The cookies came out perfectly, and we did a lot of bowl-licking in the process and cooky testing to check that the final product passes the approval of the otherwise fussy quality control bakers and eaters in the family!
Miraculously, the cookies kept disappearing from the platter just as I remember it happened when I was a child! But I rest assured the little helper can bake just fine anytime, not just for holidays, while I watch and enjoy a delightful walnut merengue crescent moon cookie when ready with my cappuccino. Perhaps it will be way more than one, in the end, because they are addictively scrumptious!
Ingredients for walnut meringue crescent moon cookies
For the base
Egg yolks
Coconut oil
Coconut sugar
Baking powder
Orange zest
Plain white flour
Salt
Jam layer
Any jam goes, but a slightly sour one will enhance the flavours. I prefer reduced sugar spicy strawberry jam. A jar is enough for this recipe.
For the meringue
Egg whites
Coconut sugar
Walnuts
Rum essence
Salt

Preparation method for walnut meringue crescent moon cookies
The base
Add the coconut oil at room temperature, a pinch of salt, orange zest, and coconut sugar to a large mixing bowl. Use a handheld mixer and the dough hooks to mix at a low speed.
Add the egg yolks one by one and continue mixing.
Sieve the flour and baking powder over and mix until it incorporates nicely.
If the dough becomes too firm, add a spoon or two of milk and mix.
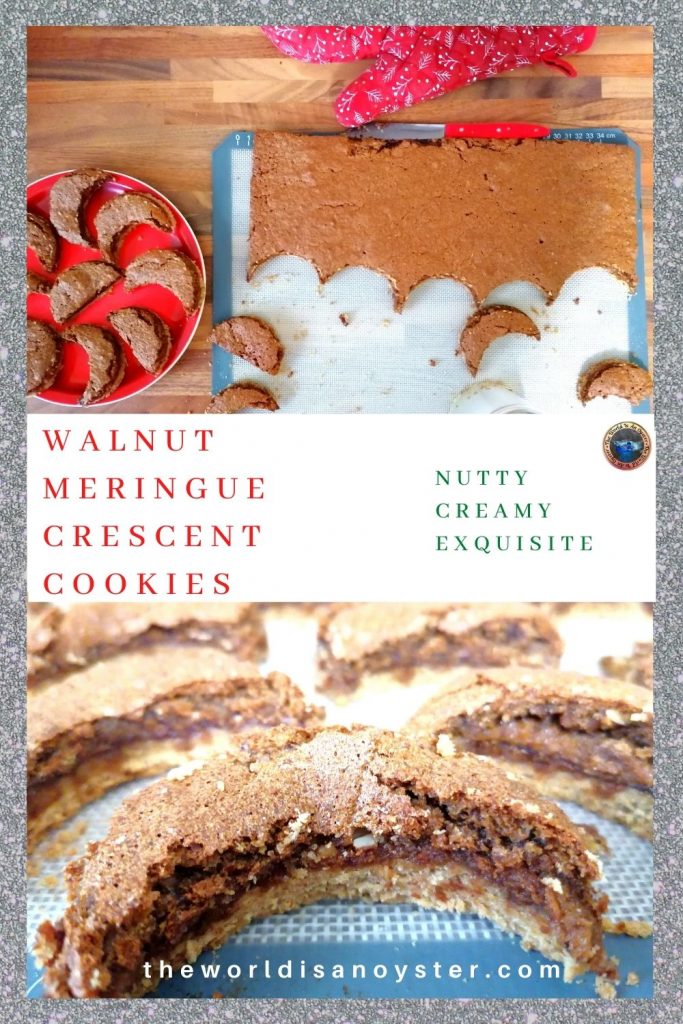
Move the dough into a lined baking tray and level it by pressing gently with your wet hands.
Spread the jam over and level it nicely with a spatula.
The meringue
Before starting, preheat the oven to 180°C (356°F) and line the baking tray with a silicone sheet or baking parchment.
We followed mom’s method for the meringue and made the French version. Because we baked the walnut meringue crescent cookies already assembled, the meringue did not need beforehand cooking.
Mix the egg whites with a pinch of salt at high speed until stiff. Use a grinder to finely grind the coconut sugar (until you obtain a powdered, lighter brown icing sugar). Add it gradually to the eggs and mix at a low speed.
Grind the walnuts (not too long; they need to remain flakey) and add them to the batter. Fold gently with a spatula until incorporated.
Pour the meringue over the jam and level it without pressing too much.
Bake for 40 minutes and check the top is not charring.
When ready and you have checked the walnut meringue and base are cooked throughout, let it cool slightly.

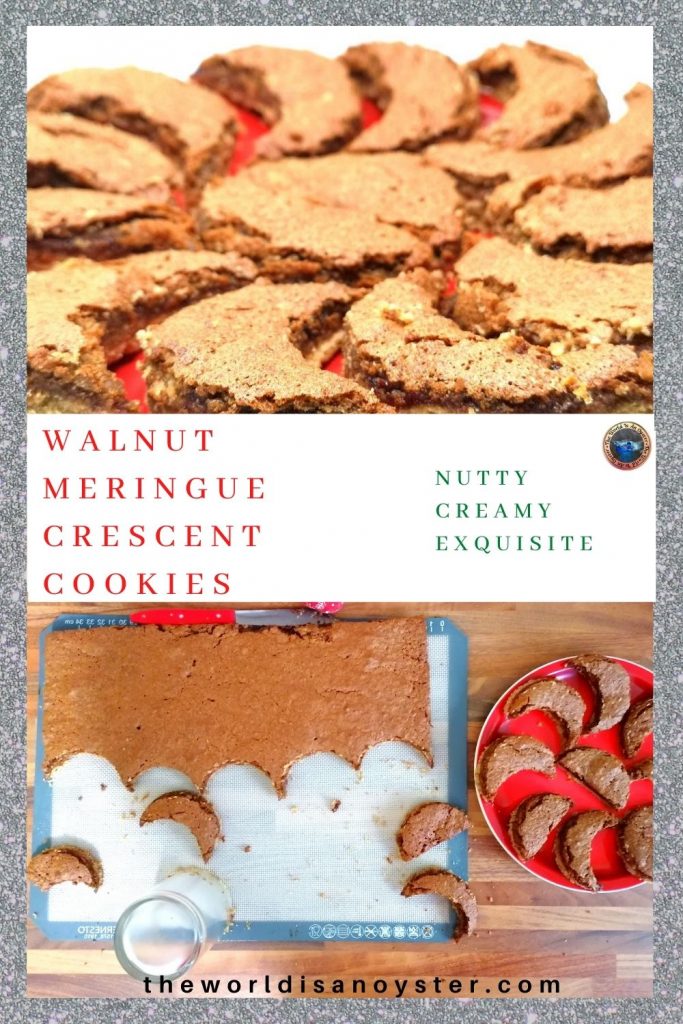
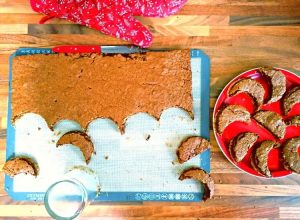
Use a medium-size drinking glass to cut the crescent moon shapes while still warm.
Enjoy the cute and tasty walnut meringue crescent cookies with a festive hot chocolate or a nice cappuccino!
Walnut Meringue Crescent Cookies
Ingredients
The dough
- 200 g organic coconut oil
- 5 egg yolks organic, medium
- 400 g plain flour organic, white
- 1 tsp baking powder flat
- 80 g coconut sugar organic
- 1 organic orange zest
- 1 pinch salt sea/rock
Organic strawberry jam
The merengue
- 5 egg whites
- 120 g ground coconut sugar organic
- 150 g ground walnuts organic
- 1 pinch salt sea/rock
- 1 tbsp rum essence
Instructions
To make the dough
- Add the coconut oil at room temperature, a pinch of salt, orange zest, and coconut sugar in a large mixing bowl. Use a handheld mixer and the dough hooks to mix at a low speed.
- Add the egg yolks one by one and continue mixing.
- Sieve the flour and baking powder over and mix until it incorporates nicely.
- If the dough becomes too firm, add a spoon or two of milk and mix. Optionally, chill the dough for half an hour.
- Move the dough into a lined baking tray and level it by pressing gently with your wet hands.
- Spread the jam over and level it nicely with a spatula.
The meringue
- Preheat the oven to 180°C (356°F) and line the baking tray with a silicone sheet or baking parchment.
- Batter the egg whites with a pinch of salt at high speed until stiff. Use a grinder to finely grind the coconut sugar (until you obtain a powdered, lighter brown icing sugar). Add it gradually to the eggs and mix at a low speed.
- Grind the walnuts (not too long; they need to remain flakey) and add them to the batter. Fold gently with a spatula until incorporated. Add the rum essence.
- Pour the meringue over the jam and level it without using too much pressure.
- Bake for 40 minutes and check the top is not charring.
- When the baking time is up, use a toothpick to check that the walnut meringue and base are cooked thoroughly.
- Keeping the parchment/silicone sheet, move the cake from the tray to a cooling rack. Allow it to cool slightly.
- Move from the cooling rack to the tabletop and use a medium drinking glass to cut the crescent moon shapes while the cake is still warm.
Walnut Meringue Crescent Cookies Easy Recipe
The post Walnut Meringue Crescent Cookies Easy Recipe appeared first on The World Is an Oyster.
]]>The post Easy Pumpkin Cake With Creamy Filling Recipe appeared first on The World Is an Oyster.
]]>Autumn Pumpkin Delights
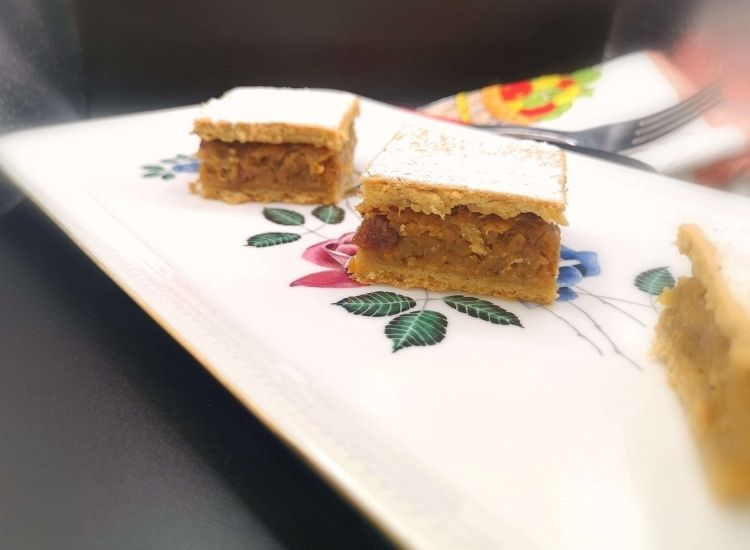
As the autumn sets in an overabundance of colours and hues over the land, it is customary to eat pumpkin in any form besides carving a few for Halloween. An easy to make pumpkin cake with creamy filling is just perfect for those crisp October mornings and can work wonders with a steamy cup of coffee.
This post may contain affiliate links, which means I will receive a commission if you purchase through my links at no extra cost to you. Please read the full disclosure for more information. Thank you!
My favourite pumpkin cake of all is the one in mom’s recipe book. She made it without fail every autumn, and I kept the tradition ever since I became the owner of her bountiful recipe book many years ago.
Mom’s recipe does not use pumpkin in the dough layers. Instead, it creates a delicious creamy filling packed with all the goodness this fairy tale vegetable has to offer in combination with autumn spices that enhance the taste of this simple cake.
Why do we love pumpkins?
We love pumpkins not only because they miraculously shift shapes and become luxurious carriages for exploited good souls in Disney land, but primarily because of the excellent health benefits this vegetable provides and its unmistakable taste, especially when combined with the right spices.
Part of the Cucurbitaceae family and cousin with courgette, watermelon and cucumber, pumpkin is over 90% water but loaded with vitamins and nutrients that help the human immune system fight nasty diseases. All this, of course, applies to the raw pumpkin, consumed as it is.

Once processed at a temperature or mixed with sugar, the narrative changes a bit.
This blog promotes a healthy lifestyle and thrives on creating the healthiest possible recipes using organic products and low, unrefined sugar. Therefore, this cake with creamy pumpkin filling attempts to keep up with these principles.
Mom’s original pumpkin cake with creamy filling recipe and my alterations
Mom’s original recipe is what I call the “perfect ten” formula. It does not involve gymnastics if you think of Nadia Comaneci right now. Instead, the recipe requires ten tablespoons of each main ingredient for the dough.
In time, I have adjusted the recipe and replaced ingredients to stay on the healthier side. Therefore, five tablespoons of coconut sugar make this cake as tasty as I remember it from my childhood.
Because I was born in communism and lived under a restrictive regime for the first fourteen years of my life, I remember the shortage of foods and the cards we used to buy what we were allowed monthly (similar to wartime in the UK).
The choice was practically non-existent, so we had to use whatever we could buy and make it last a month until the next card was issued. What coconut sugar, what cold-pressed rapeseed oil? I never heard of these things until communism ended in a blood bath in Romania!
Fortunately, we live in different times, and I am not sure if for the better since too much choice does not necessarily mean safer or healthier. But, because I strongly advocate against all industrially processed foods and am pro-nature, I hope that I stay on the healthy side as much as possible and help others think of their food choices in the process.
For these reasons, there will be no margarine, refined oil or sugar or non-organic ingredients in this recipe. But it is still a cake, and it needs some flavour. Half of the sugar quantity mom used does just that, especially since preparing the pumpkin will require additional sugar. Remember that the flavour comes from the spices, and a sack of sugar will only make any desert needlessly sickly sweet.
Ingredients for pumpkin cake with creamy filling
Organic pumpkin
Organic plain flour
Organic eggs (yolks for dough; whites for pumpkin filling)
Cold-pressed rapeseed oil
Unsweetened almond milk
Organic coconut sugar
Baking powder
Spices (cinnamon, cloves, ginger, aniseed, nutmeg)
Raisins, walnuts (optional)
A pinch of rock/sea salt

Method
To prepare the dough
Preheat the oven and line the baking tray with parchment paper.
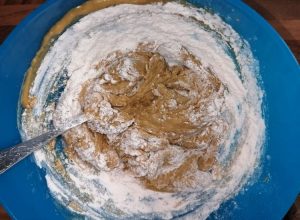
Use an electric mixer to batter the egg yolks with sugar and salt until it becomes lighter in colour. Add the milk, then the oil and mix with a spatula. Sieve the flour mixed with baking powder over and mix until it incorporates nicely.
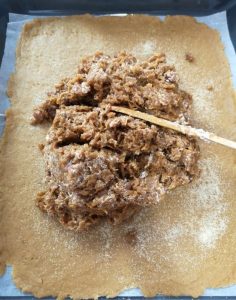
Knead the dough until all the ingredients incorporate nicely and split it into two parts.
Use a roller pin to roll each part to fit nicely on the bottom of your baking tray.
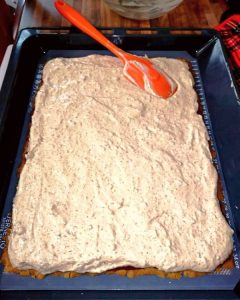
Place the first sheet into the tray, spread some semolina (it helps absorb excess humidity), add the pumpkin filling and place the second dough sheet on top.
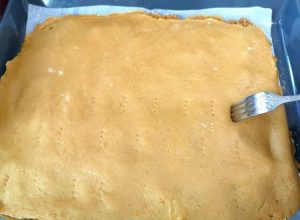
Gently pinch the top sheet with a fork to allow any trapped air to escape and obtain a smooth baked surface.
To prepare the creamy pumpkin filling
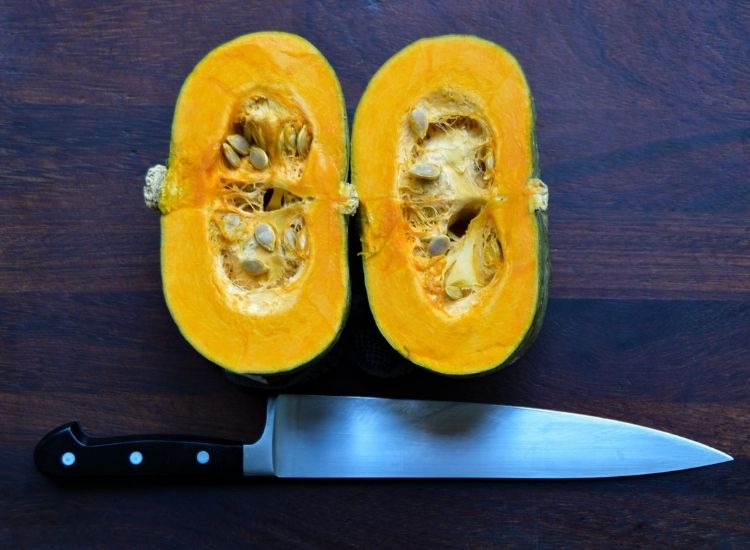
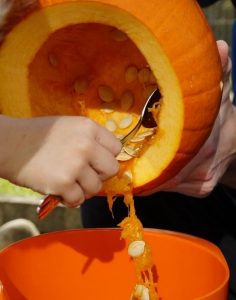
Wash the pumpkin with warm water and dish wash. Rinse well and dry the pumpkin.
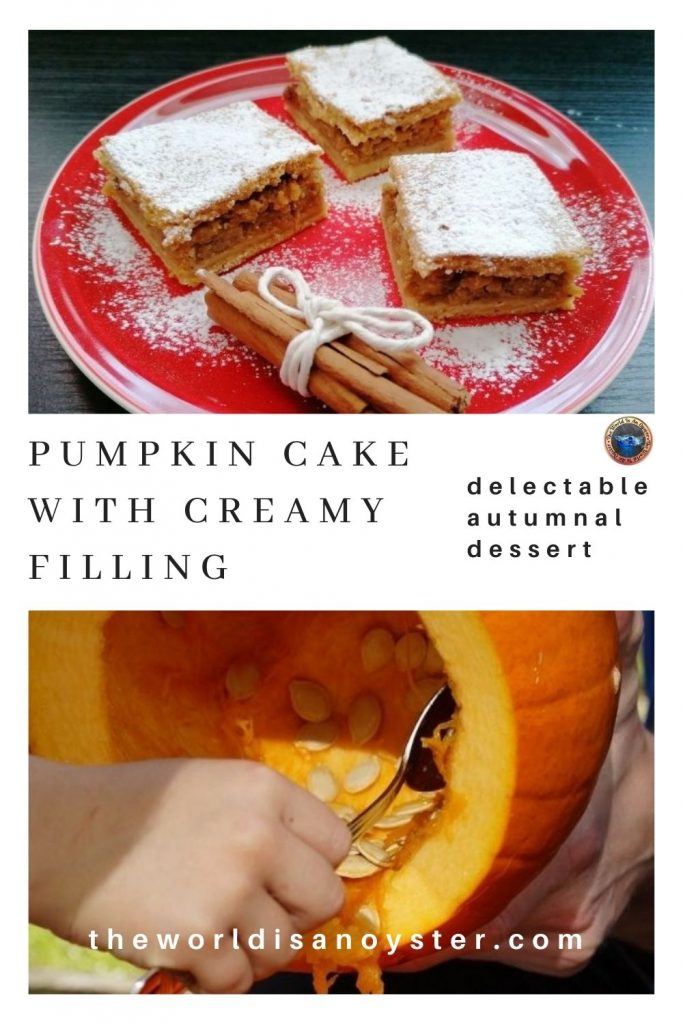
Use a sharp chef knife and a vegetable cutting board to cut the pumpkin as you would for Halloween carvings. Peel the external hard layer off and use a large tablespoon to carve the seeds and the pulp out of the pumpkin.
The seeds have a lot of health benefits, and you can easily find a use for them (in bread baking, for instance, or added to cereals).
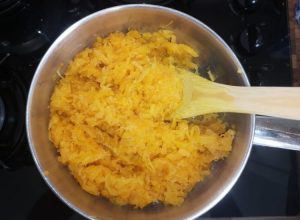
Cut the pumpkin you will use into pieces small enough to make it comfortable to grate. Use a box grater to shred the pumpkin on the larger holes side. The same applies to an electric grater.
If you use previously grated and frozen pumpkins, allow defrosting overnight and remove the excess water by pressing down.
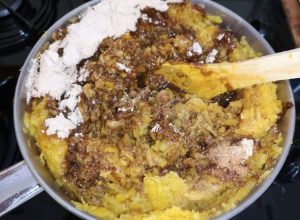
Place the grated pumpkin into a pan and over low heating, as if you would make a jam. Allow cooking at low heating the whole time, even if it might sound tedious. You are not aiming for a charred pumpkin and ruined pan! Patience makes perfect!
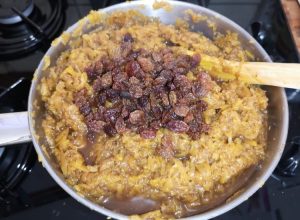
When the whole quantity of pumpkin is thermally processed, and the volume reduces visibly, add the sugar, spices, and raisins/nuts. Mix and cook for further two-three minutes.

Turn the heat off and allow the cooked pumpkin to cool completely before the next step. Failure to do so will spoil the entire filling for this cake!
While the pumpkin cools, batter the egg whites with a pinch of salt until you get stiff peaks. Add it to the completely cooled pumpkin and mix gently with a spatula until it incorporates nicely. The filling will become fluffy, creamy looking and lighter in colour.
Pour the pumpkin filling over the first dough sheet in the tray, then continue as explained above with the second sheet.
Bake on the middle rake for 40-50 minutes. Allow cooling before slicing.
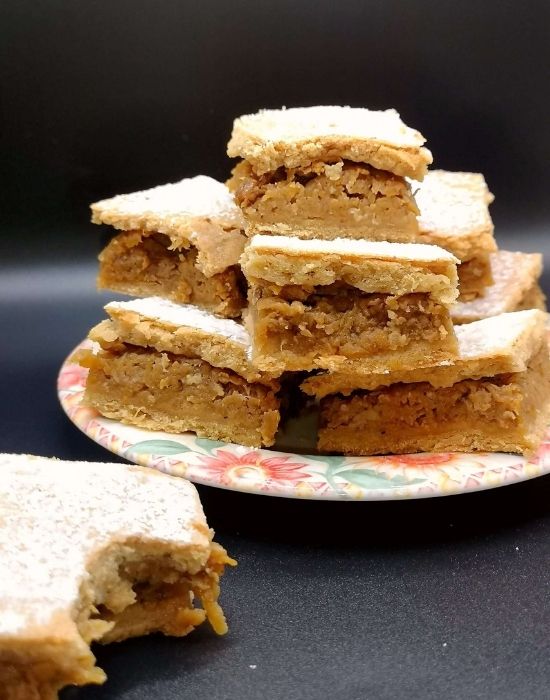
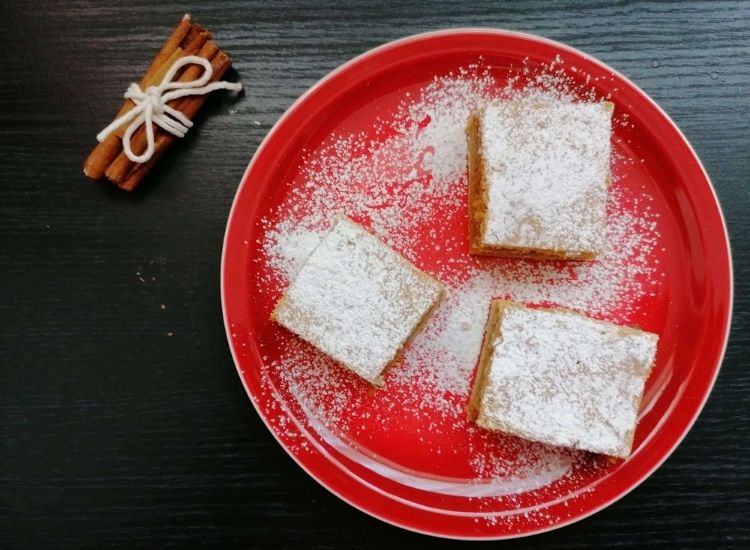
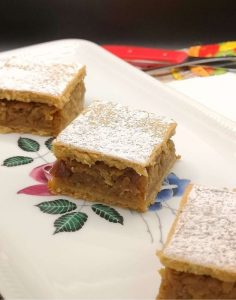
Cut the pumpkin cake with creamy filling in squares or a rhomboid shape, dust it with powdered sugar if desired (I usually skip this step) and serve with the coffee of your choice.
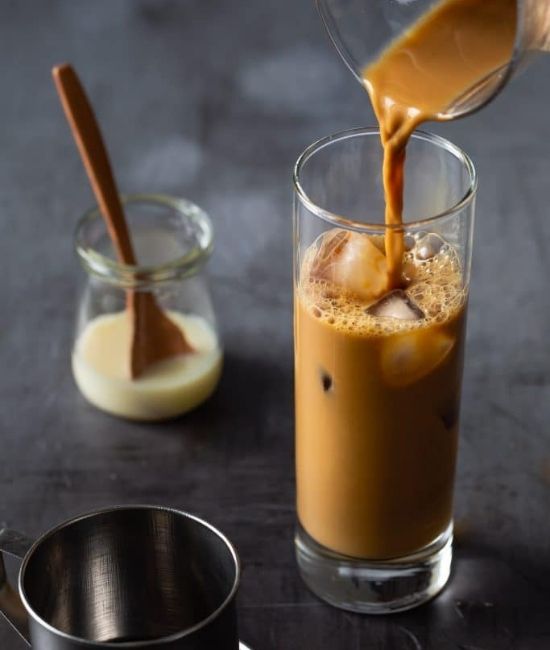
If you don’t mind the cold weather or live in a milder climate, and iced coffee is your thing, check here for inspiring ideas.

Enjoy!

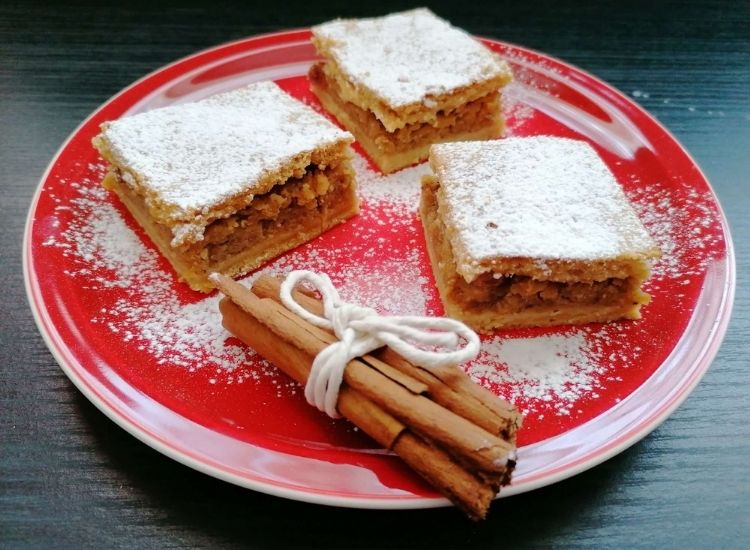
Pumpkin cake with creamy filling
Equipment
- Mixing bowl
- Pan
- Electric mixer
- Spatula
- Chef knife
- Large spoon
- Large chopping board
- Rectangular baking tray
Ingredients
For the dough
- 3 pieces large organic egg yolks keep the the whites for the pumpkin filling
- 10 tbsp almond milk unsweetened
- 10 tbsp rapeseed oil organic, cold pressed
- 5 tbsp organic coconut sugar
- 300-400 g organic plain flour use as needed for a firm dough that requires rolling
- 1 tsp baking powder
- ¼ tsp sea/rock salt
For the pumpkin filling
- 1 medium pumpkin or 1kg shredded, frozen pumpkin, defrosted and drained
- 5 tbsp organic coconut sugar
- 2 tbsp raisins and/or walnuts optional
- 3 organic egg whites beaten
- 1 tbsp semolina it absorbs humidity
Instructions
To make the dough
- Preheat the oven to 180°C/356°F/gas mark 4. Line the baking tray with parchment paper.
- In a large bowl, mix the egg yolks with coconut sugar and a bit of salt until it becomes lighter in colour and creamy. It is OK to use an electric mixer for this step.
- Add the milk, then the oil and mix with a spatula.
- Sieve the flour mixed with baking powder over and mix until it incorporates nicely.
- Knead the dough until all the ingredients incorporate nicely and split it into two parts.

- Use a roller pin to roll each part to fit nicely on the baking tray.
- Gently pierce the top sheet with a fork to allow any trapped air to escape and obtain a smooth baked surface. Usually, I pierce both dough sheets.
To prepare the pumpkin filling
- Wash the pumpkin with warm water and dish wash. Rinse well and dry the pumpkin.
- Use a sharp chef knife and a vegetable cutting board to cut the pumpkin as you would for Halloween carvings. Peel the external hard layer off and use a large tablespoon to carve the seeds and the pulp out of the pumpkin.
- Cut the pumpkin you will use into pieces small enough to make it comfortable to grate. Use a box grater to shred the pumpkin on the larger holes side. The same applies to an electric grater.
- Place the grated pumpkin into a pan and over low heating, as if you would make a jam. Allow cooking at low heating the whole time, even if it might sound tedious. You are not aiming for a charred pumpkin and ruined pan! Patience makes perfect!
- When the whole quantity of pumpkin is thermally processed, and the volume reduces visibly, add the sugar, spices, and raisins/nuts. Mix and cook for further two-three minutes.
- Turn the heat off and allow the cooked pumpkin to cool completely before the next step. Failure to do so will spoil the entire filling for this cake!
Assembling and baking the cake
- While the pumpkin cools, batter the egg whites with a pinch of salt until you get stiff peaks. Add it to the completely cooled pumpkin and mix gently with a spatula until it incorporates nicely. The filling will become fluffy, creamy looking and lighter in colour.
- Place the first sheet into the tray, pierce with a fork to reduce air pockets and spread some semolina (it helps absorb excess humidity).
- Pour the pumpkin filling over the first dough sheet in the tray, then continue as explained above with the second sheet.
- Bake on the middle rake for 40-50 minutes. Allow cooling before slicing. Optionally dust with powdered sugar.
Notes
Autumn Pumpkin Delights
The post Easy Pumpkin Cake With Creamy Filling Recipe appeared first on The World Is an Oyster.
]]>The post Quick and Easy Summer Berry Tart appeared first on The World Is an Oyster.
]]>A Modern Twist on a Fruit Tart With a History
There is no easier cake to make than a summer berry tart! If you have less than an hour to spare and berries to use, then simply throw a handful of ingredients into a bowl, mix, bake, prepare a pudding at high speed and decorate with whatever fresh fruits you might have in the fridge.
This post may contain affiliate links, which means I will receive a commission if you purchase through my links, at no extra cost to you. Please read the full disclosure for more information. Thank you!
The exquisite taste and attractive decoration will get you points for creativity when you serve this tart, and nobody will ever know how rushed you were to bake it.
We are used to living life at high speed, and sometimes even a little time to indulge is hard to find. Luckily, we have ready-made mixes that help speed up the process of baking.
Those familiar with this blog know that I advocate healthy eating, organic everything and a big fat NO to pesticides. But, for this occasion only (because time was extremely tight), I chose to make a quick pudding using a packed mix rather than real eggs. A bit of food engineering involved, true, but this happens extremely rarely in my kitchen.
The pudding mix I used is German made and available online. In Europe, it is available in any food shop and is largely used.
If you have an extra half an hour to spare, I explain how to make pudding from scratch and use fresh products in my Tiramisù recipe. The only difference is that you will not need to add mascarpone for this tart recipe.
Of Tarts and Puddings
There is a bit of a culinary debate over the origins and proper making of tarts. Although the Greeks and Romans have made something similar in antiquity, tart baking has evolved and changed through the ages.
Today’s recipe has its beginnings in the kitchen of the Tatin sisters, French hotel owners in the XIX century. Busy as they were (wow, lack of time seems to have been a problem always!), one of the sisters forgot to add dough to her pie – she added it later during baking and thus invented the upside-down pie. Mistakes create masterpieces; what can I say?
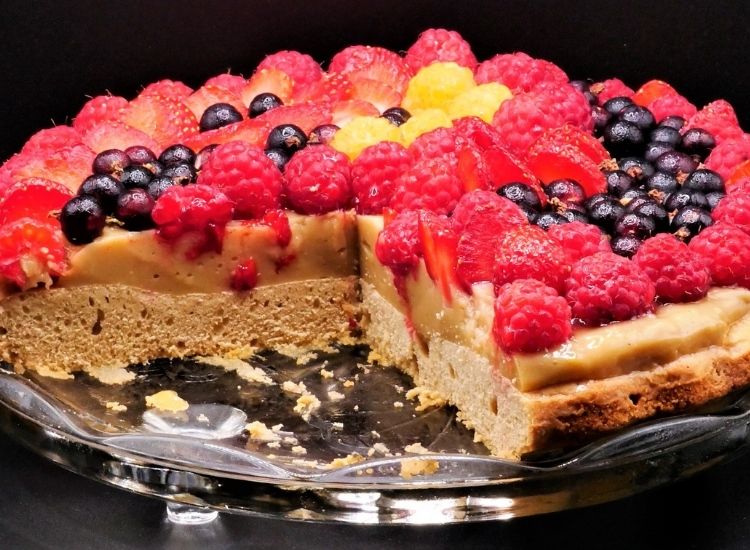
A tart can have a crusty base or a fluffy sponge filled/topped with what I have always called pudding – essentially, a vanilla cream made by boiling egg yolks, sugar, corn/potato starch and milk together. Some call it custard, but I will stick with pudding.
I prefer a fluffy sponge because I can use syrup to moisten it, adding flavour to the tart. On rare occasions, if no children are involved in tasting, I replace the syrup with liquor and get an even better boozy fruit tart.
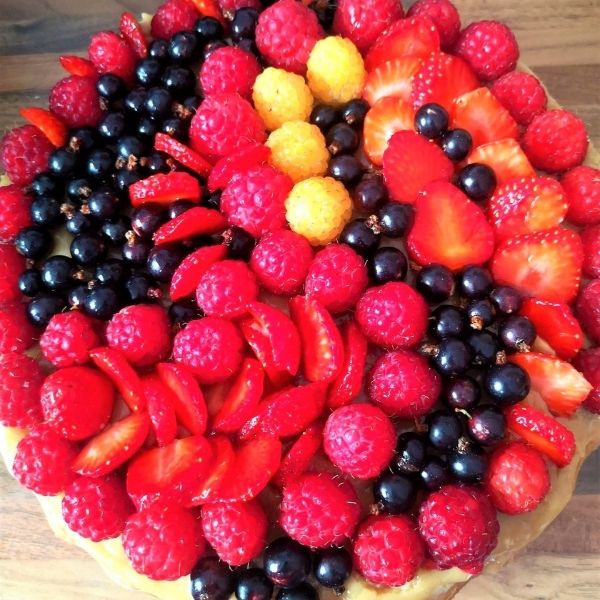
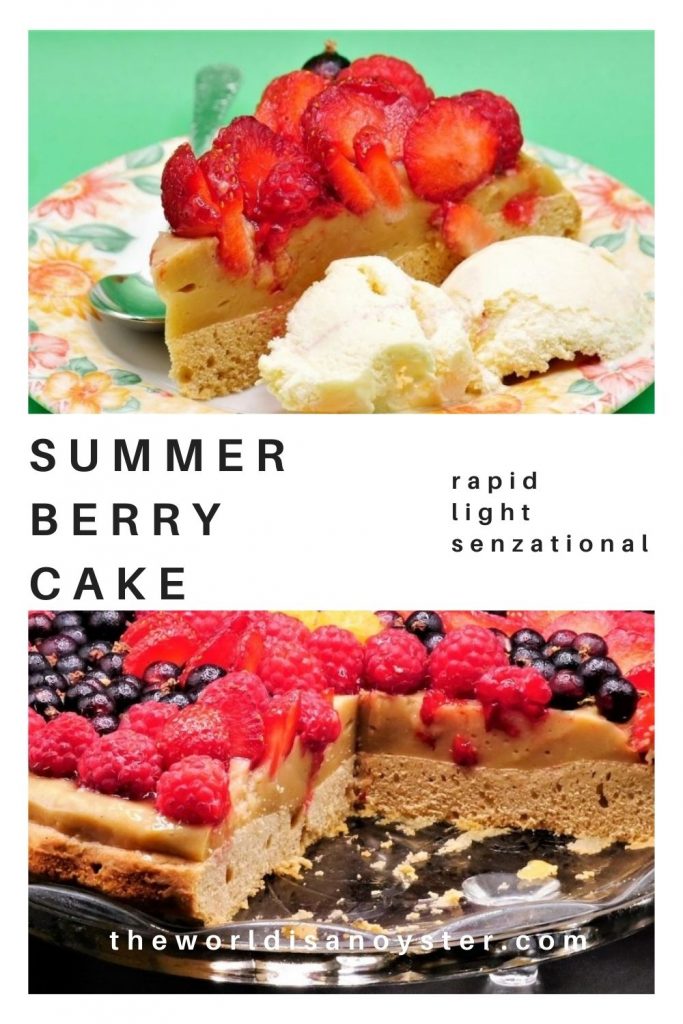
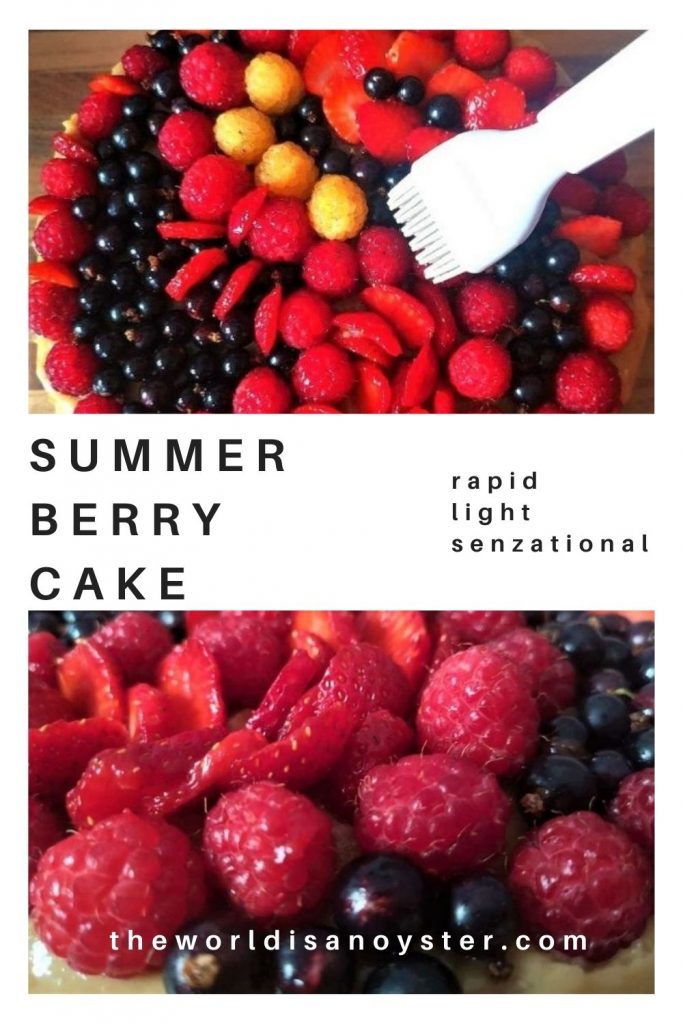
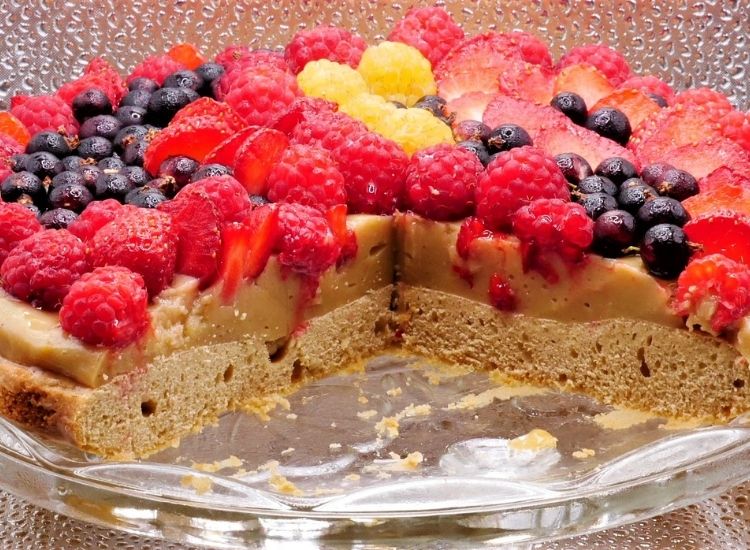
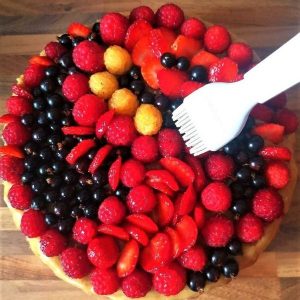
Ingredients for Summer Berry Tart
I used raspberries (red and yellow) for this tart, strawberries and blackcurrants freshly picked from my little allotment, washed, drained, hulled, and sliced (the strawberries). You can use any summer berries in any combination as long as you know and trust the source. I cannot stress enough the importance of avoiding pesticides all together in foods!
For the fluffy sponge
Organic large eggs
Organic coconut sugar
Oil (rapeseed, preferably – because it is cold-pressed. If possible, avoid refined oils – vegetable, margarine and all “spreads”, canola, soybean, corn – as you would pest!) A while ago, I read that there is one molecule difference between plastic and margarine! Imagine what people spread on their toast!
Almond milk/semi-skimmed cow milk, organic
Organic white flour
Baking powder
Rock/sea salt (not “table”)
For the pudding
One sachet of pudding powder
Coconut sugar
Milk
Optionally, follow the instructions in the Tiramisù recipe
For the syrup
Coconut sugar
Water
Organic lemon
For the gelatine pellicule
One gelatine sheet
Water
How to Make Summer Berry Tart
For this tart, I used a flan dish of 24 cm in diameter, oiled and floured.
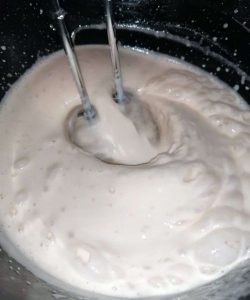
Make the sponge by literally throwing all the ingredients together in a large bowl and whisking with an electric mixer for about 5 minutes. Usually, I separate eggs, add everything individually and generally spend more time on the sponge batter. It made no difference to the consistency, so this will be the only method I’ll use from now.
Place the batter in the tray and bake on the middle rack for 20-25 minutes in a preheated oven. Check the sponge is baked thoroughly, turn it upside down as explained in the recipe card and place it on a cooling rack.
Meanwhile, prepare the pudding by following the instructions on the sachet. Add vanilla essence for extra flavour if needed or even a tablespoon of liquor if you prefer to keep the same taste as the syrupy sponge.
Cool and whisk the pudding to smoothen it. Add it to the top of the sponge and level nicely.
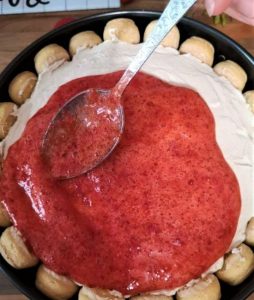
Decorate with the berries of your choice.
Using a brush, smear the gelatine over the berries to help them set (it also helps to keep a fresh, vibrant colour for longer).
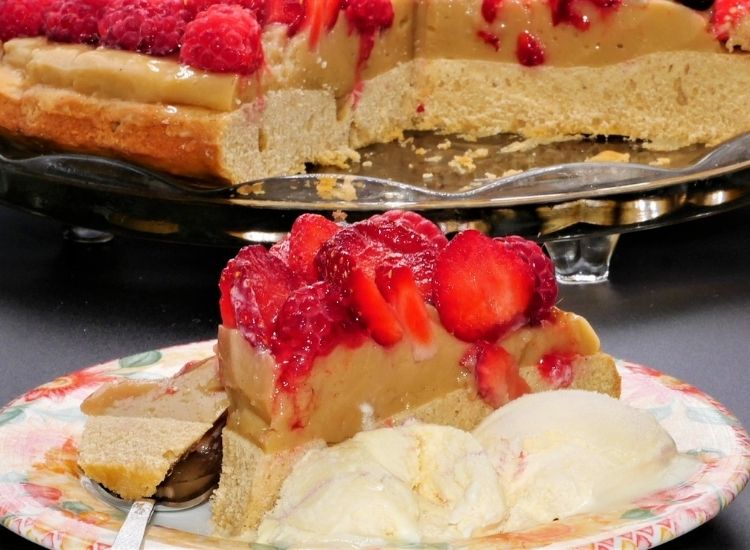
Refrigerate the summer berry tart for two-three hours before cutting. Serve with a scoop of ice cream or coffee of your choice, a bubbly or a glass of liquor.
Enjoy!

Summer Berry Tart
Equipment
- Large mixing bowl
- Electric mixer
- Pan
- Baking dish
Ingredients
For the sponge
- 2 eggs
- 100 g coconut sugar
- 60 ml cold water
- 60 ml oil cold-pressed rapeseed
- 180 g plain white flour
- 10 g baking powder
- ¼ tsp fine salt
For the syrup
- 50 ml water
- 1 tbsp coconut sugar
- 1 lemon zest and juice organic
For the pudding
- 1 sachet Vanilla Pudding
- 3 tbsp coconut sugar
- ½ l almond milk
For the topping
- 300 g any summer berries organic
- 1 sheet gelatine
- 2 tbsp water
Instructions
Sponge
- Prepare the baking tray by oiling and flouring the base and walls. I used rapeseed oil but butter is OK too.

- Preheat the oven to 170°C fan oven/375°F/gas mark 5
- Place all the ingredients for the sponge in a large mixing bowl and batter for 5 minutes with an electric mixer.
- Pour the content into the baking tray and level it nicely with a large silicone spoon without pressing down.
- Place on the middle rack in the oven and bake for 20-25 minutes. Perform the toothpick test to check that the sponge is baked thoroughly. Allow extra baking time if required.
- Let the sponge in the baking tray and slightly cool on a cooling rack.
- Using oven gloves, place a large plate/cake stand over the baking dish and turn it upside down. Bang it to the table gently if needed to remove the sponge from the baking dish.
- Allow the sponge to cool completely.
Pudding
- Follow the instruction of the sachet to prepare the pudding. I used less sugar than suggested, but this is a personal taste.

- Optionally, you can add vanilla essence for a stronger flavour.
- Allow the pudding to cool completely before use.
- You might need to whisk it a little with an electric mixer before adding it to the sponge for a smoother texture (the pudding tends to become lumpy as it cools down).
Gelatine
- Follow the instructions on the gelatine sachet to prepare the gelatine.
- Leave aside to cool and thicken slightly before use.
Syrup
- Wash, dry, zest and juice the lemon. Add it to water into a pan together with the sugar and bring to boil at medium heat.
- When it starts boiling, reduce the heat and stir occasionally. Boil for 3-4 minutes until it thickens slightly.
- Let aside to cool before use. Optionally, you can sieve the syrup. I prefer to keep the lemon zest for extra tartness.
Assembling the summer berry tart
- Using a spoon, pour the syrup over the top of the tart, making sure to cover all areas. The same technique applies to liquor; 4-5 tablespoons should suffice.
- When the syrup is absorbed into the sponge, place the smoothed vanilla pudding on top and spread it evenly.
- Decorate with summer berries of your choice (previously washed, drained and hulled).
- Smear the gelatine over the berries using a kitchen brush. You will obtain a nice, shiny pellicule that will help set the fruits into the pudding and preserve the bright colour for longer.
- Refrigerate the berry fruit tart for 2-3 hours before slicing it.

Notes
A Modern Twist on a Fruit Tart With a History
The post Quick and Easy Summer Berry Tart appeared first on The World Is an Oyster.
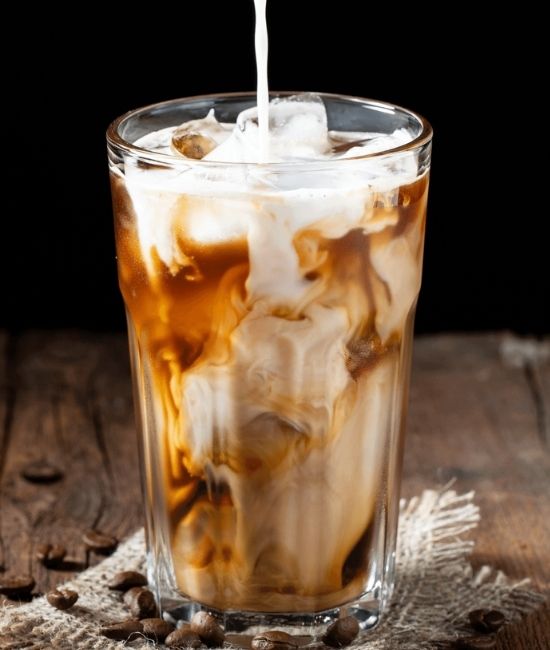
]]>The post 20 Iced Coffee Recipes To Make in Any Season appeared first on The World Is an Oyster.
]]>Iced Coffees for Hot Days
A legend says we have to thank the African goats (not gods!) for giving us coffee since the said animals apparently discovered the goodness of the tiny beans long before humans had made coffee generally accepted and consumed all over the planet.
This post may contain affiliate links, which means I will receive a commission if you purchase through my links, at no extra cost to you. Please read the full disclosure for more information. Thank you!
To think that it only took half a millennia for a tiny bean to become probably the most acknowledged social drink! And in Europe, it almost did not make it at all, since the priests who first tasted it when it arrived in Venice declared it “Satan’s bitter invention!”
Thank god a pope had more common sense (and authority!) and approved it; otherwise, I would not enjoy my only addiction five centuries later!
The Italians ended up loving coffee so much that they even provided household names for different varieties. Cappuccino is my favourite, especially with a slice of decadent chocolate cake.
But I also love a proper Turkish coffee brewed on hot sand or a lovely Greek strong coffee with a completely different taste to the Italian espresso, even if it looks similar.
One thing is sure: every morning, I press my coffee machine’s start button even before getting on with the breakfast. By the time I finish eating, a steamy, creamy cup of coffee waits for me to enjoy it! But as you’ll see here, a little espresso can go many wonderful ways!
There is a lot of talk about coffee’s health benefits and risks. For once, I will ignore the bad and focus on the good and the happiness a single cup of coffee can offer to those who drink it.
We all make coffee at home when we don’t meet socially to have one. Here are a few delicious ways to enjoy a homemade iced coffee on a hot day or a more decadent coffee cocktail if the occasion is more special.
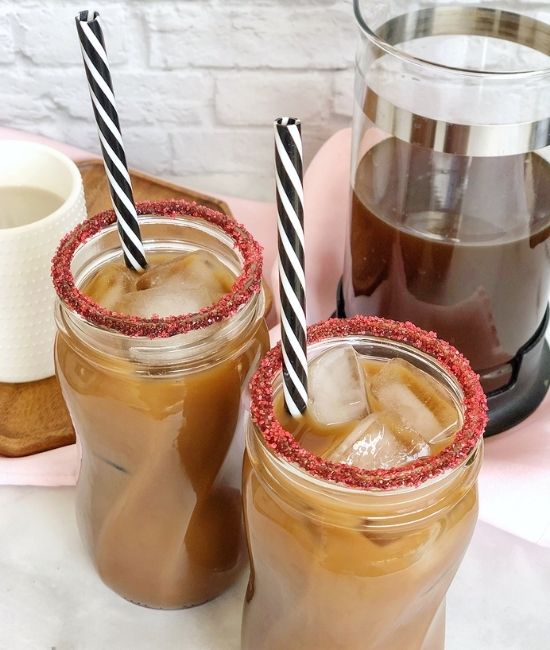
Recipe provided by theforkedspoon.com
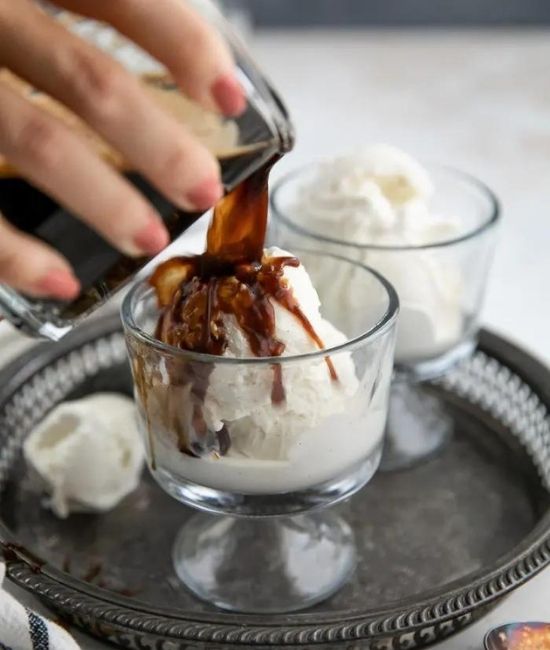
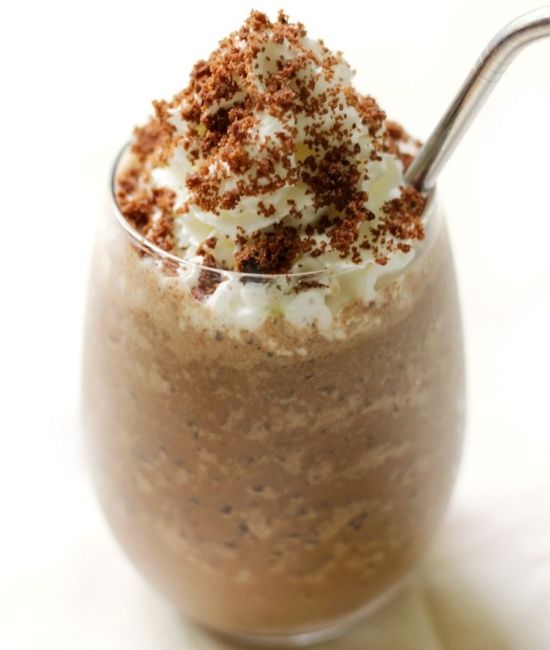
The Affogato is a classic Italian dessert consisting of sweet vanilla ice cream topped or “drowned” with hot espresso coffee. A sweet mid-afternoon treat, or after-dinner pick-me-up, this espresso ice cream is just what you need to survive the hot summer months – thank you, Italy!
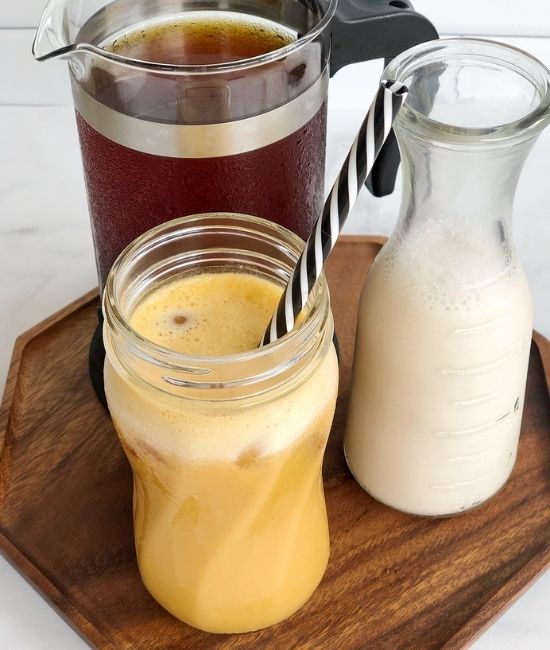
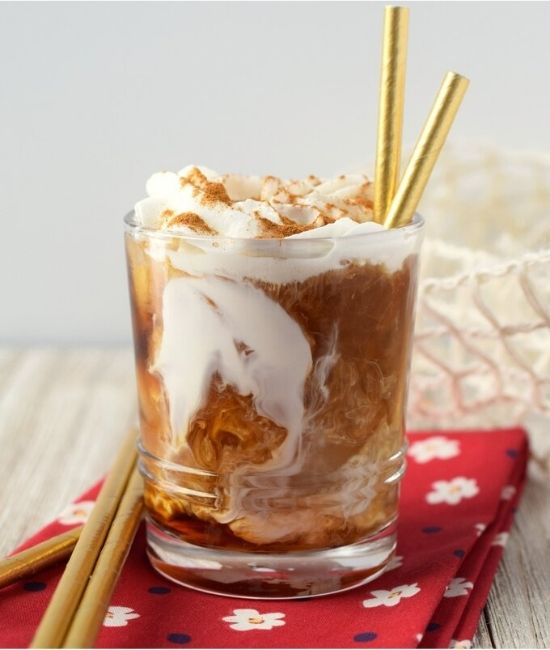
2. Pumpkin Spice Cold Brew Coffee
Recipe provided by theurbenlife.com
Enjoy this iced pumpkin spice cold brew coffee in the comfort of your own home every fall, even if the heat of the summer has appeased. Easy to make, using real pumpkin!
3. Pomegranate Grenadine Iced Mocha Latte
Recipe provided by slumberandscones.com
An iced mocha latte is one of the best treats during the summer. In this version, the addition of homemade pomegranate grenadine makes this even more decadent and enjoyable.
Recipe provided by atasteofmadness.com
Easy Mint Mojito Coffee recipe is a Philz copycat drink – the best and most refreshing way to start the day.
Recipe provided by fittyfoodlicious.com
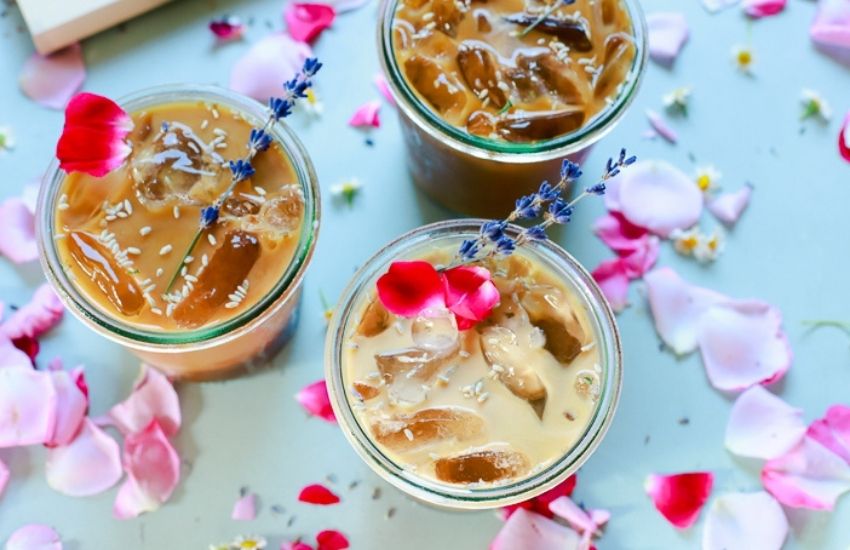
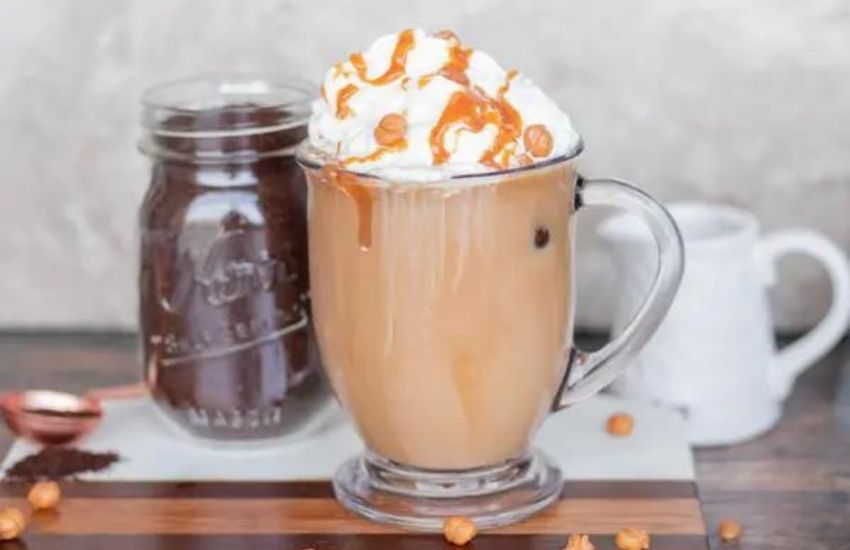
Everyone needs a go-to drink. One that can send all the stresses of life away and make a person feel at home. Made with coconut sugar, dark roast coffee, honey-infused lavender syrup, and a touch of cream, this will be one drink you’ll come back to all summer long!
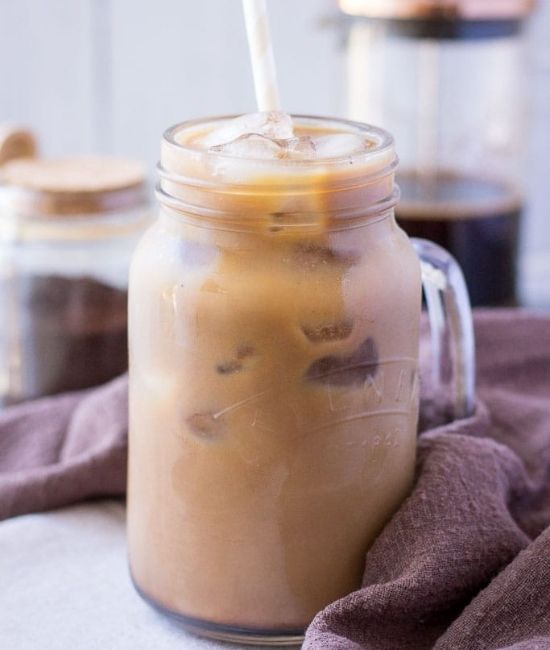
Recipe provided by windingcreekranch.org
This is a simple recipe for delicious iced coffee at home that tastes just as good, if not better, than at the coffee house. With only a handful of ingredients, you can be sipping on a delicious iced coffee in just a few minutes.
7. Shaken Brown Sugar Oatmilk Espresso
Recipe provided by sugarandsoul.co
This Shaken Brown Sugar Oatmilk Espresso is a Starbucks Copycat recipe made with brown sugar syrup, espresso, oat milk, and cinnamon. It’s easy, delicious, and perhaps even better than the original!
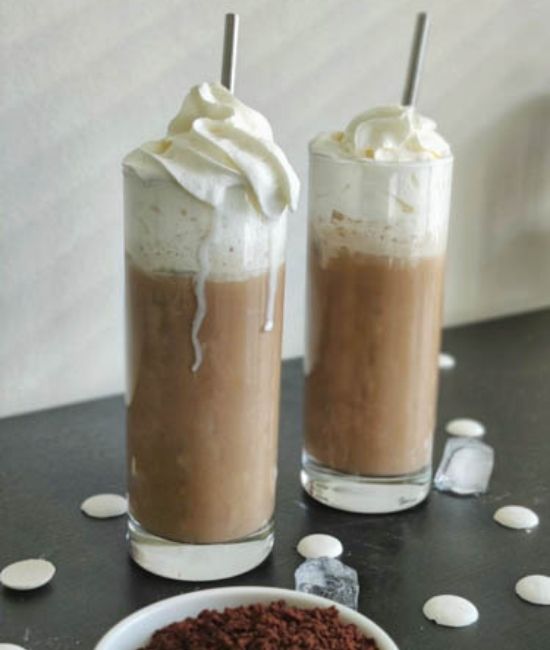
8. Boozy Bittersweet Iced Mocha Latte
Recipe provided by theurbenlife.com
This homemade boozy bittersweet iced mocha latte cocktail recipe is indulgent and delicious. The recipe yields two cups of spiked coffee, making it the ultimate adult beverage.
9. Simple Iced White Chocolate Mocha Recipe (Starbucks Copycat)
Recipe provided by sugarspiceneverythingnice.com
You will love how easy it is to make a chocolate Mocha for yourself! It needs barely few ingredients and about less than ten minutes of your time. Next time you think of stepping out of the comfort of your home to get an iced white mocha for yourself, think again!
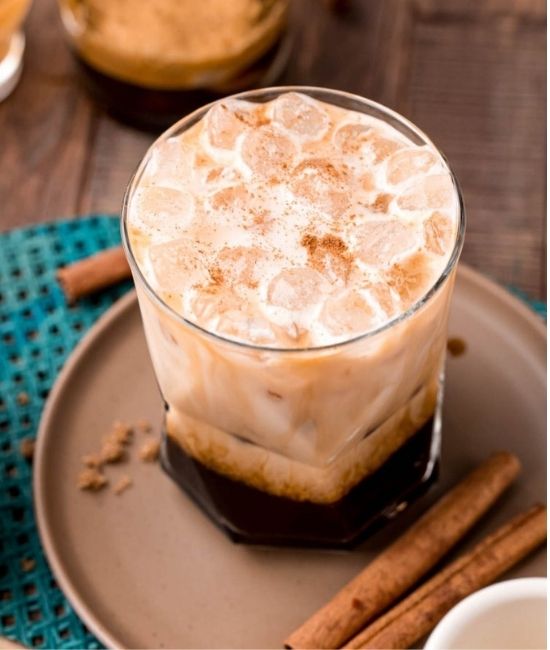
10. French Vanilla Dalgona Iced Coffee
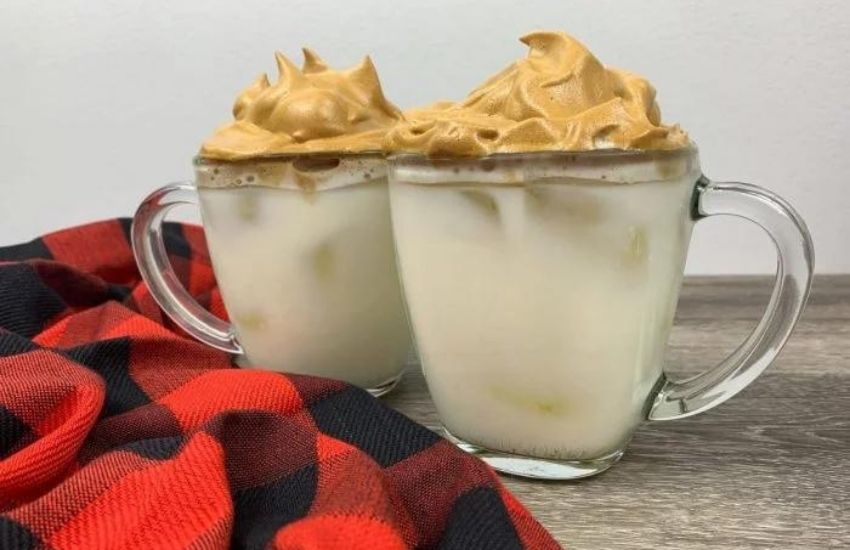
Recipe provided by ottawamommyclub.ca
Dalgona coffee (Korean Coffee) is all the rage on TikTok, Youtube, Instagram, and Facebook social media pages. It’s also called Frappe Coffee in Greece and Beaten Coffee in India. This new craze started with a South Korean actor named Jung Il-woo. Check this recipe for the rest of the story!
11. Gluten-Free Cookies & Cream Frappuccino
Recipe provided by strengthandsunshine.com
Move over, Starbucks! This Cookies & Cream Frappuccino is gluten-free, soy-free, and vegan – a homemade recipe has all the sweet deliciousness without the cost and is made right in your blender with minimal fuss!
12. Cinnamon Dolce Iced Latte (Starbucks Copycat)
Recipe provided by snacksandsips.com
A cinnamon dolce iced latte is an iced coffee drink made using cinnamon dolce syrup, cooled coffee, milk/cream, and ice. The difference between a frappuccino and iced coffee is that a frappuccino is blended and has a base made from vanilla ice cream or something similar. Iced coffee is simply coffee served over ice.
13. Cold Brewed Iced Mocha Latte
Recipe provided by natalieshealth.com
This iced Mocha Latte is a perfect morning drink – smooth, bold, and chocolatey: deliciously refreshing with a coffee boost. Cold-brewed coffee, creamy almond milk, and velvety cacao with a hint of superfood maca powder make the ultimate indulgence in this iced coffee drink.
14. Salted Caramel Vanilla Iced Latte

Recipe provided by thesuburbansoapbox.com
Turn down the heat this summer with salted caramel vanilla iced Latte – a simple frosty beverage that gives you a little pep in your step no matter how hot it is outside. And it is ready faster than a trip to your local coffee house.
15. Easy Homemade Caramel Frappe

Recipe provided by thriftyfrugalmom.com
Learn how to make a caramel frappe with this delicious, easy recipe. Not only will this homemade frappe save you money, but it’s also a great way to use up leftover coffee!
16. Grapefruit Cold Brew Coffee

Recipe provided by fittyfoodlicious.com
Grapefruit cold brew is the perfect way to ring in the summer months. With two shots of espresso, freshly squeezed grapefruit juice, and a little honey, this is one drink you’ll come back to again and again! With the days being so hot, this delectable, refreshing pomelo grapefruit drink will help you slide into summer effortlessly.
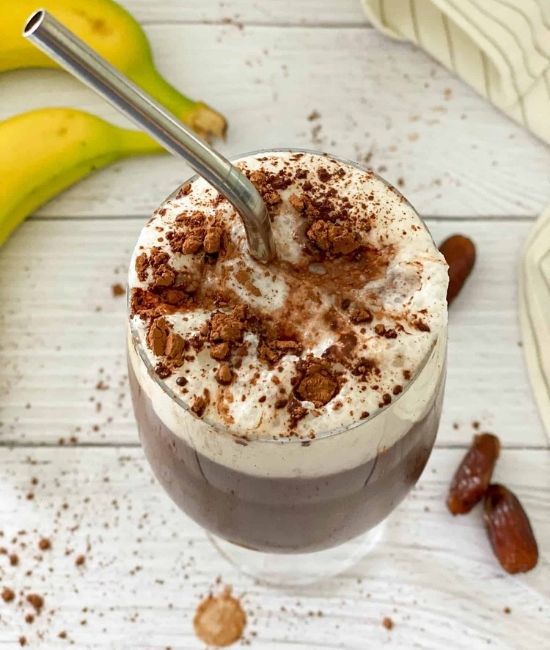
Recipe provided by thishealthykitchen.com
This is a healthy iced chocolate that is low in sugar, naturally sweetened, and incredibly delicious – a no-guilt vegan iced coffee that can be yours in under five minutes!
18. Café con Leche Martini: Espresso Vodka Cocktail

Recipe provided by senseandedibility.com
Café con Leche (coffee with milk) is a way of life in many Hispanic cultures. There’s a whole mood associated with it. You can’t go to someone’s house and not have them ask you, “¿Quieres café?”
19. Vietnamese Iced Coffee (Cafe Sua Da)
Recipe provided by delightfulplate.com
Vietnamese Iced Coffee is a cold coffee drink made from brewing Vietnamese medium-ground dark roast coffee. When sweetened condensed milk is added, it is called ca phe sua da (or cafe sua da). The version without milk is called ca phe den da.
Recipe provided by createyum.com
If you like a Caramel Macchiato from any coffee chain, then this is a delicious drink you can have any time by following these simple directions to make it for yourself.
Surely there are many more ways to enjoy an iced coffee in summer’s heat. Please comment below with your favourite recipe; I would love to know what people prefer.


Iced Coffees for Hot Days
The post 20 Iced Coffee Recipes To Make in Any Season appeared first on The World Is an Oyster.
]]>The post Ladyfinger Strawberry Cheesecake Easy Recipe appeared first on The World Is an Oyster.
]]>No-Bake Summer Fruit Cheesecake

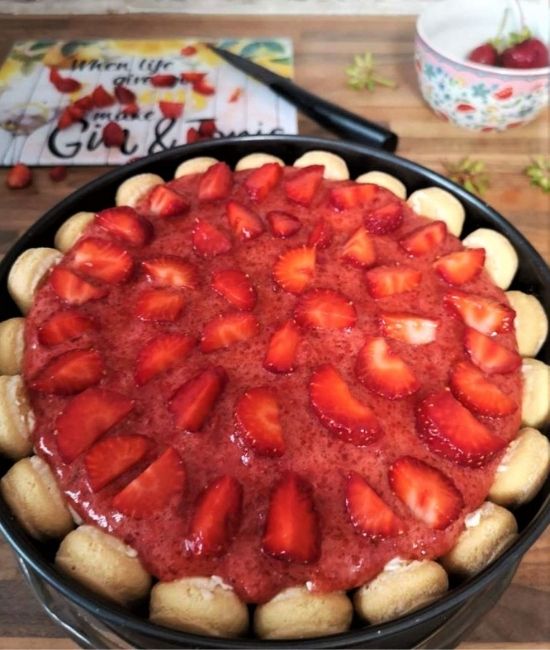
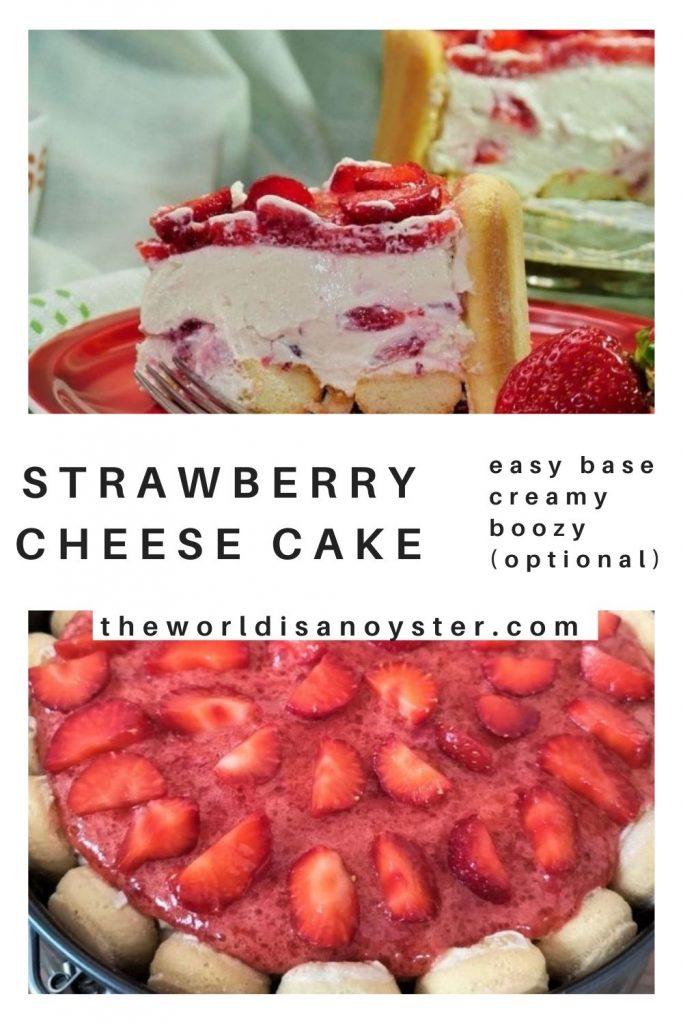
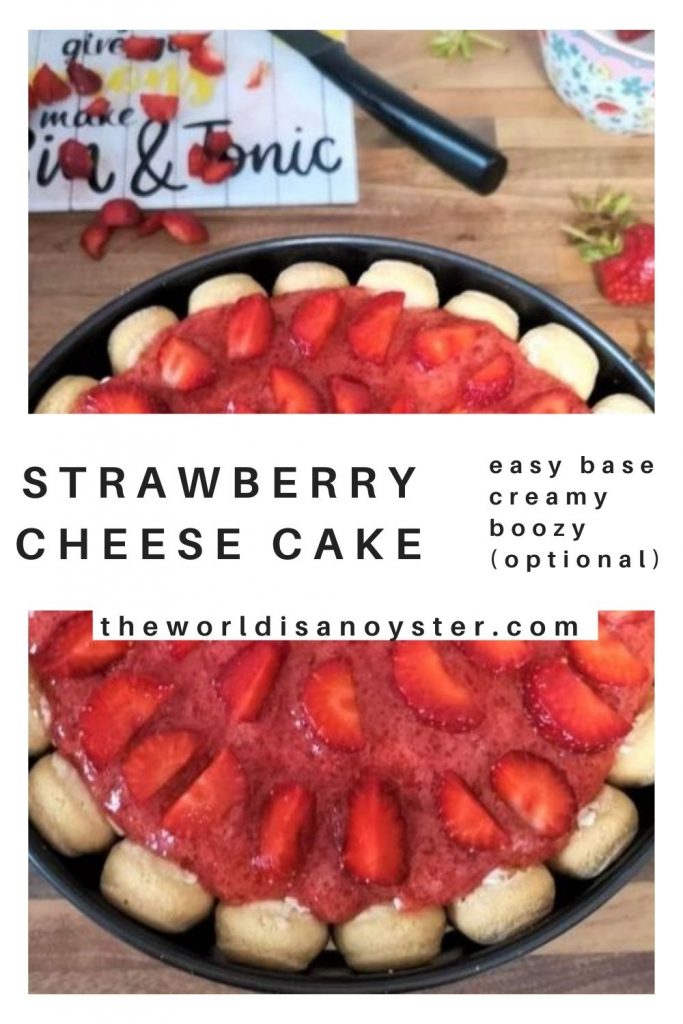
Ladyfinger strawberry cheesecake is the easiest and quickest no-bake cake to make with fresh fruits in season.
This post may contain affiliate links, which means I will receive a commission if you purchase through my links at no extra cost to you. Please read the full disclosure for more information. Thank you!
Historically, the Greeks baked cheesecake millennia before New York made famous the non-bake version. Although I am a history buff, I have catalogued this recipe as Italian because the cheeses and biscuits I used were Italian.
A quick Google search will indicate that using ladyfinger biscuits in baking is considered artistry and an elaborate delicacy. That is perhaps due to the one-thousand-year history of these tiny, delicate biscuits and their use in the European royal courts.
I use Savoiardi for this strawberry cheesecake because I love the cheese but hate the traditional base of this cake. The combination of crumbled biscuits drenched in fatty butter and sugar made me gag the first and only time I tried it. Then, I would eat like a fussy toddler the rest of the time, scraping the cheese and leaving the crusty base in a mess on the plate. Not very lady-like. Not even adult-like!
I have tried many other combinations for the base, like bran and butter (although bran is healthy, it can irritate the stomach lining; besides, there was the butter thing again – not much difference to me!).
Graham crackers did not work for me either, nor did a pistachio crust, as they still needed a glueing agent, and the only one I could think of was still butter.
Savoiardi were the best option for which I settled in the end. They are not too sweet (I always scrape the excess sugar coating); they are fluffy and airy and absorb humidity well, making cutting the cake easier.
Besides, they look impressive, delicate (the name says it all!) and fancy. It is reason enough to use it in the simplest of cakes and still make it look imperial!
For as impressive as it looks, the biscuity base and wall are not the main star of this recipe. Instead, the cheese in combination with fresh strawberries is!
Typically, I use Ricotta and Mascarpone in equal parts. Compared to butter which contains about 80% fats, Mascarpone, although a fat creamy cheese, has approximately half the fats in butter and Ricotta, only about 13%. This makes it bearable to me and reasonably fatty, although it still is a very rich cake; perhaps this is why my body cannot take the extra that would make the base and walls for it.
In addition to cheese, I use reduced organic coconut sugar. I usually grind it to make it a hue lighter to help keep the cheese as close to its natural colour as possible.
For flavour, any essence would work. My favourite combinations are either lemon, orange or rum. Of course, if no kids are involved in sampling, a couple of alcohol tablespoons won’t hurt; the best are creamy liquors, but it will add to the humidity of the cheese, so there has to be a fine balance if used.
Hardening the cheese has proved quite a task for me. I had many tries until I got the right consistency.
At first, I did not want to use any gelatine to glue the cheese – needless to say, it did not work!
Then I tried vegetable gelatine – it takes too long to set. Besides, the instructions on the sachet were rubbish. I had to make it a few times with different quantities of water (a lot less than instructed), and even so, it just did not work.
In the end, I used pork gelatine sheets, and it did the trick. I had this crazy idea in my head that it was nonsense to use pork in cake, but it is not really like that, and I don’t make this cheesecake that often anyway; I can ignore the weirdness of pork and cake together!
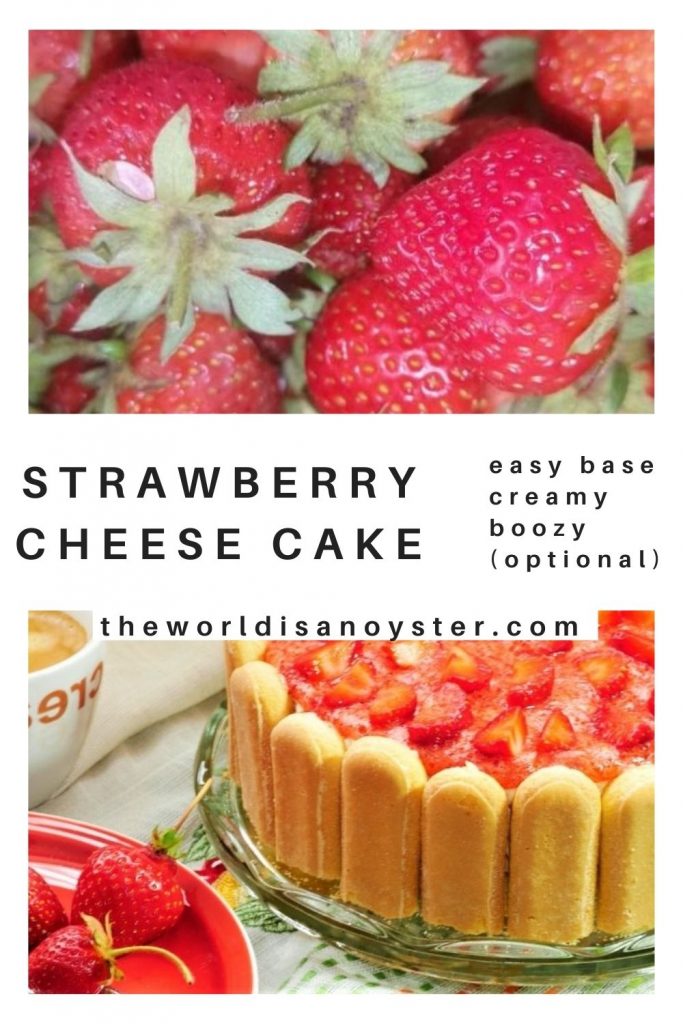
The real star of this cheesecake is, of course, the strawberries – a beautiful fruit that makes the fanciest desserts in summer, such as chocolate-dipped strawberries or chocolate cake decorated with oh, so indulgent chocolate-dipped fruits.
Sweet, juicy, aromatic – just goodness nature selflessly offers us. I always use organic strawberries freshly picked from my allotment.
Conventional strawberries contain over 20 pesticides. Of course, that makes any crop bug-free, helps the fruits grow faster, and produces more money to sustain the greed machine, but what good does that to the human body?
I read somewhere that organic strawberries contain pesticides, too. That defies the meaning of organic and if it is true, I assume it might apply to larger growers or be down to contamination from nearby conventional plots.
I never spray or use anything other than rainwater and fountain water on my plot. If that contains pesticides, it’s out of my hand!
This ladyfinger strawberry cheesecake requires only a handful of ingredients, about half an hour to put them together, and a little patience to allow chilling before enjoying it with a cappuccino or a glass of liquor.

Ingredients for ladyfinger cheesecake
Mascarpone cheese (fridge cold)
Ricotta cheese (fridge cold)
Organic coconut sugar
Ladyfingers (Savoiardi)
Essences as desired
Gelatine sheets
Strawberries
Cream liquor (optional)
Method
Wash and hull the strawberries. Chop them in quarters (or smaller if required). Optionally, sprinkle with the juice of half a lemon to preserve the freshness and colour (it will not change much anyway, because of the immediate use)
Mash a handful of strawberries and leave them aside.
Hydrate four gelatine sheets for five minutes. When the time is up, drain and remove excess water, then place them in a pan in 100 ml water, on low heat. Stir until the gelatine melts, but do not allow the water to boil. When the gelatine has dissolved, then remove it from the heat and leave it aside.
In a large bowl, mix using an electric mixer at medium speed the cheese, grounded sugar, essences (and no more than two tablespoons of liquor if chosen). Batter for about five minutes until you obtain a fluffy cream.
Optionally, you can add some of the chopped strawberries and mix gently with a large spoon.
Add half of the gelatine to the cream, mix well and leave the cheese cream aside until you build the base and walls of the cake.
Using only the wall of a springform placed on a cake stand, line it with ladyfingers. If the biscuits are too high, you might need to cut off a quarter or third of each. Then, use the leftovers to line the base.
If you have extra hands willing to help during this step, use them as the ladyfingers have a mind of their own and can make your task difficult.
As a tip, I usually fill the base and place a few biscuits on the wall; then, I add a couple of spoons of cream to keep them in place until I continue building the rest of the wall. The base should be covered as much as possible, and there should not be significant gaps in the wall either. The cheese cream is quite thick, but still, for the aesthetics of the final product, take extra care to avoid some of it escaping through the biscuits.
Use all the cheese mixture to fill the shape and flatten it nicely at the top.
Mix the mashed strawberries with the rest of the gelatine and spread it over the cheese cream.
Some bakers prefer to boil the mashed fruit and add sugar, as in a jam. I just used the strawberries with no added sugar at all, and the taste was excellent – the real, natural thing, since gelatine is tasteless (thank God, it is processed enough not to have a pork flavour!)
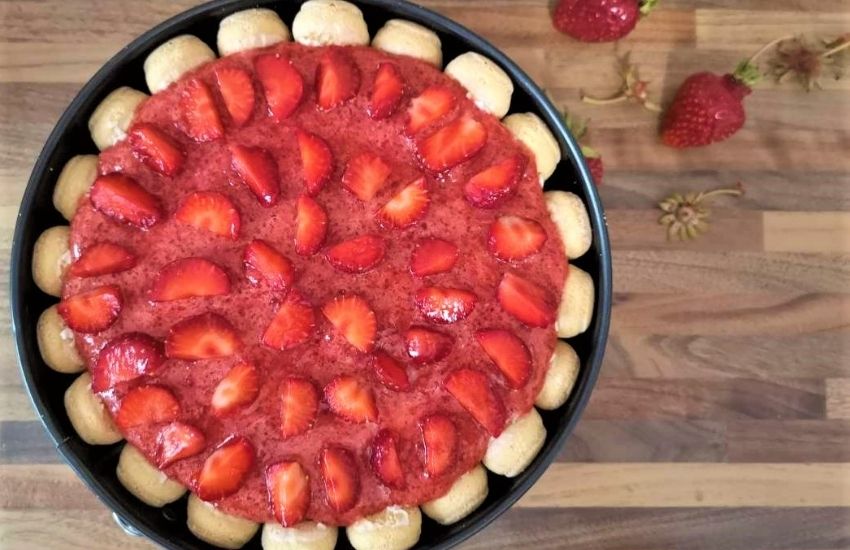
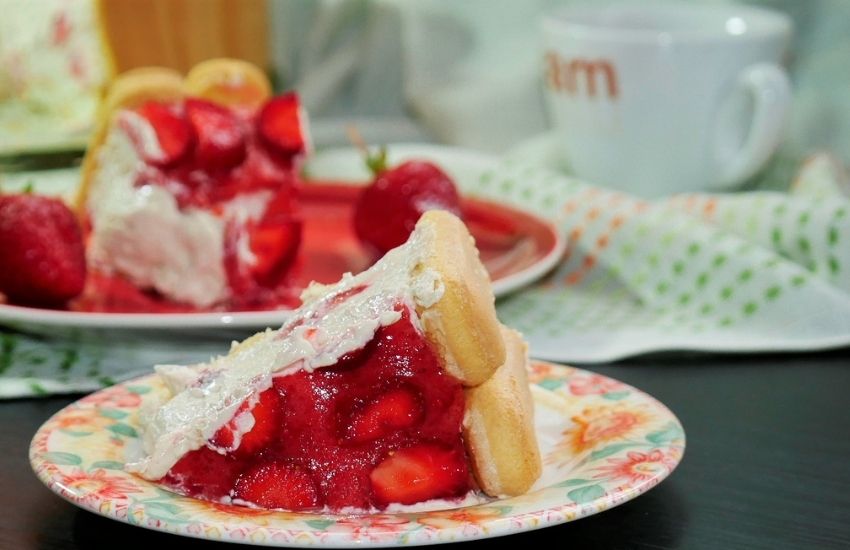
Sprinkle the rest of the chopped strawberries over the gelatine mixture, and your ladyfinger cheesecake is ready to go to the fridge for at least three hours. The ladyfingers will get moist even better, and the cake will be easier to slice if you leave it in the refrigerator overnight.
If somehow you manage not to devour it in one go (and you probably won’t because it is pretty rich), you can keep the ladyfinger strawberry cheesecake in the fridge for up to three days. However, I do not recommend freezing as the types of cheese used might go funny when defrosted.
This beautiful ladyfinger strawberry cheesecake is a fresh cake made with fresh products, and it is best to eat it fresh.
I usually make ladyfinger strawberry cheesecake when I have guests. Thus, I know I will not need to worry about preserving it for too long!
Enjoy your delectable, elaborate delicacy!

Strawberry Ladyfinger Cheesecake
Equipment
- Mixing bowl
- Electric mixer
- Cake stand
- Round spring form (wall only)
- large mixing spoon
- Measuring spoon/scale
Ingredients
- 2 pcs Mascarpone cheese 250g each
- 2 pcs Ricotta cheese 250g each
- 20 pcs Savoiardi biscuits/Ladyfingers
- 4 gelatin sheets
- 200 g strawberries
- 4-5 tbsp coconut sugar organic
- 2 tbsp cream liquor optional
- 1 tsp rum/orange essence optional
Instructions
- Wash, hull the strawberries and chop them in quarters or smaller pieces.

- In a small bowl, mash a handful of strawberries and leave them aside.
- Hydrate 4 gelatine sheets for 5 minutes. When the time is up, drain and remove excess water, then place them in a pan in 100 ml water, on low heat.
- Stir until the gelatine melts, but do not allow the water to boil. When the gelatine has dissolved, remove it from the heat and leave it aside.
- In a large bowl, mix using an electric mixer at medium speed the cheese, grounded sugar, essences (and no more than two tablespoons of liquor if chosen).

- Batter for about five minutes until you obtain a fluffy cream.
- If you wish, you can add some of the chopped strawberries and mix gently with a large spoon.
- Add half of the gelatine to the cream, mix well and leave the cheese cream aside until you build the base and walls of the cake.
- Using only the wall of a springform placed on a cake stand, line it with ladyfingers. If the biscuits are too high, you might need to cut off a quarter or third of each. Then, use the leftovers to line the base.

- Use all the cheese mixture to fill the shape and flatten it nicely at the top.
- Spread evenly the mashed fruits combined with gelatine on top of the cheese mixture.
- Sprinkle the rest of the chopped strawberries for decoration.
- Chill in the fridge for at least three hours.
Notes
Do you use ladyfingers for your cheesecakes? What other bases did you try that is not sickly fatty and sweet? I would like to know what different non-squeamish variations people figured out.
The post Ladyfinger Strawberry Cheesecake Easy Recipe appeared first on The World Is an Oyster.
]]>The post How To Make Spicy Strawberry Jam Without Pectin appeared first on The World Is an Oyster.
]]>Homemade Goodies: Spicy Strawberry Jam
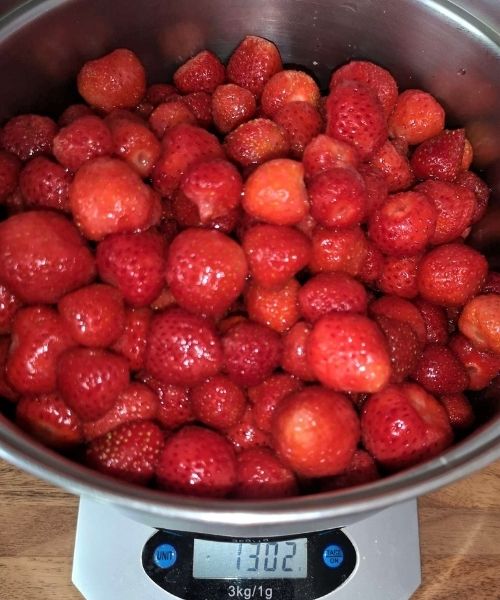
Spicy strawberry jam is the main type of preserve I make in the summer with freshly picked fruits from my allotment. Usually, the combinations include strawberry and rhubarb – a tad tangy, raspberries, currants or any other berry that goes well with strawberries.
This post may contain affiliate links, which means I will receive a commission if you purchase through my links, at no extra cost to you. Please read the full disclosure for more information. Thank you!
The idea is to make my jam at home because it is easy, cheap and healthy. In addition, the jam is organic, and the only things I add to it apart from organic coconut sugar are spices.
Every time I pick strawberries and make the traditional and mandatory at our house chocolate-dipped dessert, there are enough fruits left to make a few jars of jam. If I have any other fruit available, I try combinations.

While the fruits cook at low heat, I test spices blends. As a result, not two of my jams are the same, and each has a different flavour.
I will explain here the basic process and how to make spicy strawberry jam without using pectin. When you try yours, remember that any berry combination is alright. Also, keep in mind that jam should be more fruit than sugar, using the fresh, organic product, and this is the difference from mass commercialised one: you are making a healthier food at home.
What is pectin, and do I really need to use it when I make jam?

Pectin is a type of fibre naturally found in plants. Humans do not digest pectin unless it is modified for this purpose. “Modified” puts me off just at the sound of it, no matter how “healthy” it still seems at the end of the process.
I know one thing: for thousands of years, humans have consumed what nature had to offer. Come the industrial revolution and population explosion, everything needs to be “modified”, “enhanced”, and generally “processed”.
I get the need to make more food to feed more of us, make it last longer (have you wondered what the lists of Es are on food labels?) and the use of chemicals to make it look more colourful, smell better or last forever. But really, what is left of the natural product after so much “processing”? What do we really eat? How does it affect our body?
“More”, “perfectly shaped”, or “longer lasting” does not necessarily mean healthy.
At least you know what ingredients you used, their source, and their natural qualities in homemade foods.
If the next AI-enhanced generation of humans will survive on plastic, so be it. But, for the time being, I adore eating a fresh, organic, juicy strawberry as I pick it from my plot or make whatever I decide to make at home using as little industrial intervention as possible.

Modified pectin – digestible by our bodies – can be used to thicken jams. But jam thickens naturally if you boil it longer! Because the fruits have enough pectin in them to do just that! And as I learned in school aeons ago, liquids evaporate at high temperatures over some time; thickening occurs naturally.
So just a simple physical process of boiling does the same thing as adding modified items to your foods just for the sake of making it faster. If you think it pays to earn time over your health, I know otherwise!
The bottom line is, if you don’t mind a softer, easier to spread jam as opposed to the very thick one you can actually cut with a knife and never spread properly, then you do not need to add pectin to jams.
Sugar/fruit balance in jams
This is a subject I can spend hours debating!
We all eat jam. Our moms made it when we were kids. Of course, as the times changed, jam too turned into comfort food, mass-produced and readily available item in any grocery shop. But some of us still see the fun in making it at home.
I have tested jams made by my grandmother, mother, friend’s mothers, friends. I read countless recipes in six different languages just out of curiosity.
There is no perfect recipe for jam. It is more a matter of taste.
What I found funny, though, is how some prefer it incredibly sweet and decided that refined sugar gives jam the taste.

I read bonkers recipes in which people used 3 kg of refined white sugar for each kg of fruit. How insane is that?
The main ingredient in a jam is fruit, not sugar! And it is still pectin found in fruits that thickens jam, not sugar!
Another funny thing I heard was that sugar acts like a preservative. I am still trying to figure out how.
Salt is a disinfectant, so it prevents bacteria from developing in conserved foods. How on earth would sugar do the same thing? Taste enhancer – I get that. It makes sense. But preservative? Really?
Of course, if you Google it, it will tell you how wonderful it is in very attractive terms. But use your brain, and don’t take for granted any information that serves a purpose.
Any fruit has a natural sweetness, even rhubarb (although it is a vegetable, not a fruit, but makes good jam)! It is called “naturally occurring sugar,” and it counts as calories.
So if you make fruit jam, better make it from fruit! The last time I checked, refined sugar was no fruit.
The type of sugar I settled for years ago after trying many options is organic coconut sugar. I chose it because it is less processed, it has a lower glycaemic index and because I don’t care if my foods have a brownish colour! Perfect foods are like perfect people in magazines: altered!
Likewise, everything I bake is low in sugar. This is because the taste of foods comes from spices; add a ton of sugar or six teaspoons – the difference is still in the spices!
In general, for each kg of fruit, 200 g coconut sugar is quite enough for sweetness in jams. However, it is alright to add an extra tablespoon or two of sugar to the sourer fruits.
Why spicy strawberry jam?
If you like spicy chocolate, you will definitely like spicy strawberry jam too! Jalapeño chocolate? Yes, please! Because no rule said that sweet and hot don’t go together.
A dash of ground pepper thrown in your jam will make it just a little hot and intense – a daring variation to a classic recipe.
Cloves and cinnamon are classic spices that work in some types of jam. However, I prefer them for autumn fruits such as plums.
The zest of lemons or oranges also enhances the taste of jams. The key is moderation – too much zest can result in a bitter taste.
Vanilla and rum would also bring flavour to jam.
Again, because it is more a matter of personal preferences, it is best to try various combinations in small recipients. Then, if you are pleased with the result, use your chosen spice for the entire quantity.
My secret ingredient for jams
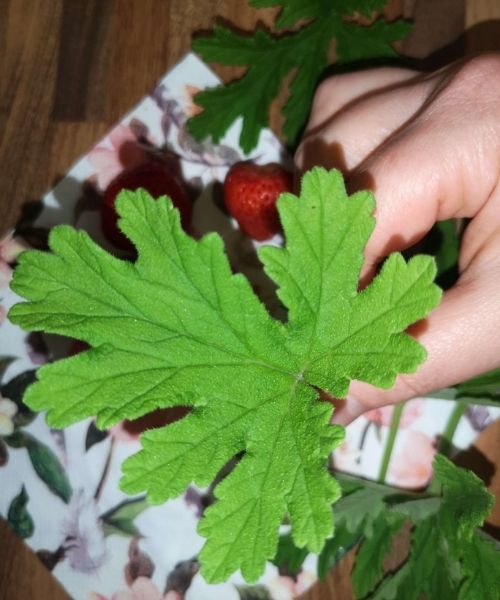
It will not be a secret after this, but there is a plant whose leaf gives the jam a specific aroma. I am talking about rose-scented geraniums, or Pelargonium graveolens, as they go by their scientific name.
Mom always used it, and perhaps this is why I still like it and continue to use it in jams. The trick is to dip a couple of leaves in the pan towards the end of the cooking process and only for a couple of minutes. Any longer than that, the aroma will become prevalent and cover that of the fruits. And we are still talking about how to make fruit jam!
I grow a rose-scented geranium in a large pot in my garden. I brought cuttings from Romania a few years ago, and they adapted very well to the UK climate.

This large pot has a strong fragrance and blossoms into a beautiful purple mid-summer to late autumn. I placed it strategically on the patio to enjoy the scent any time we are out in the garden.
What is peculiar about this plant is that the leaves are fragranced, not necessarily the flowers. Hence, their use in baking, drink and jam making.
How to sterilise the jars for jam
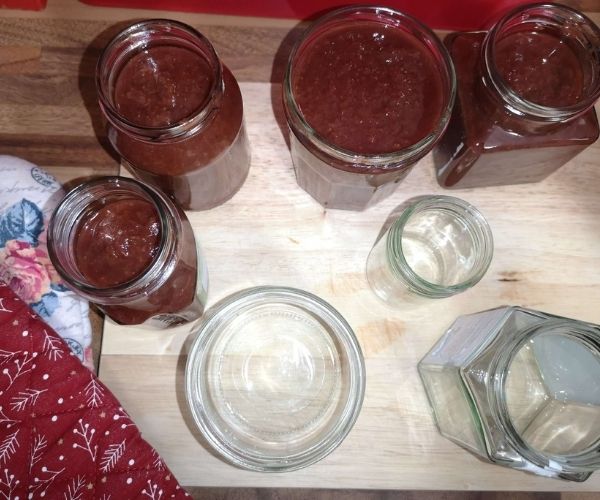
My method of sterilising the jars is simple: firstly, I wash the glass jars and lids with hot water and dishwasher, rinse well and dry.
I keep the lids aside, face-up on a towel, careful not to stick my fingers in them after washing.
The glass jars go into the microwave for two sessions of two minutes each, at medium intensity.
I always do this step after turning the heat off and leaving the jam pan aside for a few minutes.
Microwave sterilisation worked for me and preserved the jam for at least a year. I remember that mom used to sterilise the jars by boiling them and the content for hours in gigantic pans. Unfortunately, I do not have enough time for that nor space for huge pans. Hence this method I’ve used for years and proved helpful.
Hot jars have to be handled carefully and wearing protective oven gloves.
It is important that the jar heat is similar to that of the jam; otherwise, the jars can crack. This happened to me only once in donkey years because I rushed to fill the jars and skipped the second session of microwaving them.
The jam was hotter than the jars, and the first one cracked. I saw it coming but still did not prevent it from happening. Lesson learnt!
Another important thing that helps jam last better and longer is ensuring that the lids are hermetically sealed. I do this by turning the filled jars upside-down once the jam had slightly cooled. I never do this with hot jam as the lids have a plastic lining. As we know, plastic at high temperatures releases all sorts of chemicals harmful to humans, especially BPA.
If you look carefully at a jar lid, a circle in the middle goes down as you press with a finger and returns to the initial position when you release the pressure.
When you turn the jar upside-down and leave it until the jam cools entirely and then bring it to a normal standing position, a suction happens as an effect of cooling the previously heated metallic lid. This keeps the middle circle of the lid sucked down and, to me, is an indicator that the jar has sealed hermetically.
This is a non-scientific explanation of a physical process. Of course, any scientist can confirm/refute the veracity of it. But I speak from practical experience, and I know it works!
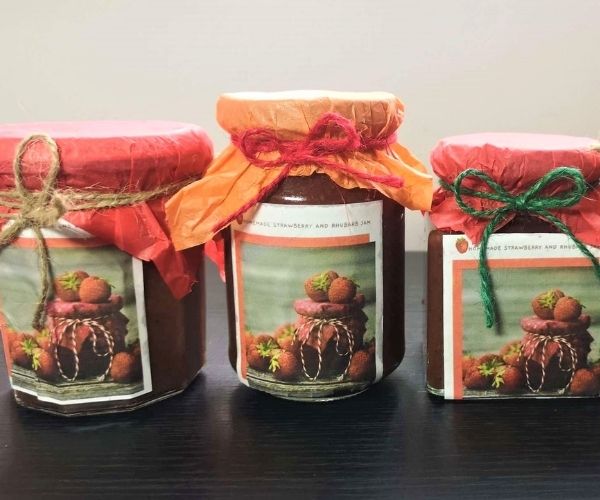
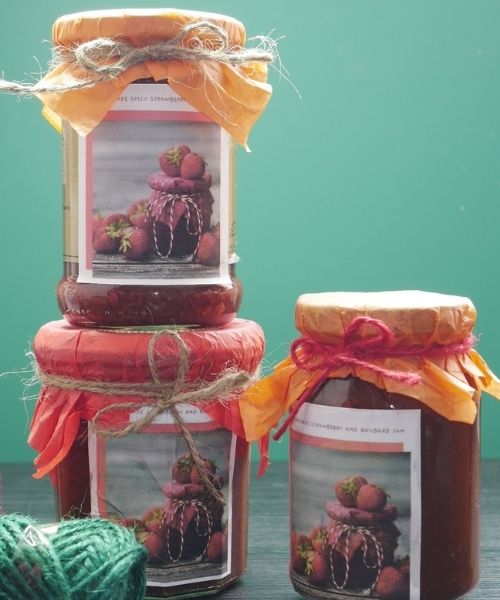
Labelling jam jars
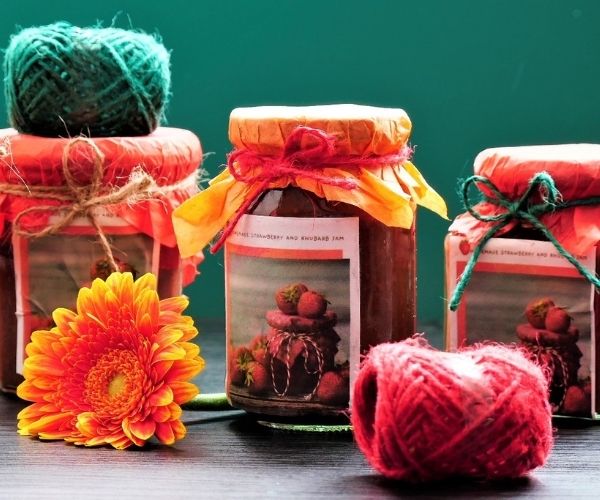
Labelling is an optional step. However, I still do it because I am a perfectionist! Since I discovered Canva (a free version is available), I design my labels and print them on sticky gloss paper (if I have enough patience to calculate and convert pixels to cm to get the right printing size). A more straightforward method is to print labels on regular paper and glue them to the jars after they cooled.
On the label, I write the type of jam/fruits used/spices and the date I made it.
By October, various jars of different colours line up orderly on the upper shelf of the fridge, waiting patiently to be used over the winter.
How to store jam
Mom used to store the jam in a cold and dark pantry. Besides, the winters in Romania used to be bitterly cold; she even kept cooked foods in the pantry and saved electricity.
My modern house has a fridge that serves the purpose. Jam is, in essence, preserved fruit that we use when fresh ones are not available.
Made as explained here and stored as detailed above, my jam lasts for over a year on the upper shelf of the fridge, at around 6-8°C.
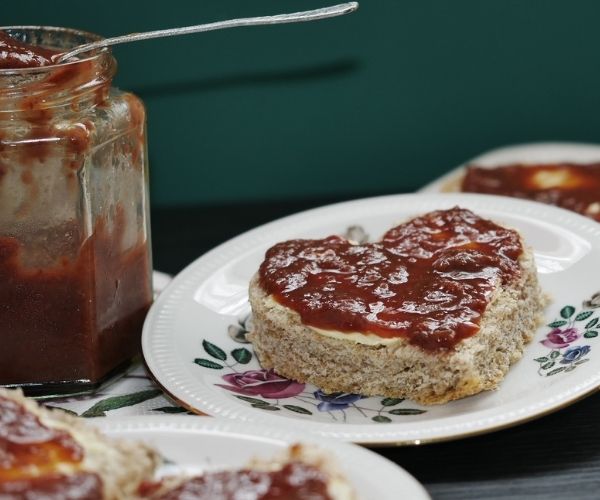
What is the best use for jam?
Spread on buttered bread (optionally).
Baking is another good use for jams.
Jam can also be used to make fruity yoghurt, sorbet or ice cream.
Some people use it in cooking, especially as a sauce for meats. However, I prefer not to mix fruits and meats since I read that the fermentation process can lead to cirrhosis.
To this day, the best use of jam is in crêpes; I have enjoyed it as a child and still do.
Ingredients for spicy strawberry jam
Strawberries (optionally, you can combine with any other berries, rhubarb etc)
Coconut sugar
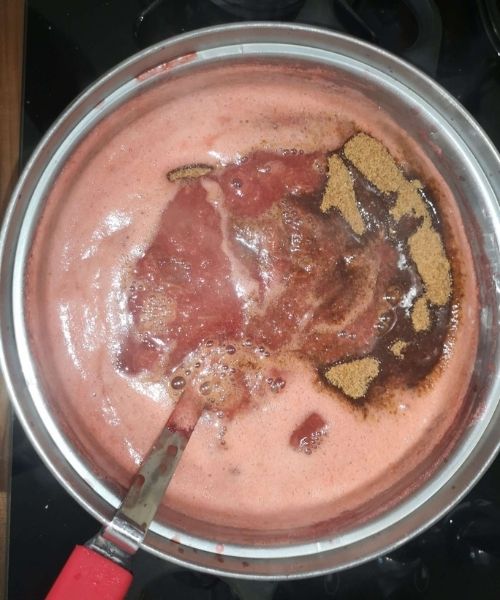
Ground pepper
Ground cloves
Rose-scented geranium leaves
Method
Wash and hull the strawberries; place them in a double bottom stainless steel pan over low heat. If required, mash the fruits slightly (most of them will mash naturally during the process).
Do not rush boiling and keep the heat to a minimum throughout making the jam; a higher flame might burn the fruit at the bottom of the pan.
The purpose of using a double bottom pan is to prevent the fruits from burning and sticking to the pan. Occasional stirring with a wooden/stainless steel spoon will also help.
After adding sugar, the stirring has to be more frequent, as the sweetened fruit’s tendency to stick to the pan will increase.
The strawberries should cook for at least an hour and a half to thicken enough.
Towards the end of cooking, add the spices and geranium leaves. Turn the heat off, remove the pan from the hob and allow the jam to cool slightly.

Meanwhile, sterilise the jars as explained above. Then, place the jars on a wooden chopping board and have the lids available at hand.
Both the jars and the jam should be at a similar temperature. Apply extra caution during this step to avoid burning. Preferably, ensure there are no children or pets in your working area.
Use a large stainless steel spoon to transfer the jam from the pan to the jar, spoon by spoon. Pay attention to any cracking noise. If this happens accidentally, stop filling the respective jar and dispose of it safely.
I recommend filling the jars almost to the brim, with only about 1 cm/half an inch left free at the top.
When all the jars are filled, screw the lids tightly and allow further cooling.
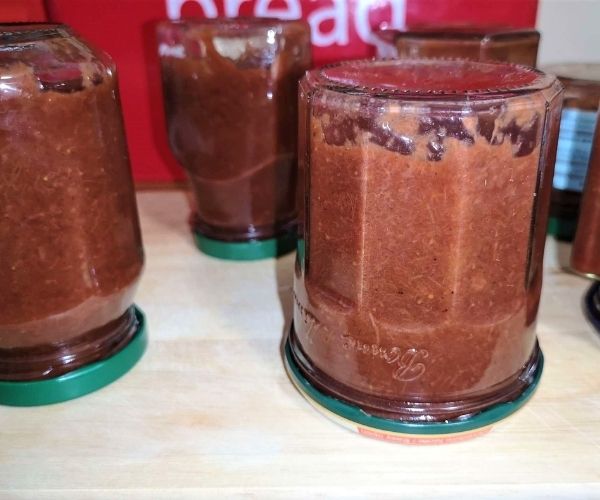
Before the jars cool entirely and are still warm to touch, turn them upside-down and leave overnight or for a minimum of a couple of hours until completely cooled.
Perform the lid circle test as explained above. If the metallic centre of the lid remains in a concave position (curves inwards), it means that the jar is hermetically sealed and will preserve the jam for at least a few months.
Preferably, store the spicy strawberry jam in the fridge, on the upper shelf where the temperature is slightly higher than in the fruit box.
Check each jar regularly. If at any point you discover a mould pellicle forming at the top, discard the jar immediately as it means the jam is contaminated and not safe for consumption.
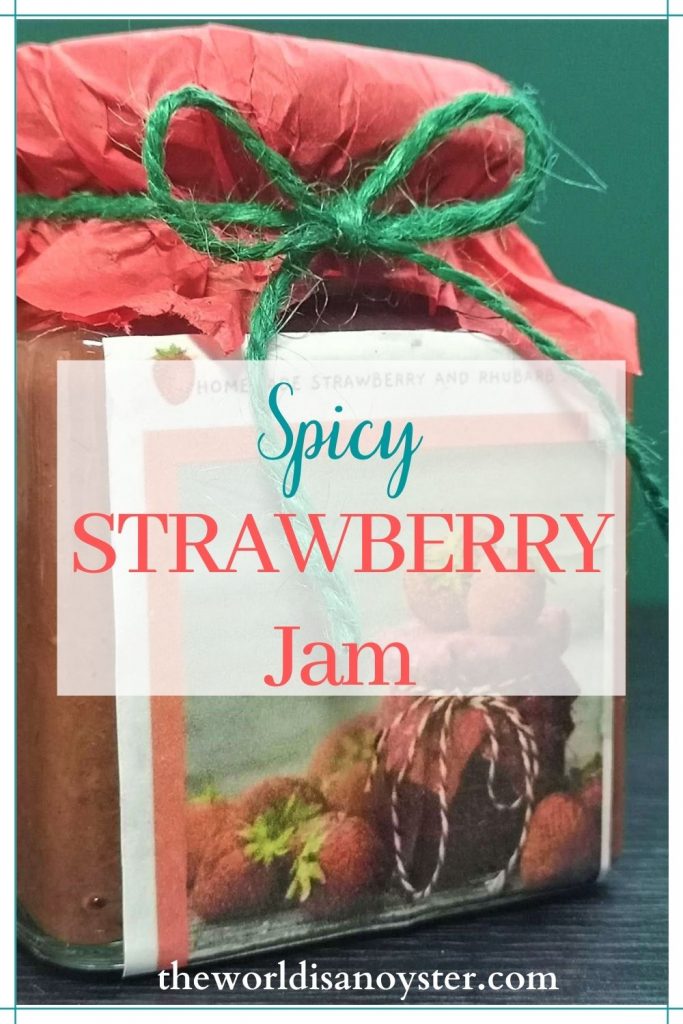
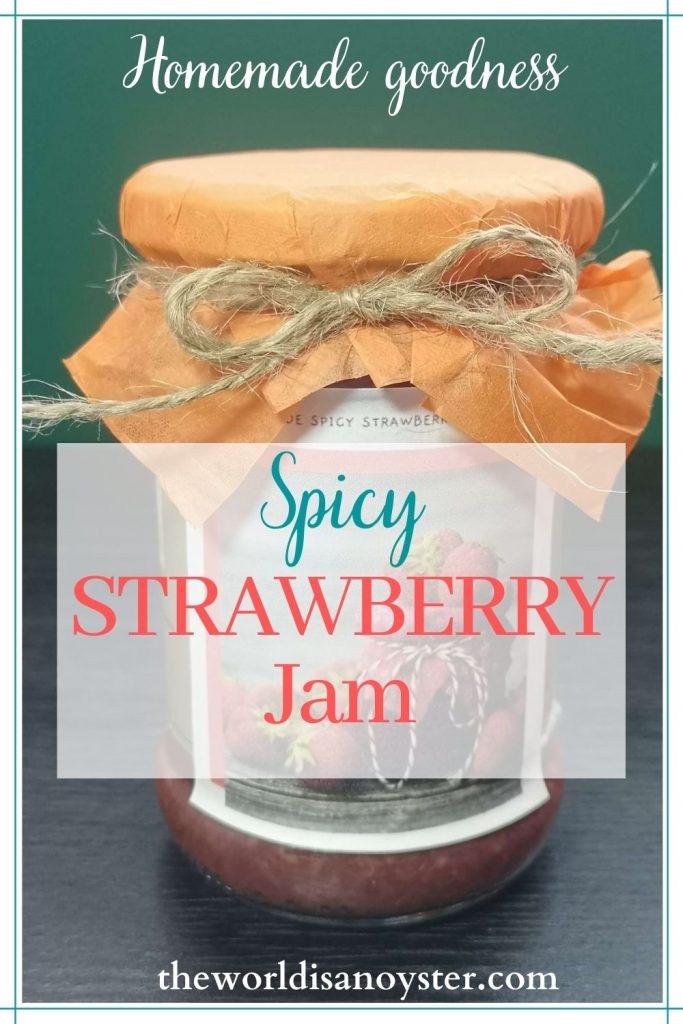
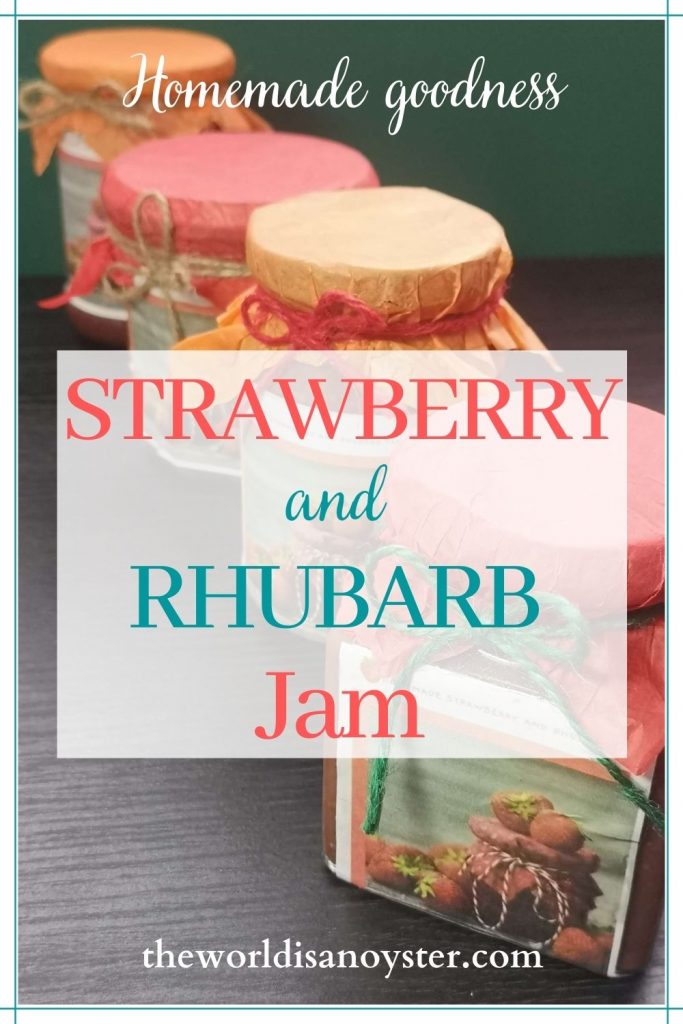
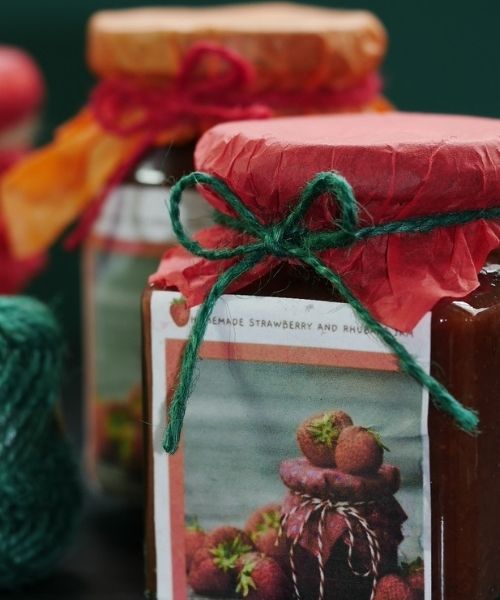
Spicy Strawberry Jam
Equipment
- Double bottom stainless steel pan
- 4 glass jars with lids
- large mixing spoon
Ingredients
- 1 kg strawberries organic
- 200 g coconut sugar organic
- 1 tsp black ground pepper flat
- 1 tsp ground cloves flat
- 2 pcs rose-scented geranium leaves freshly cut, washed
Instructions
- Wash and hull the strawberries.
- Place the fruits in a double bottom stainless steel pan over low heat.

- Mash the fruits slightly (most of them will mash naturally during the process).
- When the fruit reduced, add the coconut sugar and stir frequently.
- Towards the end of cooking, add the spices and geranium leaves.
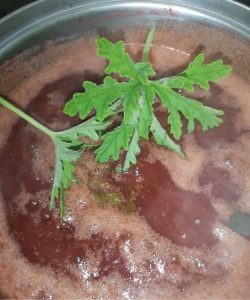
- Turn the heat off, remove the pan from the hob and allow the jam to cool slightly.
- Sterilise the jars in the microwave as explained above and place them on a wooden chopping board. Have the lids available at hand.
- Use a large stainless steel spoon to transfer the jam from the pan to the jar. Pay attention to any cracking noise. If this happens accidentally, stop filling the respective jar and dispose of it safely.
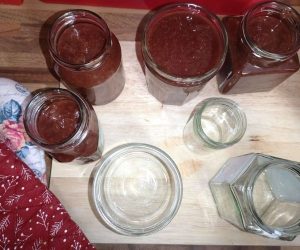
- Screw the lids tightly and allow further cooling.
- Before the jars cool entirely but are still warm to touch, turn them upside-down and leave overnight or for at least a couple of hours until completely cooled.
- Perform the lid circle test as explained above. If the metallic centre of the lid curves inwards, it means that the jar is hermetically sealed and will preserve the jam for at least a few months.

- Preferably, store in the fridge, on the upper shelf.
Notes
Homemade Goodies: Spicy Strawberry Jam
The post How To Make Spicy Strawberry Jam Without Pectin appeared first on The World Is an Oyster.
]]>The post How To Transform a Chocolate Cake Into a Decadent Delight appeared first on The World Is an Oyster.
]]>Boozy Chocolate-Dipped Strawberry Cake
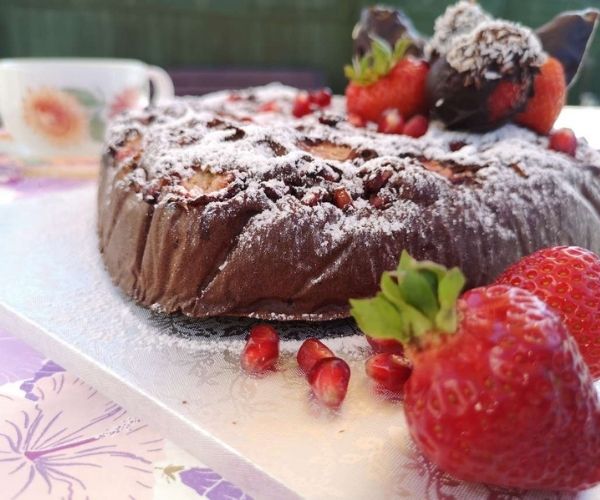
The easiest way to transform a classic cake into a perfectly indulgent delight is by decorating a simple chocolate sponge with boozy, decadent chocolate-dipped strawberries. Your otherwise unassuming cake will impress anyone who will happen to be around, guaranteed!
This post may contain affiliate links, which means I will receive a commission if you purchase through my links, at no extra cost to you. Please read the full disclosure for more information. Thank you!
I have spoken about my little allotment in another post (link above) and about how such a tiny plot can offer so much bounty every year and with so little intervention on my part.
Although I only made it to the allotment three times in the past two weeks, I picked kilograms of beautiful strawberries. I stuffed my face until I could not breathe without even washing the sweet, juicy organic beauties (the rain did the job for me!)
Then I still had plenty of fruit to bring home and divide into categories: freezer, jam, more face stuffing because I can’t help it when they call me!
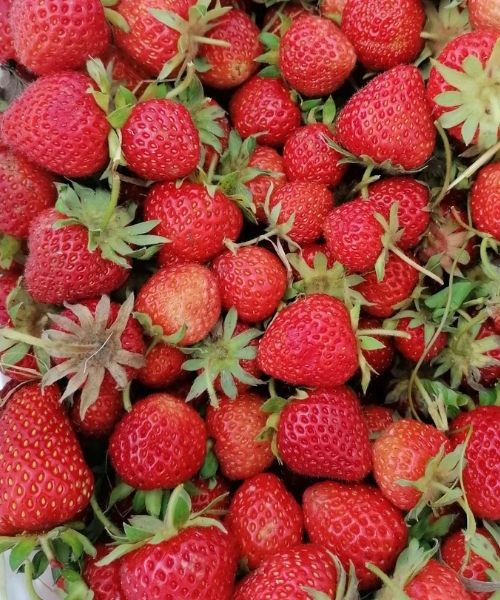
With the leftovers, I wanted to see how strawberries work in a double chocolate combination. Because I had already made classic chocolate-covered strawberries on a few occasions this summer, I went for something different: a boozy chocolate–dipped strawberry cake that was pure chocolate heaven!
The only difference was to add two tablespoons of Baileys to the melted dark chocolate. The result: even more indulgence for the adults (the underage still got their safe share of white and milk chocolate extravaganza!)
Melted chocolate is a bit tricky to work because you have to be quick and precise (needless to mention that the speed will decrease exponentially with every shot you decide to treat yourself to; I only indulged twice, but I observed the difference!)
If you add anything else while melting dark chocolate, especially a liquid ingredient, the chocolate tends to harden even faster. The solution is to reduce heat to a minimum and keep the bowl on the bain-marie a little longer.
Once the fruits are covered in boozy chocolate, decorate as you prefer and place the strawberries on a rack or a piece of baking parchment; refrigerate them for at least half an hour before decorating the cake.
I decided to use extra ripe bananas for sweetness and only added a tablespoon of organic coconut sugar to this cake. According to my taste (bear in mind that I don’t like sickly sweet anything!), the sponge was sweet enough. Still, even if it weren’t, I don’t think anybody would have noticed since the boozy chocolate-dipped strawberries conferred the flavour and were the main attraction!
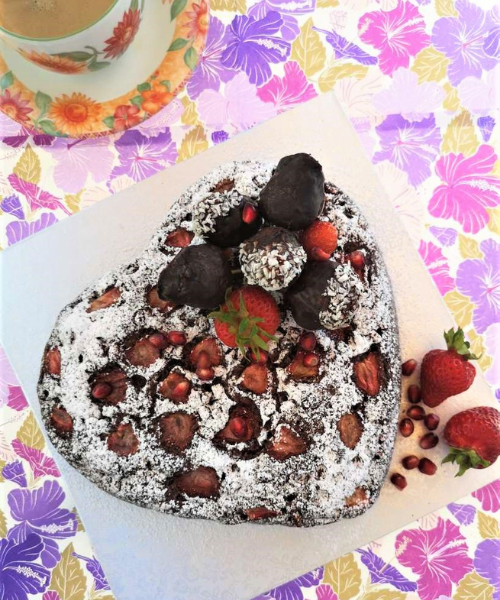
Perhaps because aside from the booze, I choose a heart-shaped tray for the sponge, the idea that this cake would be perfect for Valentine’s Day was mentioned a few times. Of course, it won’t be the season for picking fresh strawberries from your garden unless you live somewhere where it is summer in February.
For the rest of us, a grocery store would do, as long as they sell organic strawberries! If you wonder why I keep mentioning organic, it is because my cooking/baking is largely organic-based. For your information, you can find more about the health benefits of strawberries here.
Ingredients for Chocolate-Dipped Strawberries and Pomegranate Chocolate Cake
For the sponge:
3 overripe bananas
1 tbsp organic coconut sugar
200 g organic white flour
3 tbsp organic cacao powder
5 organic eggs
1/2 tsp baking powder
2 tbsp Baileys (or any other chocolate liquor)
A pinch of salt
For decoration:
A handful of fresh strawberries
A handful of pomegranate (optional)
1/2 bar dark chcolate
2 tbsp Baileys
Shredded coconut or a crunchy cover (optional)
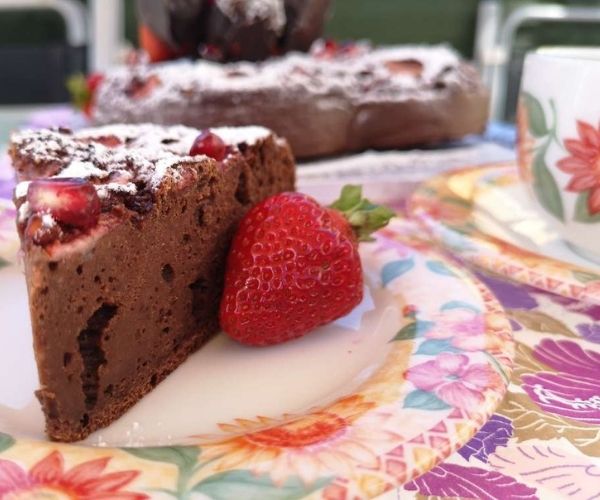
Method
Start by washing the strawberries, hull them (cut the green top) and stick a toothpick in each.
Fill a quarter of a pan with water and prepare the bain-marie to melt the chocolate. Break half a bar of dark chocolate in a glass bowl (not plastic!) and place it on the bain-marie. As it melts, add the cream liquor and stir. It might need a minute or two until the consistency is right to start dipping the fruits.
Place the chocolate bowl on a trivet (handle with care, as it will be hot!) and work quickly to deep the strawberries. If you choose to use additional toppings, do so before placing the dipped fruits on the rack or parchment paper.
Place in the fridge and allow to cool for at least half an hour.
Meanwhile, prepare the sponge.
Preheat the oven to 180°C/350°F/gas mark 4. Line the baking mould with parchment paper. I used a loose base heart-shaped tray, approximately 20 cm wide.
Peel the bananas and mash them using a hand mixer at low speed. Add the eggs, salt and sugar and mix at high speed for 6-7 minutes until the composition becomes lighter in colour and the volume triples.
Add the cacao powder and mix at low speed for 20-30 seconds until the colour becomes uniform.
Sieve the flour and baking powder together, add at once and incorporate slowly, using a large spatula. You should not over-mix during this step to preserve the oxygenation level and the puffiness of the sponge.
Place the batter in the lined tray and decorate with slices of strawberry.
I added a handful of pomegranate, hoping to enhance the taste a little. Because this sponge was a little sticky due to the bananas, I had to bake it a little longer, and some of the pomegranates charred. Next time I will incorporate the tiny fruits into the sponge to avoid this. Or use four tablespoons of coconut sugar instead of overripe bananas.
Bake for 50-60 minutes and do the toothpick test to ensure the sponge is cooked thoroughly. Allow extra baking time if needed.
When the sponge is ready, turn the heat off, leave it in the oven for another ten minutes. When the ten minutes are up, remove the tray from the oven and place it on a cooling rack. Next, remove the tin’s sides and base and allow the sponge to cool completely.
Place the sponge on the serving platter, dust with powdered sugar (optional) and stick the chocolate-dipped strawberries into the sponge to finish the cake.
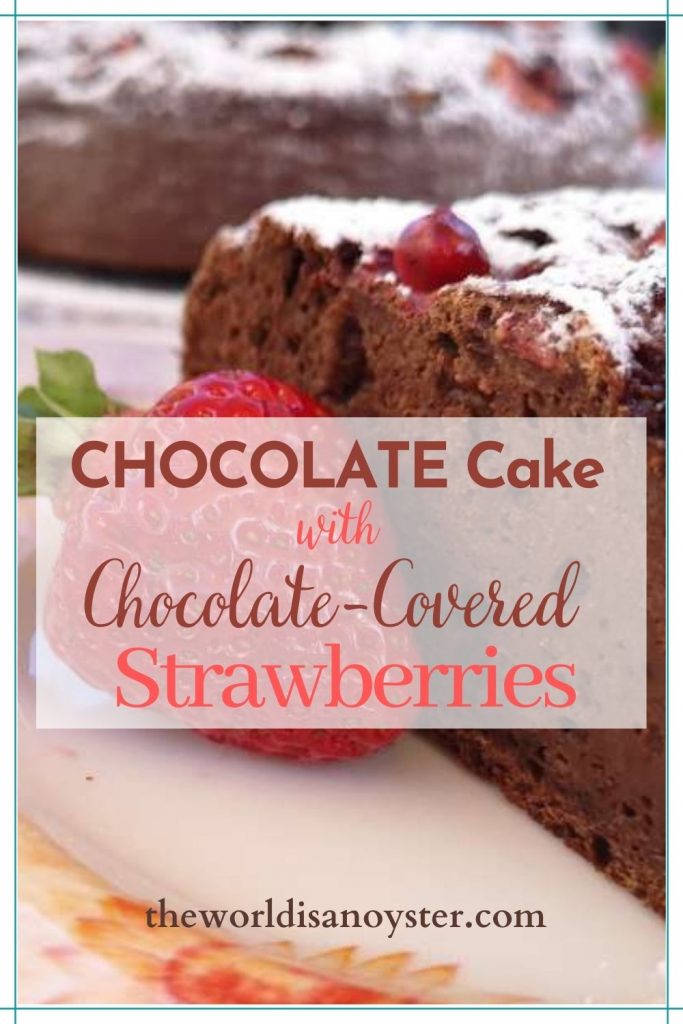
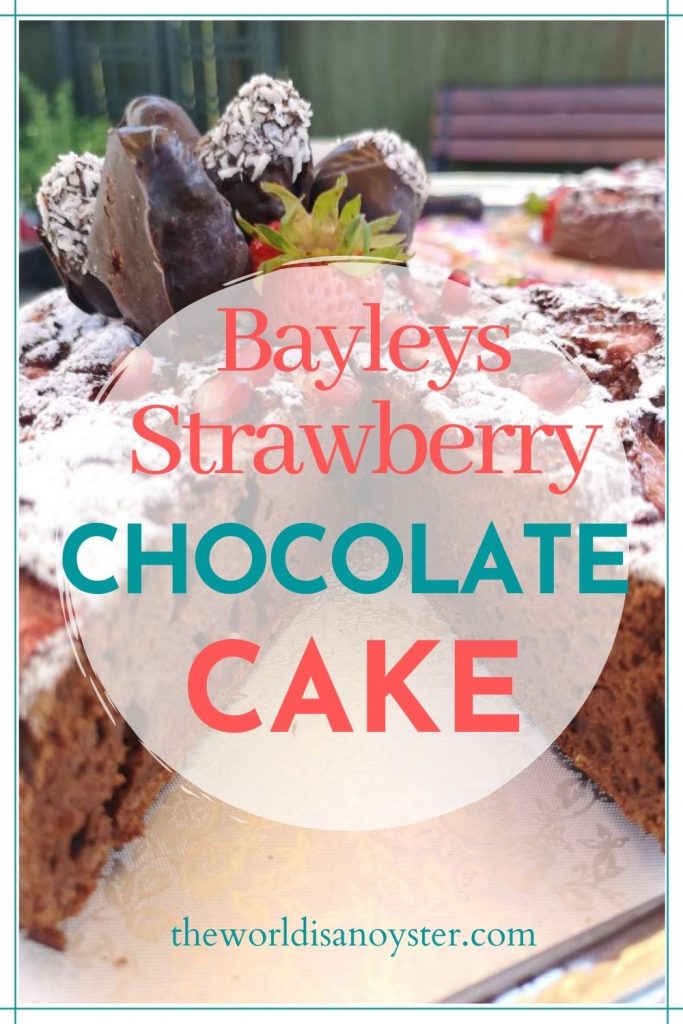
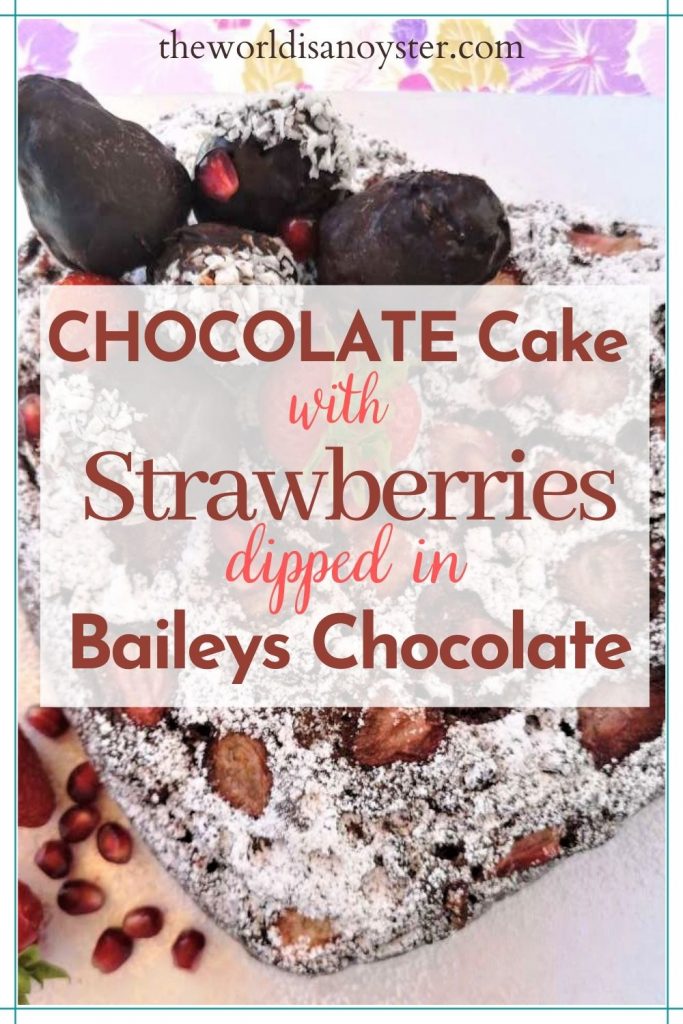
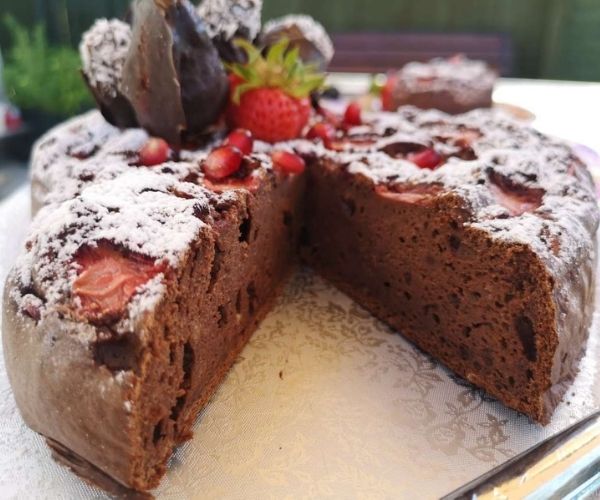
Chocolate Cake with Baileys Chocolate-Dipped Strawberries
Equipment
- Medium size baking tray (about 20 cm Ø or 20 cm irregular shape)
- Parchment paper
- Large mixing bowl
- Large silicone spatula
- Pan and glass bowl for bain-marie
- Electric mixer
Ingredients
- 3 pcs overripe bananas organic, peeled
- 5 pcs eggs large, organic
- 2 tbsp Baileys or any chocolate liquor
- 200 g white flour light, organic
- 1 tbsp coconut sugar organic
- 3 tbsp cacao powder organic
- ½ tsp baking powder
- 1 pinch salt sea/rock, finely ground
- 5-7 pcs strawberries washed and hulled by cutting the green top off
- 1 handful pomegranate optional
- ½ bar dark chocolate minimum 60% cacao
- 2 tbsp Baileys/other chocolate liquor
- 1 tsp shredded coconut or ground nuts for extra decoration
Instructions
How to make the boozy chocolate-dipped strawberries
- Wash the strawberries, hull them (cut the green top) and stick a toothpick in each.

- Fill a quarter of a pan with water and prepare the bain-marie to melt the chocolate.
- Break half a bar of dark chocolate in a glass bowl (not plastic!) and place it on the bain-marie. As the chocolate melts, add the cream liquor and stir. It might need a minute or two until the consistency is viscous enough to start dipping the fruits.
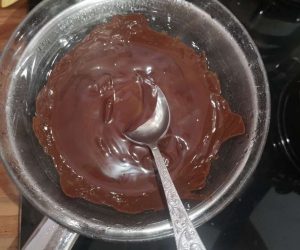
- Place the chocolate bowl on a trivet (handle with care, as it will be hot!) and work quickly to deep the strawberries. Deep in any additional toppings, then place the fruits on a rack or parchment paper.

- Refrigerate for at least half an hour.
How to make the sponge
- Preheat the oven to 180°C/350°F/gas mark 4. Line the baking mould with parchment paper. I used a loose base heart-shaped tray, approximately 20 cm wide.
- Peel the bananas and mash them using a hand mixer at low speed. Add the eggs, salt and sugar and mix at high speed for 6-7 minutes until the composition becomes lighter in colour and the volume triples.

- Add the cacao powder and mix at low speed for 20-30 seconds until the colour becomes uniform.
- Sieve the flour and baking powder together, add at once and incorporate slowly, using a large silicone spatula. If you overdo this step, the sponge might flatten.
- Preferably, add the pomegranate and incorporate them gently.
- Place the batter in the lined tray and decorate with slices of strawberry.

- Bake for 50-60 minutes and do the toothpick test to ensure the sponge is cooked thoroughly. Allow extra baking time if needed. Reduce heating if necessary to avoid charring the top.
- When the sponge is ready, turn the heat off, leave it in the oven for another 10 minutes, then remove and place it on a cooling rack. Next, remove the tin's sides and base and allow the sponge to cool completely.
- Dust with powdered sugar and decorate the cake by sticking the chocolate-dipped strawberries into the sponge.
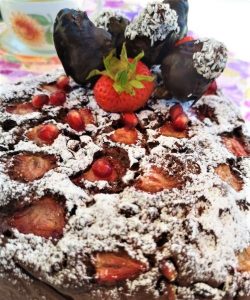
- Slice and serve as it is or with ice cream/whipped cream/additional fruits.
Notes
If needed, store the chocolate-dipped strawberry cake in the fridge for up to three days. Serve with your preferred coffee, a bubbly or chocolate liquor. Enjoy!
Boozy Chocolate-Dipped Strawberries and Pomegranate Chocolate Cake
The post How To Transform a Chocolate Cake Into a Decadent Delight appeared first on The World Is an Oyster.
]]>