The post Walnut Meringue Crescent Cookies Easy Recipe appeared first on The World Is an Oyster.
]]>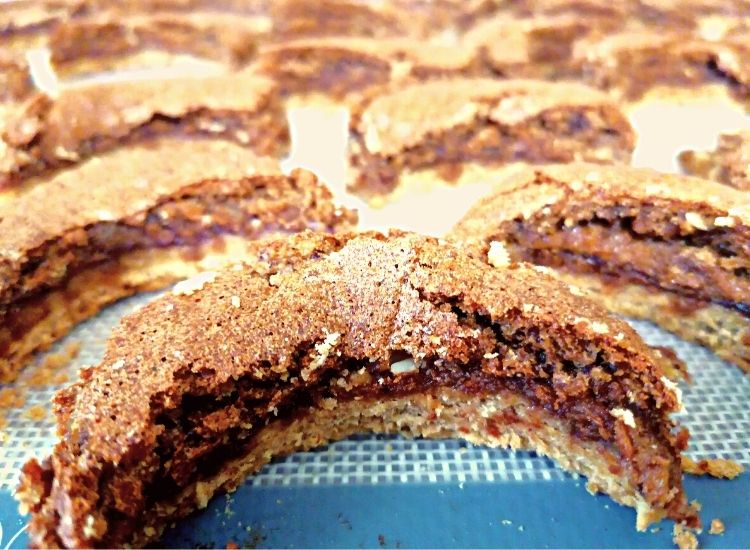
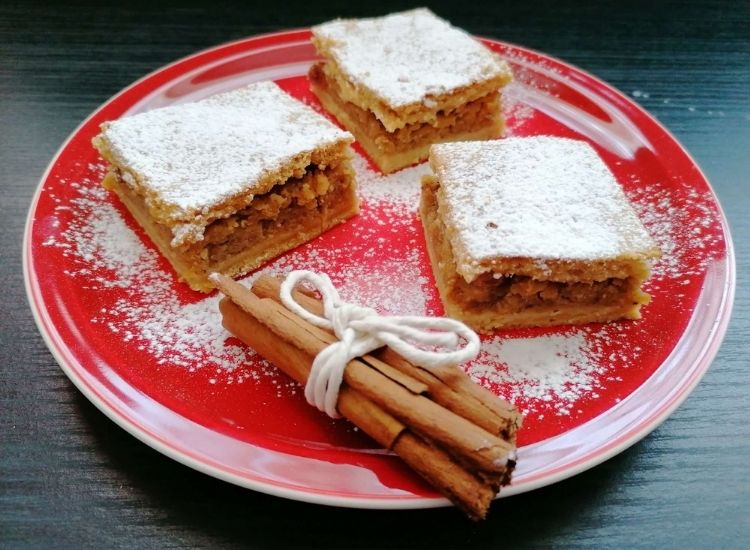
Walnut meringue crescent moon cookies were always the best delight mom baked for holidays. It is a dessert easy to make but so flavourful, with a tender base, a jam layer and a creamy, nutty top – precisely what we loved to munch on often in-between meal times.
This post may contain affiliate links, which means I will receive a commission if you purchase through my links at no extra cost to you. Please read the full disclosure for more information. Thank you!
We would sneak into the pantry where mom kept the massive trays will all the goodies she’d baked for Christmas or Easter (of which the fluffy cozonac was always the centrepiece!) and pinch moon cookies from the beautiful stack so that she would not see (so we thought!) how many were missing by the big day!
It was not long until I started making them with my younger sister and repeated the recipe mainly around Christmas time.
This year, I had the precious helping hand of Santa’s little helper contributing to baking mom’s traditional walnut and meringue crescent moon cookies, and the fun we had in the kitchen was delightful!
Of course, witty Santa’s helper (England born and bred) reading an old recipe handwritten in Romanian was hilarious. Still, I was there to provide the correct translation, and we did not use any alien ingredients on this occasion!
What was incredibly touching to see was how the little helper managed perfectly well with very little intervention on my part. I watched and reminisced how I did the same, around the same age, if not older, in mom’s kitchen back home in Romania.
I am glad to write this and forever remember the generation switch moment as it happened, keeping an old tradition and using the same old (and a tad grease-stained in places) recipe book that mom took the time and patience to write.
It feels emotional now that I’m writing down the recipe. But when we baked the walnut meringue crescent moons, it was fun and pure joy to see how different ingredients transform when mixed and create a delightful dessert.
We agreed on something we both have a passion for – baking is biochemistry, and the kitchen is the lab!
Mom used whatever ingredients she could buy during a difficult time, when communist rule meant restrictions of all sorts, including food.
Today, I am trying to educate my kid to understand the difference the temperature brings to various ingredients and how to use healthier versions and combine them in a way that keeps the flavour but reduces the harm to our body. Mom’s recipe mentioned margarine; we use organic coconut oil or organic butter.
For a self-proclaimed future scientist, I am delighted to see how such a young person understands what excessive refining does to sugar and why that is harmful to our health or how the human digestive system does not have the right enzyme to process cow milk and how healthier substitutes not only help personal health but have a role in the massive chain reaction that affects the environment.
Back to our fun baking for a couple of hours, it was the best time spent away from the computer, and I can’t wait until next time it happens again!
The cookies came out perfectly, and we did a lot of bowl-licking in the process and cooky testing to check that the final product passes the approval of the otherwise fussy quality control bakers and eaters in the family!
Miraculously, the cookies kept disappearing from the platter just as I remember it happened when I was a child! But I rest assured the little helper can bake just fine anytime, not just for holidays, while I watch and enjoy a delightful walnut merengue crescent moon cookie when ready with my cappuccino. Perhaps it will be way more than one, in the end, because they are addictively scrumptious!
Ingredients for walnut meringue crescent moon cookies
For the base
Egg yolks
Coconut oil
Coconut sugar
Baking powder
Orange zest
Plain white flour
Salt
Jam layer
Any jam goes, but a slightly sour one will enhance the flavours. I prefer reduced sugar spicy strawberry jam. A jar is enough for this recipe.
For the meringue
Egg whites
Coconut sugar
Walnuts
Rum essence
Salt

Preparation method for walnut meringue crescent moon cookies
The base
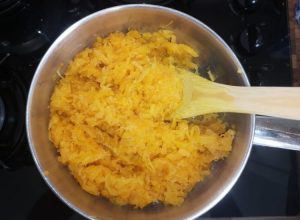
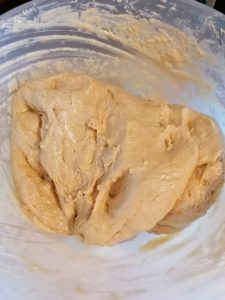
Add the coconut oil at room temperature, a pinch of salt, orange zest, and coconut sugar to a large mixing bowl. Use a handheld mixer and the dough hooks to mix at a low speed.
Add the egg yolks one by one and continue mixing.
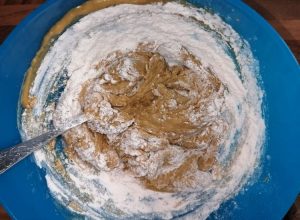
Sieve the flour and baking powder over and mix until it incorporates nicely.
If the dough becomes too firm, add a spoon or two of milk and mix.
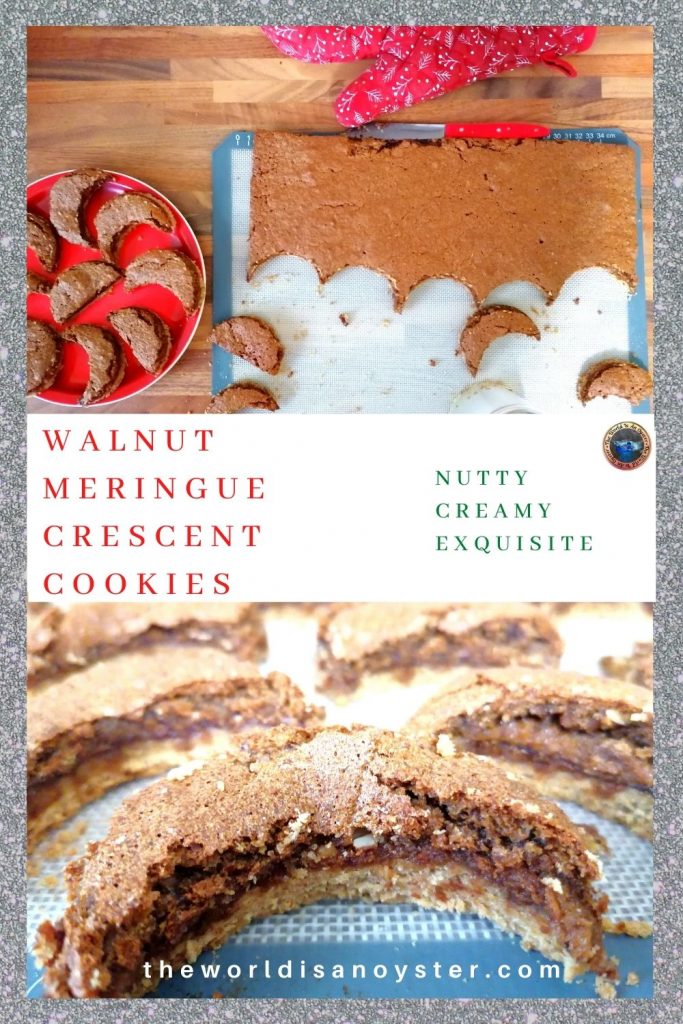
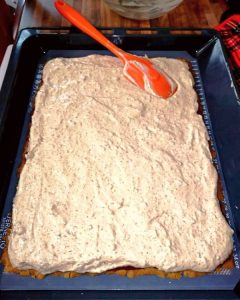
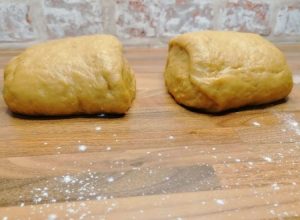
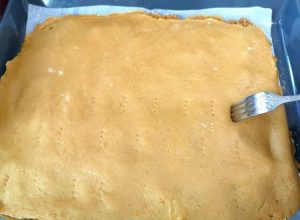
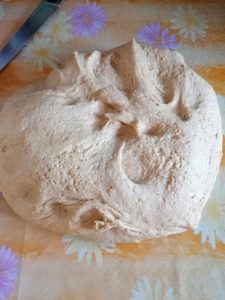
Move the dough into a lined baking tray and level it by pressing gently with your wet hands.
Spread the jam over and level it nicely with a spatula.
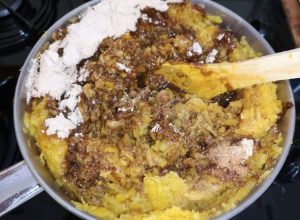
The meringue
Before starting, preheat the oven to 180°C (356°F) and line the baking tray with a silicone sheet or baking parchment.
We followed mom’s method for the meringue and made the French version. Because we baked the walnut meringue crescent cookies already assembled, the meringue did not need beforehand cooking.
Mix the egg whites with a pinch of salt at high speed until stiff. Use a grinder to finely grind the coconut sugar (until you obtain a powdered, lighter brown icing sugar). Add it gradually to the eggs and mix at a low speed.
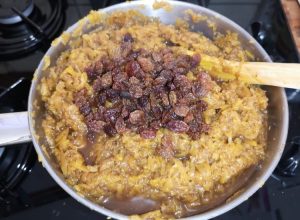
Grind the walnuts (not too long; they need to remain flakey) and add them to the batter. Fold gently with a spatula until incorporated.
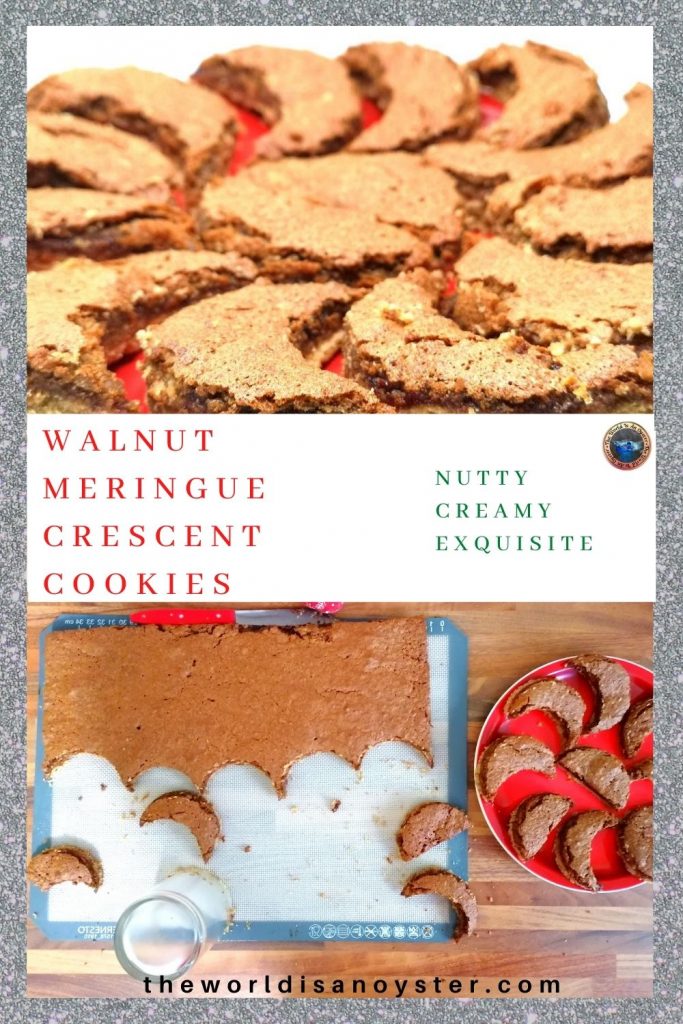
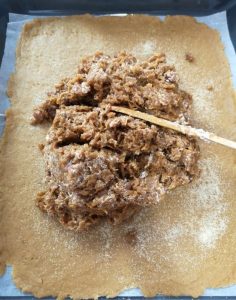
Pour the meringue over the jam and level it without pressing too much.
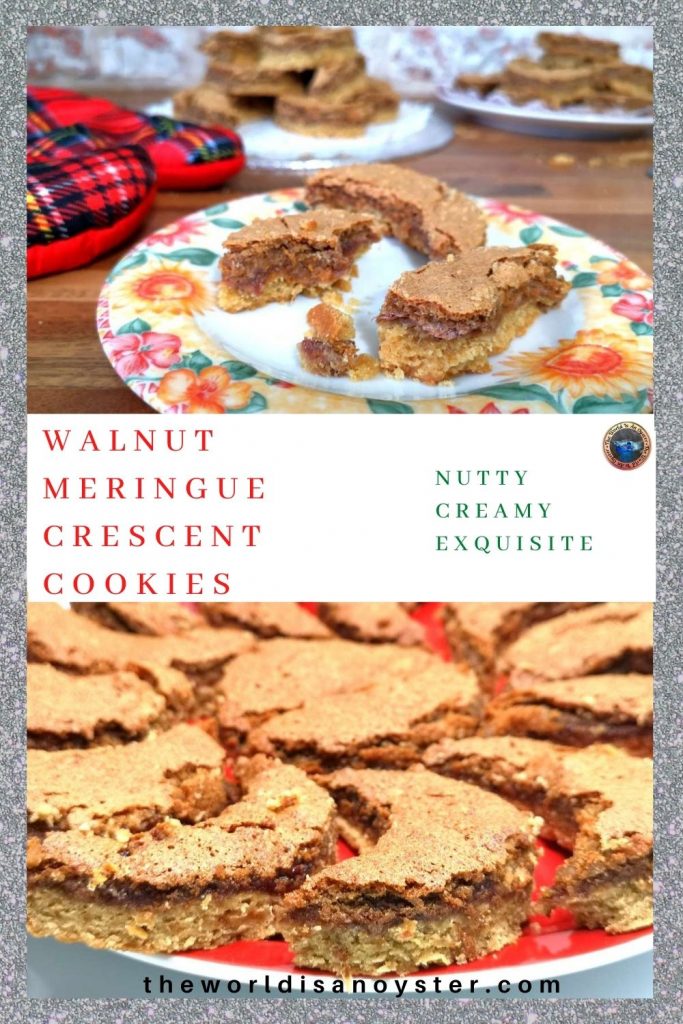
Bake for 40 minutes and check the top is not charring.
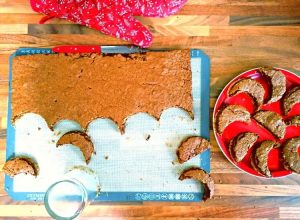
When ready and you have checked the walnut meringue and base are cooked throughout, let it cool slightly.

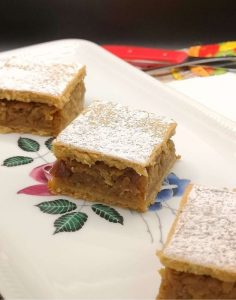
Use a medium-size drinking glass to cut the crescent moon shapes while still warm.
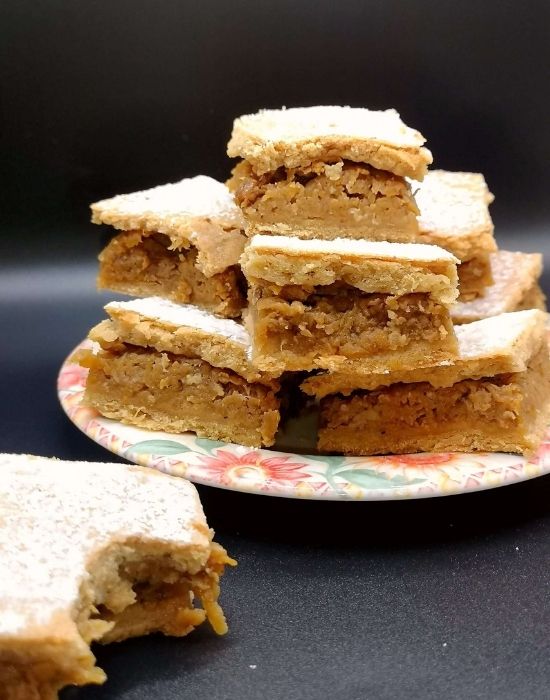
Enjoy the cute and tasty walnut meringue crescent cookies with a festive hot chocolate or a nice cappuccino!
Walnut Meringue Crescent Cookies
Ingredients
The dough
- 200 g organic coconut oil
- 5 egg yolks organic, medium
- 400 g plain flour organic, white
- 1 tsp baking powder flat
- 80 g coconut sugar organic
- 1 organic orange zest
- 1 pinch salt sea/rock
Organic strawberry jam
The merengue
- 5 egg whites
- 120 g ground coconut sugar organic
- 150 g ground walnuts organic
- 1 pinch salt sea/rock
- 1 tbsp rum essence
Instructions
To make the dough
- Add the coconut oil at room temperature, a pinch of salt, orange zest, and coconut sugar in a large mixing bowl. Use a handheld mixer and the dough hooks to mix at a low speed.
- Add the egg yolks one by one and continue mixing.
- Sieve the flour and baking powder over and mix until it incorporates nicely.
- If the dough becomes too firm, add a spoon or two of milk and mix. Optionally, chill the dough for half an hour.
- Move the dough into a lined baking tray and level it by pressing gently with your wet hands.
- Spread the jam over and level it nicely with a spatula.
The meringue
- Preheat the oven to 180°C (356°F) and line the baking tray with a silicone sheet or baking parchment.
- Batter the egg whites with a pinch of salt at high speed until stiff. Use a grinder to finely grind the coconut sugar (until you obtain a powdered, lighter brown icing sugar). Add it gradually to the eggs and mix at a low speed.
- Grind the walnuts (not too long; they need to remain flakey) and add them to the batter. Fold gently with a spatula until incorporated. Add the rum essence.
- Pour the meringue over the jam and level it without using too much pressure.
- Bake for 40 minutes and check the top is not charring.
- When the baking time is up, use a toothpick to check that the walnut meringue and base are cooked thoroughly.
- Keeping the parchment/silicone sheet, move the cake from the tray to a cooling rack. Allow it to cool slightly.
- Move from the cooling rack to the tabletop and use a medium drinking glass to cut the crescent moon shapes while the cake is still warm.
Walnut Meringue Crescent Cookies Easy Recipe
The post Walnut Meringue Crescent Cookies Easy Recipe appeared first on The World Is an Oyster.
]]>The post Easy Pumpkin Cake With Creamy Filling Recipe appeared first on The World Is an Oyster.
]]>Autumn Pumpkin Delights
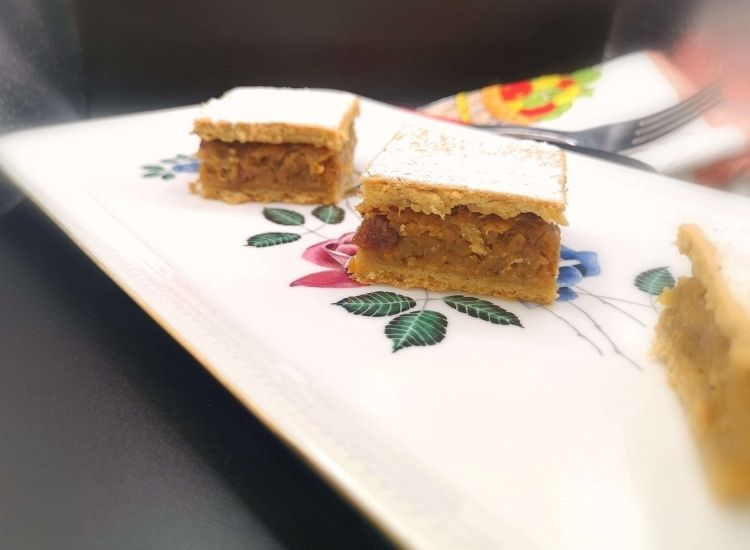
As the autumn sets in an overabundance of colours and hues over the land, it is customary to eat pumpkin in any form besides carving a few for Halloween. An easy to make pumpkin cake with creamy filling is just perfect for those crisp October mornings and can work wonders with a steamy cup of coffee.
This post may contain affiliate links, which means I will receive a commission if you purchase through my links at no extra cost to you. Please read the full disclosure for more information. Thank you!
My favourite pumpkin cake of all is the one in mom’s recipe book. She made it without fail every autumn, and I kept the tradition ever since I became the owner of her bountiful recipe book many years ago.
Mom’s recipe does not use pumpkin in the dough layers. Instead, it creates a delicious creamy filling packed with all the goodness this fairy tale vegetable has to offer in combination with autumn spices that enhance the taste of this simple cake.
Why do we love pumpkins?
We love pumpkins not only because they miraculously shift shapes and become luxurious carriages for exploited good souls in Disney land, but primarily because of the excellent health benefits this vegetable provides and its unmistakable taste, especially when combined with the right spices.
Part of the Cucurbitaceae family and cousin with courgette, watermelon and cucumber, pumpkin is over 90% water but loaded with vitamins and nutrients that help the human immune system fight nasty diseases. All this, of course, applies to the raw pumpkin, consumed as it is.

Once processed at a temperature or mixed with sugar, the narrative changes a bit.
This blog promotes a healthy lifestyle and thrives on creating the healthiest possible recipes using organic products and low, unrefined sugar. Therefore, this cake with creamy pumpkin filling attempts to keep up with these principles.
Mom’s original pumpkin cake with creamy filling recipe and my alterations
Mom’s original recipe is what I call the “perfect ten” formula. It does not involve gymnastics if you think of Nadia Comaneci right now. Instead, the recipe requires ten tablespoons of each main ingredient for the dough.
In time, I have adjusted the recipe and replaced ingredients to stay on the healthier side. Therefore, five tablespoons of coconut sugar make this cake as tasty as I remember it from my childhood.
Because I was born in communism and lived under a restrictive regime for the first fourteen years of my life, I remember the shortage of foods and the cards we used to buy what we were allowed monthly (similar to wartime in the UK).
The choice was practically non-existent, so we had to use whatever we could buy and make it last a month until the next card was issued. What coconut sugar, what cold-pressed rapeseed oil? I never heard of these things until communism ended in a blood bath in Romania!
Fortunately, we live in different times, and I am not sure if for the better since too much choice does not necessarily mean safer or healthier. But, because I strongly advocate against all industrially processed foods and am pro-nature, I hope that I stay on the healthy side as much as possible and help others think of their food choices in the process.
For these reasons, there will be no margarine, refined oil or sugar or non-organic ingredients in this recipe. But it is still a cake, and it needs some flavour. Half of the sugar quantity mom used does just that, especially since preparing the pumpkin will require additional sugar. Remember that the flavour comes from the spices, and a sack of sugar will only make any desert needlessly sickly sweet.
Ingredients for pumpkin cake with creamy filling
Organic pumpkin
Organic plain flour
Organic eggs (yolks for dough; whites for pumpkin filling)
Cold-pressed rapeseed oil
Unsweetened almond milk
Organic coconut sugar
Baking powder
Spices (cinnamon, cloves, ginger, aniseed, nutmeg)
Raisins, walnuts (optional)
A pinch of rock/sea salt

Method
To prepare the dough
Preheat the oven and line the baking tray with parchment paper.
Use an electric mixer to batter the egg yolks with sugar and salt until it becomes lighter in colour. Add the milk, then the oil and mix with a spatula. Sieve the flour mixed with baking powder over and mix until it incorporates nicely.
Knead the dough until all the ingredients incorporate nicely and split it into two parts.
Use a roller pin to roll each part to fit nicely on the bottom of your baking tray.
Place the first sheet into the tray, spread some semolina (it helps absorb excess humidity), add the pumpkin filling and place the second dough sheet on top.
Gently pinch the top sheet with a fork to allow any trapped air to escape and obtain a smooth baked surface.
To prepare the creamy pumpkin filling
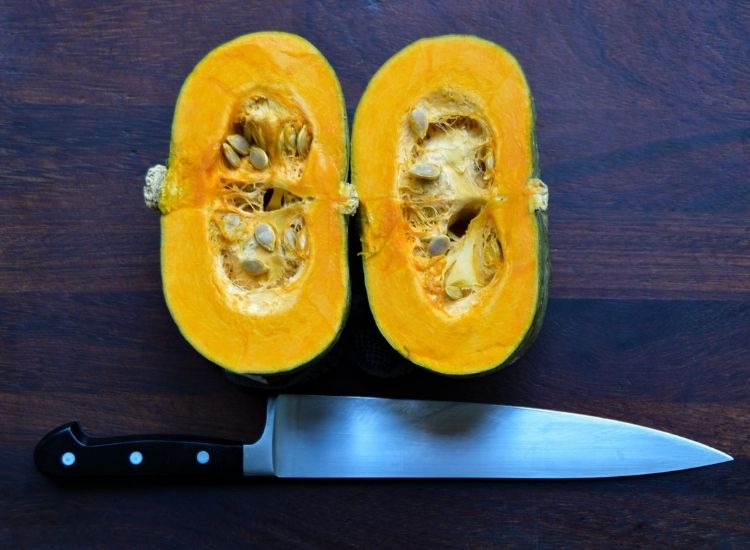
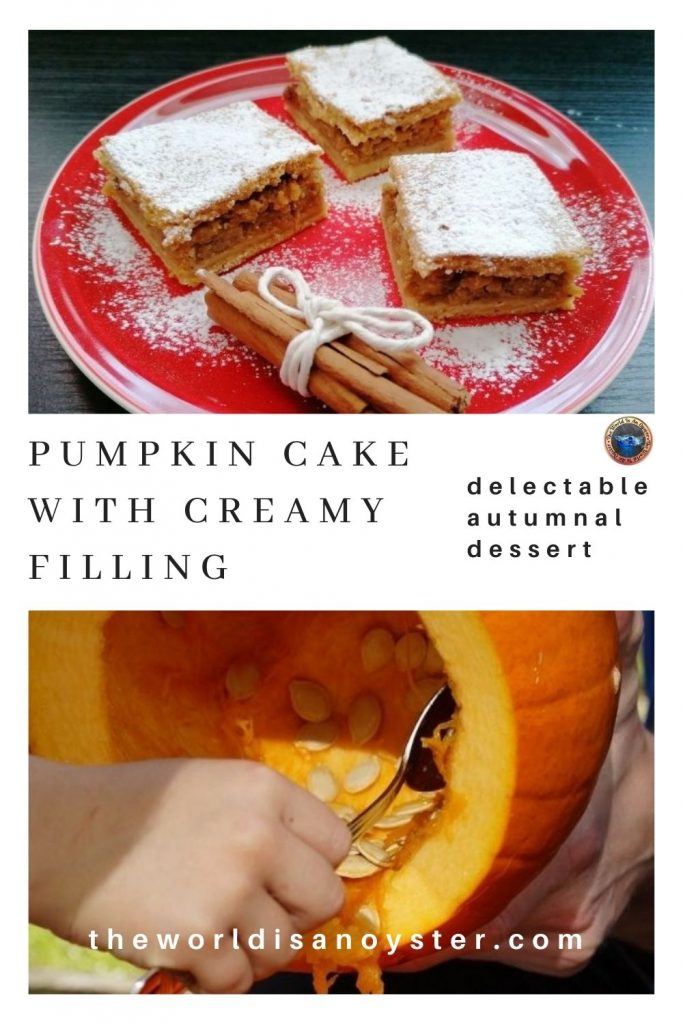
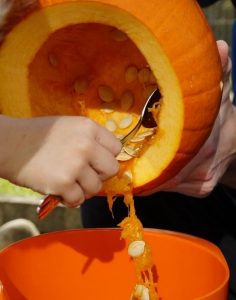
Wash the pumpkin with warm water and dish wash. Rinse well and dry the pumpkin.
Use a sharp chef knife and a vegetable cutting board to cut the pumpkin as you would for Halloween carvings. Peel the external hard layer off and use a large tablespoon to carve the seeds and the pulp out of the pumpkin.
The seeds have a lot of health benefits, and you can easily find a use for them (in bread baking, for instance, or added to cereals).
Cut the pumpkin you will use into pieces small enough to make it comfortable to grate. Use a box grater to shred the pumpkin on the larger holes side. The same applies to an electric grater.
If you use previously grated and frozen pumpkins, allow defrosting overnight and remove the excess water by pressing down.
Place the grated pumpkin into a pan and over low heating, as if you would make a jam. Allow cooking at low heating the whole time, even if it might sound tedious. You are not aiming for a charred pumpkin and ruined pan! Patience makes perfect!
When the whole quantity of pumpkin is thermally processed, and the volume reduces visibly, add the sugar, spices, and raisins/nuts. Mix and cook for further two-three minutes.

Turn the heat off and allow the cooked pumpkin to cool completely before the next step. Failure to do so will spoil the entire filling for this cake!
While the pumpkin cools, batter the egg whites with a pinch of salt until you get stiff peaks. Add it to the completely cooled pumpkin and mix gently with a spatula until it incorporates nicely. The filling will become fluffy, creamy looking and lighter in colour.
Pour the pumpkin filling over the first dough sheet in the tray, then continue as explained above with the second sheet.
Bake on the middle rake for 40-50 minutes. Allow cooling before slicing.
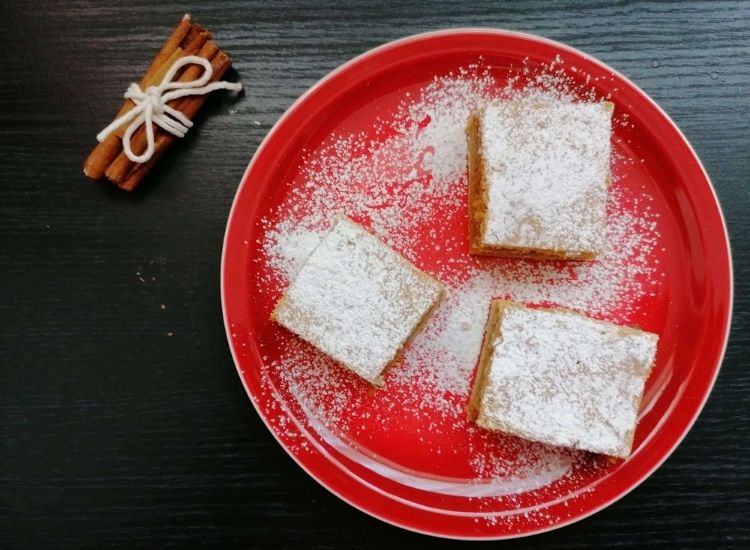
Cut the pumpkin cake with creamy filling in squares or a rhomboid shape, dust it with powdered sugar if desired (I usually skip this step) and serve with the coffee of your choice.
If you don’t mind the cold weather or live in a milder climate, and iced coffee is your thing, check here for inspiring ideas.

Enjoy!

Pumpkin cake with creamy filling
Equipment
- Mixing bowl
- Pan
- Electric mixer
- Spatula
- Chef knife
- Large spoon
- Large chopping board
- Rectangular baking tray
Ingredients
For the dough
- 3 pieces large organic egg yolks keep the the whites for the pumpkin filling
- 10 tbsp almond milk unsweetened
- 10 tbsp rapeseed oil organic, cold pressed
- 5 tbsp organic coconut sugar
- 300-400 g organic plain flour use as needed for a firm dough that requires rolling
- 1 tsp baking powder
- ¼ tsp sea/rock salt
For the pumpkin filling
- 1 medium pumpkin or 1kg shredded, frozen pumpkin, defrosted and drained
- 5 tbsp organic coconut sugar
- 2 tbsp raisins and/or walnuts optional
- 3 organic egg whites beaten
- 1 tbsp semolina it absorbs humidity
Instructions
To make the dough
- Preheat the oven to 180°C/356°F/gas mark 4. Line the baking tray with parchment paper.
- In a large bowl, mix the egg yolks with coconut sugar and a bit of salt until it becomes lighter in colour and creamy. It is OK to use an electric mixer for this step.
- Add the milk, then the oil and mix with a spatula.
- Sieve the flour mixed with baking powder over and mix until it incorporates nicely.
- Knead the dough until all the ingredients incorporate nicely and split it into two parts.
- Use a roller pin to roll each part to fit nicely on the baking tray.
- Gently pierce the top sheet with a fork to allow any trapped air to escape and obtain a smooth baked surface. Usually, I pierce both dough sheets.
To prepare the pumpkin filling
- Wash the pumpkin with warm water and dish wash. Rinse well and dry the pumpkin.
- Use a sharp chef knife and a vegetable cutting board to cut the pumpkin as you would for Halloween carvings. Peel the external hard layer off and use a large tablespoon to carve the seeds and the pulp out of the pumpkin.
- Cut the pumpkin you will use into pieces small enough to make it comfortable to grate. Use a box grater to shred the pumpkin on the larger holes side. The same applies to an electric grater.
- Place the grated pumpkin into a pan and over low heating, as if you would make a jam. Allow cooking at low heating the whole time, even if it might sound tedious. You are not aiming for a charred pumpkin and ruined pan! Patience makes perfect!
- When the whole quantity of pumpkin is thermally processed, and the volume reduces visibly, add the sugar, spices, and raisins/nuts. Mix and cook for further two-three minutes.
- Turn the heat off and allow the cooked pumpkin to cool completely before the next step. Failure to do so will spoil the entire filling for this cake!
Assembling and baking the cake
- While the pumpkin cools, batter the egg whites with a pinch of salt until you get stiff peaks. Add it to the completely cooled pumpkin and mix gently with a spatula until it incorporates nicely. The filling will become fluffy, creamy looking and lighter in colour.
- Place the first sheet into the tray, pierce with a fork to reduce air pockets and spread some semolina (it helps absorb excess humidity).
- Pour the pumpkin filling over the first dough sheet in the tray, then continue as explained above with the second sheet.
- Bake on the middle rake for 40-50 minutes. Allow cooling before slicing. Optionally dust with powdered sugar.
Notes
Autumn Pumpkin Delights
The post Easy Pumpkin Cake With Creamy Filling Recipe appeared first on The World Is an Oyster.
]]>The post How to Make Rustic Roasted Potatoes With Game Sausages appeared first on The World Is an Oyster.
]]>A Cosy Winter Dish
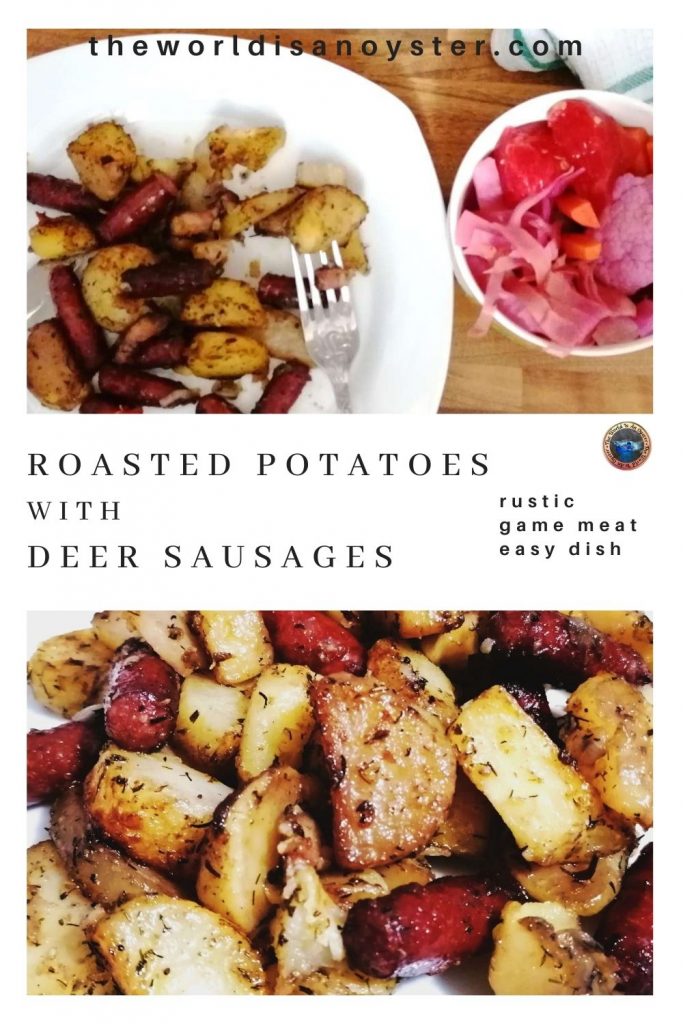
Rustic roasted potatoes with game sausages or traditionally prepared meats are a regular dish in any Romanian restaurant, especially in Transylvania.
This post may contain affiliate links, which means I will receive a commission if you purchase through my links at no extra cost to you. Please read the full disclosure for more information. Thank you!
I grew up in the magnificent city of Brașov, surrounded by mountains. The ski resort was only fifteen minutes away, so I would go up to the slops even without the intention to practise winter sports, but only for a hearty meal at one of the restaurants that would offer traditional foods. And take my word, there is no better, tastier and delicious food than the traditional Romanian!
I had this dish with small and big game, from pheasant and quail to wild boar, venison or deer, typical game around Transylvania’s forests.
Of course, the restaurants’ chefs would cook game meat in a country fashion, and make a big fuss about how they present the dishes. Even a beef salad would look totally unexpected as Romanians are incredibly fussy customers! Because we know what we want and how we want it and quality must always prevail, especially when we pay for it! Not that restaurants are expensive in Romania!
You will find this country listed at the top of the best and cheapest travel destinations in many travel guides. But don’t be mistaken; cheap does not mean low expectations! It’s just the way the country’s economy works, for the time being.

Back to my rustic potatoes, I had some smoked deer sausages in the freezer, and this gave me the idea to re-create a taste that I missed since travel was practically non-existent in the past year.
Just the thought of enjoying a meal I crave and can’t wait to travel to Romania to enjoy was enough motivation to get me cooking a traditional country dish.
Ironically, my sausages were an Austrian export from yet another European country with a famous alpine culinary tradition.
However, I live in the UK and recently read an article saying that British woodlands recorded a deer invasion.

There was no demand for venison with an intermittent lockdown in the past year and restaurants were forced to close.
As an effect, the deer population boomed and reached new records, the total number being at the highest it’s been in the past thousand years!
Imagine that! Not since Alfred the Great’s time have so many deer roamed freely through the British woodland!
My mind would always go way beyond. Imagine time-travel works. What would a proper Saxon lost in time through quantic physics and electromagnetic waves say about us? A population in millions, going to the butcher to buy meat that only requires a bow and arrow to hunt and a big fire to cook! Pretty twisted!
I wonder if Amazon sells bows and arrows? But then I would need a licence to hunt. Nah! I feel guilty if I have to kill a fly!
Most certainly, I would not look a deer in the eye and see sausages! I would not eat it!
When I have it delivered to the door in plastic packaging, it does not look like a murder happened to satisfy a gourmet whim. I can enjoy them in my rustic roasted potatoes and game sausages dish!
Our humble Saxon would be puzzled beyond imagination!
Ingredients for Rustic Roasted Potatoes With Game Sausages
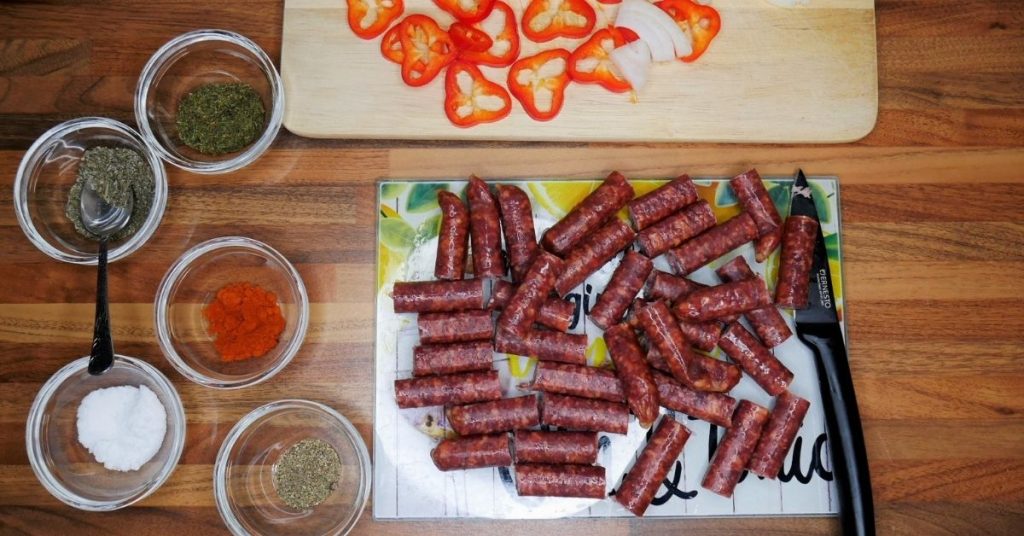
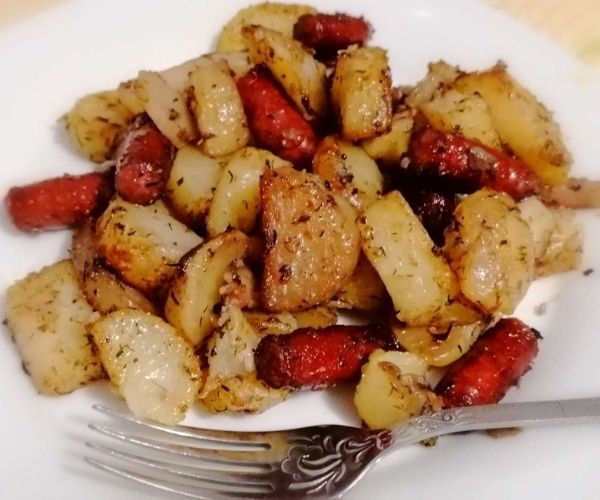
As the title suggests, the main ingredients in this recipe would be potatoes and game sausages – I had smoked deer sausages available. If you chose something else, make sure you follow the cooking instructions on the packaging.
A large onion
A few garlic cloves
A sweet pointed pepper (I only used it to give this dish some colour)
A glass of wine (to use in the actual cooking process; I’m not implying that you cannot enjoy one while cooking, too!)
Half a glass of extra virgin olive oil
Spices: black pepper, paprika, rock salt
Herbs: thyme and rosemary
Method
Wash and boil the potatoes for about 20 minutes. When ready cool, peel and cut the potatoes into equal wedges and place them in a large bowl.
Add spices and herbs and mix until they are nicely coated.
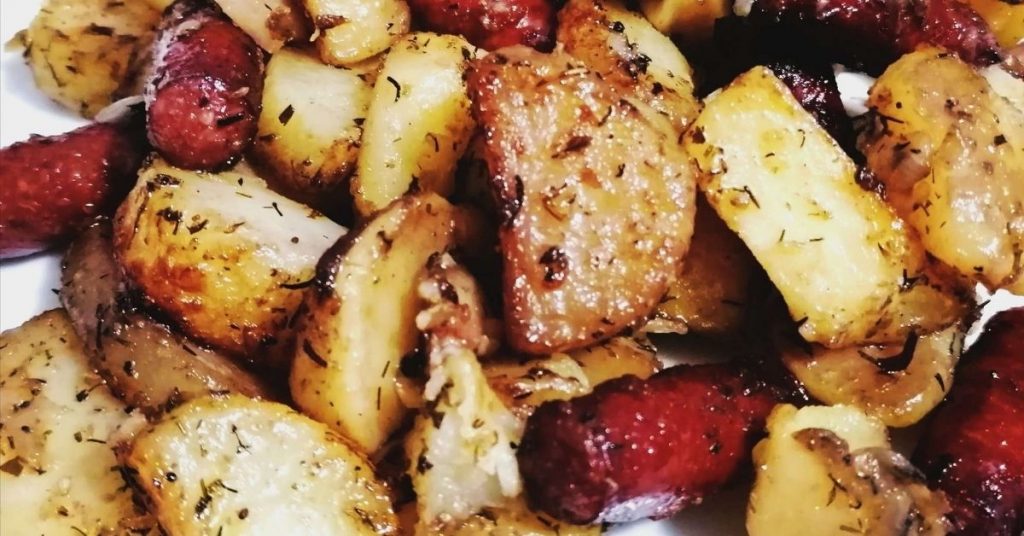
Place the potatoes into a roasting tray, sprinkle wine and oil and bake for about 30 minutes.
Add the sausages at the end, as they don’t need more than 5-10 minutes of cooking time if they are smoked. Watch they don’t burn! Charred meat (or any other food) contains a high amount of acrylamide which is connected with different types of cancer; best avoid it at all costs!
When ready, serve with sour cream if you wish or with freshly cut dill.

Rustic roasted potatoes with game sausages go well with a winter pickle salad if it happens to be at hand, or with a tomato salad. And a bottle of red!
Bon appetite!


Rustic Roasted Potatoes With Game Sausages
Ingredients
- 6 pcs deer sausage
- 6 pcs potatoes white or red, large
- 1 pcs onion large
- 5 cloves garlic
- 1 pcs sweet pointed pepper optional
- 4 tbsp olive oil extra virgin
- 1 glass white wine
- 1 tsp salt
- 1 tsp ground black pepper
- 1 tsp paprika
- 1 tsp thyme dry
- 1 tbsp dried rosemary
- 1 tbsp freshly chopped dill
- 3 tbsp sour cream optional
Instructions
- Wash and boil the potatoes for about 20 minutes. Use a large pan and make sure the water covers the potatoes.
- Preheat the oven to 200°C/400°F/gas mark 6.
- When the potatoes are ready, cool them under cold water, peel and cut them into wedges. Place into a large bowl.
- Chop or slice the onion (rings, halves or quarters, as you please), the poited pepper and the garlic cloves; add to the potatoes.
- Sprinkle all the spices, the wine and olive oil and mix well using a spatula until all the wedges are nicely coated.
- Place the wedges into a roasting tray and bake for 30 minutes.
- Cut the sausages into pieces.
- When the wedges are nearly ready, remove the tray from oven and add the sausages.

- Bake for another 10-15 minutes. Watch that the sausages don't burn.
- Serve warm with an assorted winter salad. Sprinkle with freshly cut dill and sour cream (optionally).

Notes
A Cosy Winter Dish
The post How to Make Rustic Roasted Potatoes With Game Sausages appeared first on The World Is an Oyster.
]]>The post How To Make Homemade Chocolate From Scratch appeared first on The World Is an Oyster.
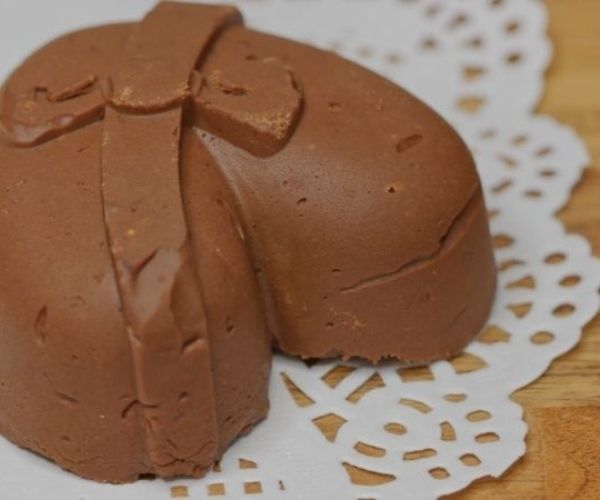
]]>The Best Chocolate Is Always Homemade!
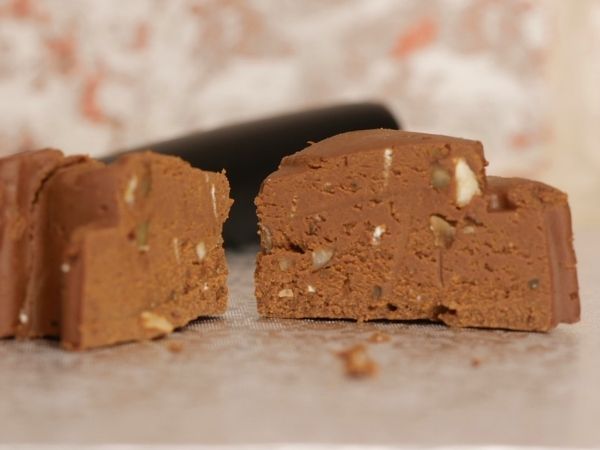
Homemade chocolate is the most delicious treat mom used to make when I was a child. Using simple ingredients and requiring little time and effort, homemade chocolate is easy to make from scratch, and the taste is divine!
The velvety softness and aromas will make you fall in love with it and prefer it over the classical bars, guaranteed!
This post may contain affiliate links, which means I will receive a commission if you purchase through my links at no extra cost to you. Please read the full disclosure for more information. Thank you!
Mom always saved it for special occasions, Christmas, Easter or birthdays, making it more desirable.
These days, homemade chocolate would make a perfect Valentine’s Day treat or gift or a unique addition to the special meals you would prepare for your loved ones on this occasion.
I make this sweet treat rarely, but I always prefer the scratch version rather than melting another already-made chocolate or making fudge.
Homemade Chocolate VS Fudge
Fudge might be the closest version to homemade chocolate, but it is not the same thing. The difference is the proportion of sugar used in fudge – way too much for my taste!
When I moved to the UK, I visited a candy shop and witnessed their fudge making. Although the location was picturesque and the fudge business very successful, I lost interest in the demonstration when the makers emptied an entire sack of white, refined sugar in the massive bowl they used for making fudge.
Anyone who cares the slightest bit about their health knows that refined sugar is a no-no. I will not debate here; there are enough facts easily accessible on the internet to make an informed choice.
I prefer coconut sugar for two main reasons: it is less refined than white sugar and is a healthier option than artificial sweeteners!
Besides, I always use it in small quantities. I never liked anything sickening sweet, and I understand that sugar is not a preservative, although there are enough people who believe so!
If you add 2kg of sugar to a kilogram of fruit when you make jam, for instance, it will not preserve it for longer but will surely make the jam sickeningly sweet!
Likewise, I use reduced sugar quantities in baking; I would rather taste other flavours besides sugar in my cakes!
Homemade Chocolate VS Chocolate Bar
Although I love dark chocolate, I am very selective with the brands I choose to buy. A sickly sweet one won’t do!
In time – and persistent tasting (Oh, I know, I was talking about health barely a minute ago, oops!) I settled mainly with German/Swiss/Austrian chocolate producers. And I will always pay a few pence extra for quality than still paying and not enjoying a bar of chocolate!
I want to feel the taste of cacao in my chocolate and distinct flavours, not tons of sugar that would diminish any other savour!
Because I am picky, I make my chocolate the way I fancy, and this offers me a variety of aromas to enjoy.
I love the punch pepper or chilly gives to chocolate, just as I enjoy a citrusy flavour or a boozy one. Plus, I relish hazelnuts, dried fruits or nougat crumbs in my chocolate.
It is so easy to adapt the recipe, and creativity is essential!
Who can say making homemade chocolate from scratch is no fun when you are free to experiment all you like?
It might get a bit messy in the process, but this is cooking: you are in your kitchen, not in a pharmaceutical production line! Enjoy the fun part and leave the chores for later! Or even better – persuade someone else to clean up; after all, you’ve already done your bit!
Ingredients:
Water
Organic coconut sugar
Organic cacao powder
Powdered milk
Unsalted butter
Flavours to your taste
Roasted hazelnuts (optional)
Method:
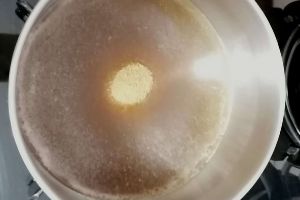
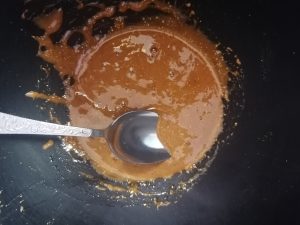
In a pan, boil the water with sugar for eight minutes until it becomes syrupy.
Add the cacao powder, mix well and continue boiling at low temperature for another four minutes. Stir occasionally so that it does not crystalise or stick to the pan.
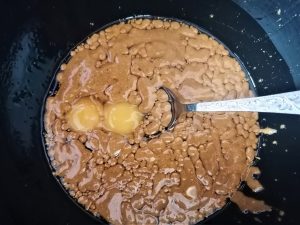
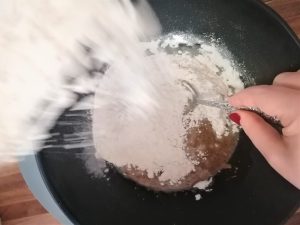
Remove the pan from the hob, add the powdered milk and mix well.
Depending on the type of powdered milk used, you might want to grind it before if it is too lumpy.
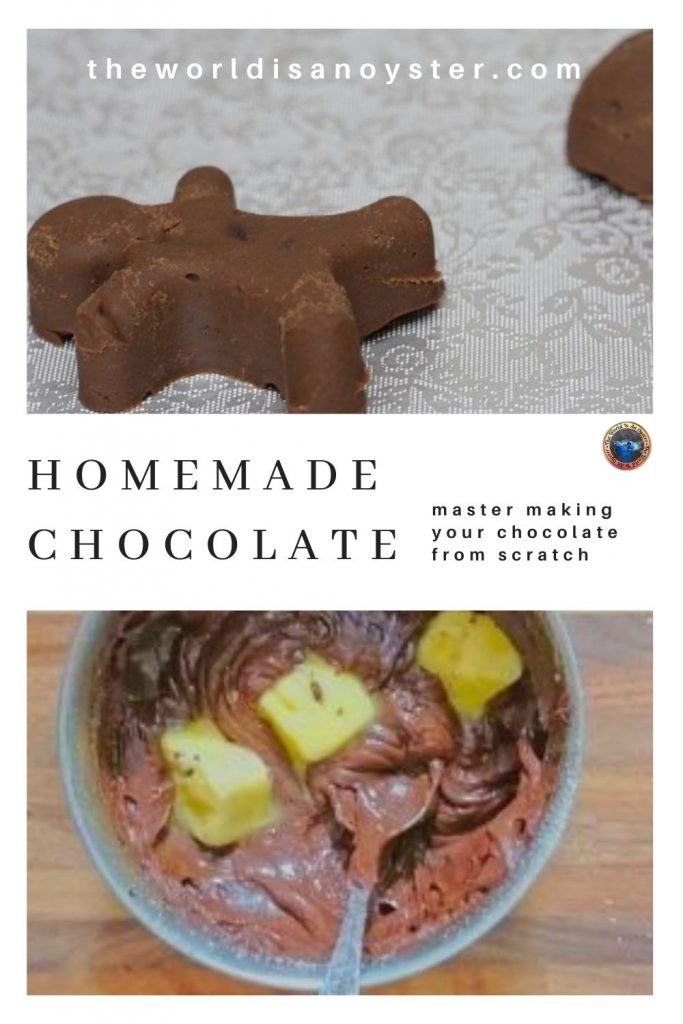
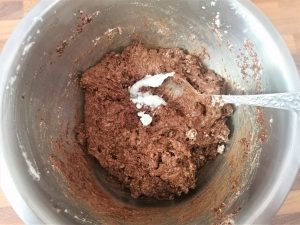
During this step, you will see how the powdered milk quickly absorbs the syrupy composition and thickens. The thickness will balance when you add butter. Keep mixing until all lumps dissolve and the consistency is of thick cream.
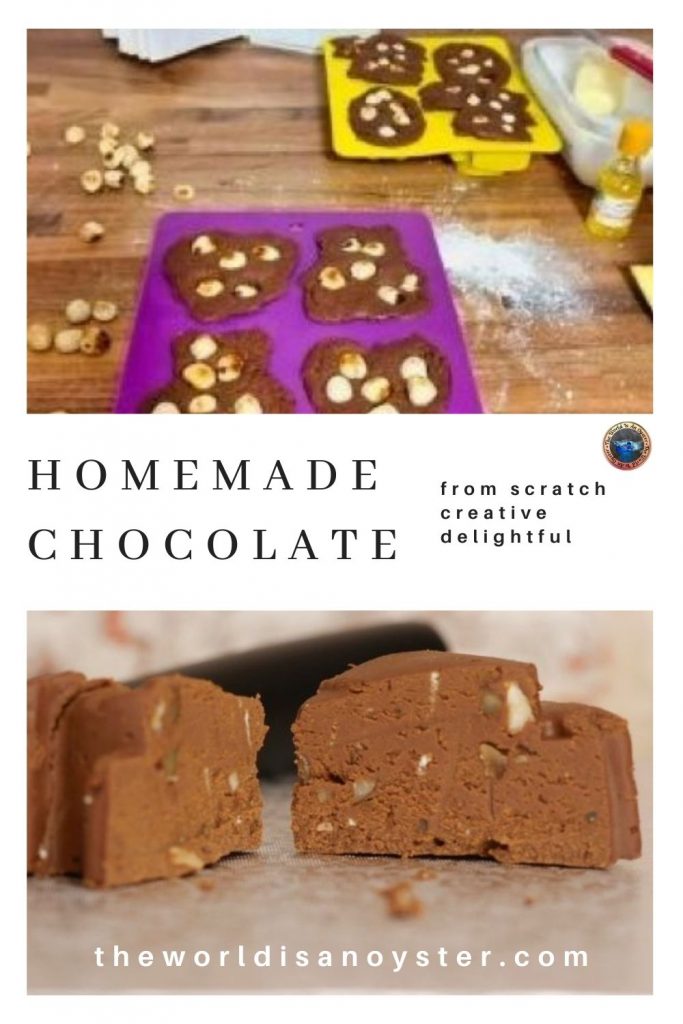
Add the butter and mix well. Optionally, add roasted crushed hazelnuts, dried fruits, or anything else you might think of that goes well with chocolate.
Add flavours of your choice, and feel free to experiment with small bits first to see if you want to go for that specific taste.
My favourite flavours are rum essence with a dash of ground pepper or orange essence with pepper. The choice is yours!
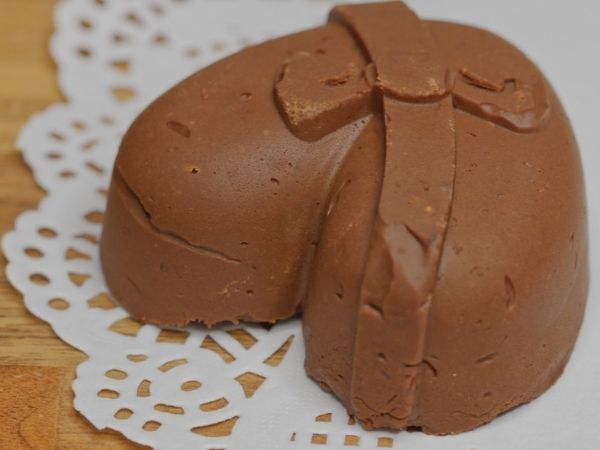
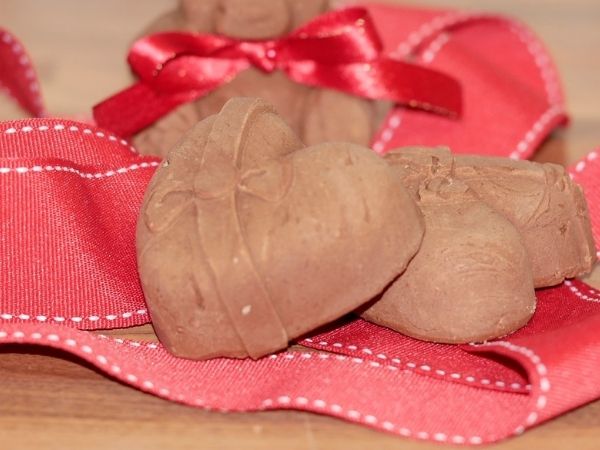
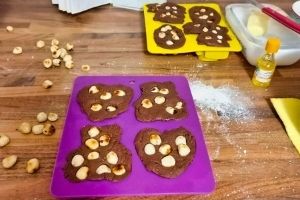
At this point, the composition should be malleable enough to pour in silicone moulds if you decide to go for unique occasion shapes.
If you are going for simple bar shapes, place parchment paper on a tray, empty the content from the pan and level nicely with a spatula.
Cool in the fridge for at least 4-6 hours, depending on the layer’s thickness. Overnight is better!
If you used shapes, carefully remove your chocolate from the silicone moulds. Otherwise, cut bars of desired thickness and enjoy when you are craving something sweet!

Homemade Chocolate
Ingredients
- 200 ml water
- 200 g coconut sugar organic
- 50 g cacao powder organic
- 200 g powdered milk (extra 30-50 g if needed)
- 100 g unsalted butter
- flavours of choice
- 60 g roasted hazelnuts optional
Instructions
- In a pan, boil the water with sugar for 8 minutes, until it becomes syrupy.
- Add the cacao powder, mix well and continue boiling at low temperature for another 4 minutes. Stir occasionally, so it does not crystalise or stick to the pan.
- Remove the pan from the hob, add the powdered milk and mix well. Depending on the type of powdered milk used, you might want to grind it before if it is too lumpy.
- During this step, you will observe that the powdered milk will quickly absorb the syrupy composition and thicken. Keep mixing until all lumps dissolve.
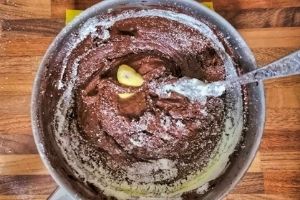
- Add the butter and mix well. Optionally, add roasted crushed hazelnuts.
- Add whatever flavours you wish. Try with small quantities first to see if you want to go for it. My favourite flavours are rum essence with a little dash of ground pepper or orange essence with pepper. The choice is yours!
- At this point, the composition should be malleable enough to pour in silicone moulds if you decided to go for special occasion shapes. Larger moulds work better than smaller; the Christmas shapes I tried were not quite successful because of this!
- If you are going for simple bar shapes, place a parchment paper on a tray, empty the content from the pan and level nicely with a spatula.
- Cool in the fridge for at least 4-6 hours, depending on the layer's thickness. Overnight is better!
- If you used shapes, carefully remove your chocolate from the silicone moulds. Otherwise, cut bars of desired thickness and enjoy when you are craving something sweet!
Notes
The Best Chocolate Is Always Homemade!
The post How To Make Homemade Chocolate From Scratch appeared first on The World Is an Oyster.
]]>The post Walnut Snails Recipe Inspired by a Famous German Pastry appeared first on The World Is an Oyster.
]]>How the Walnut Snails Recipe Made It to Mom’s Recipe Book
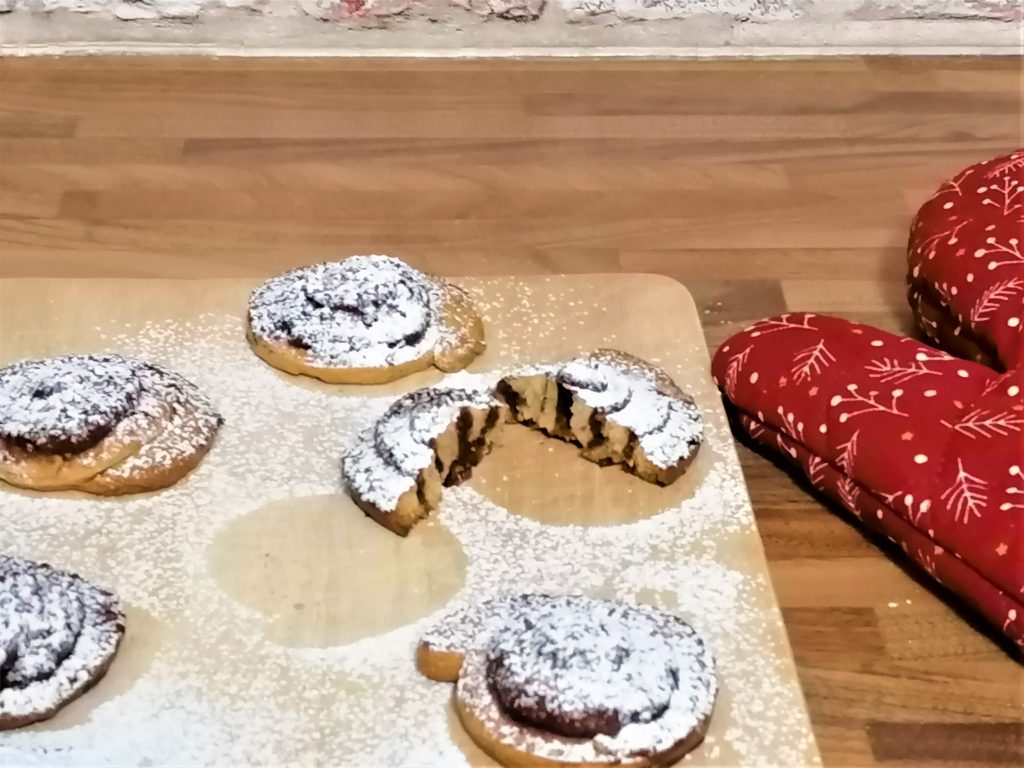
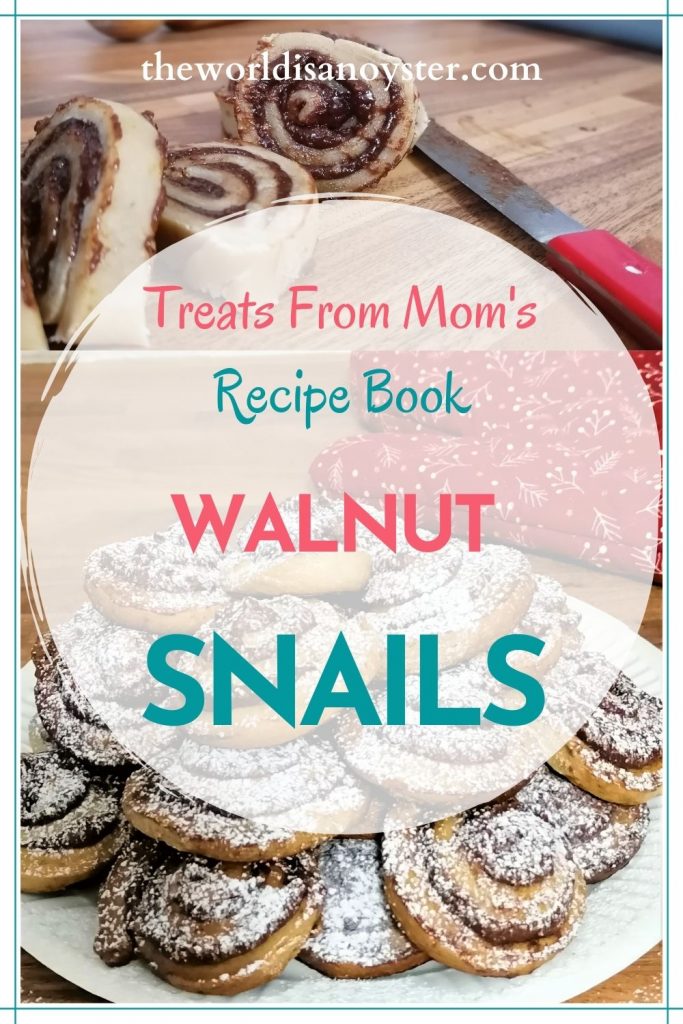
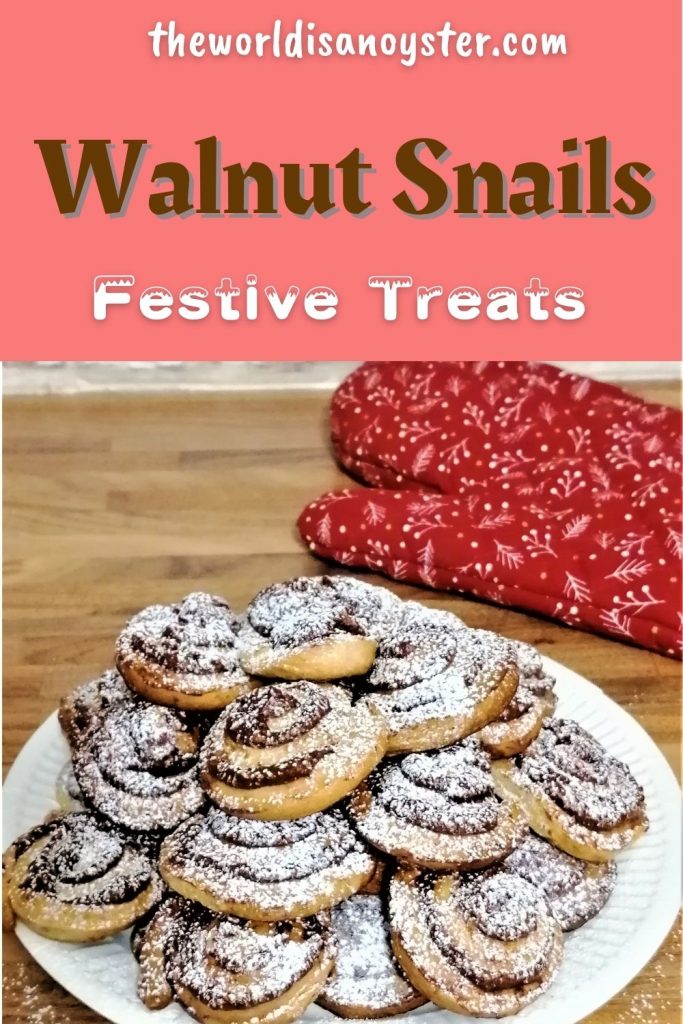
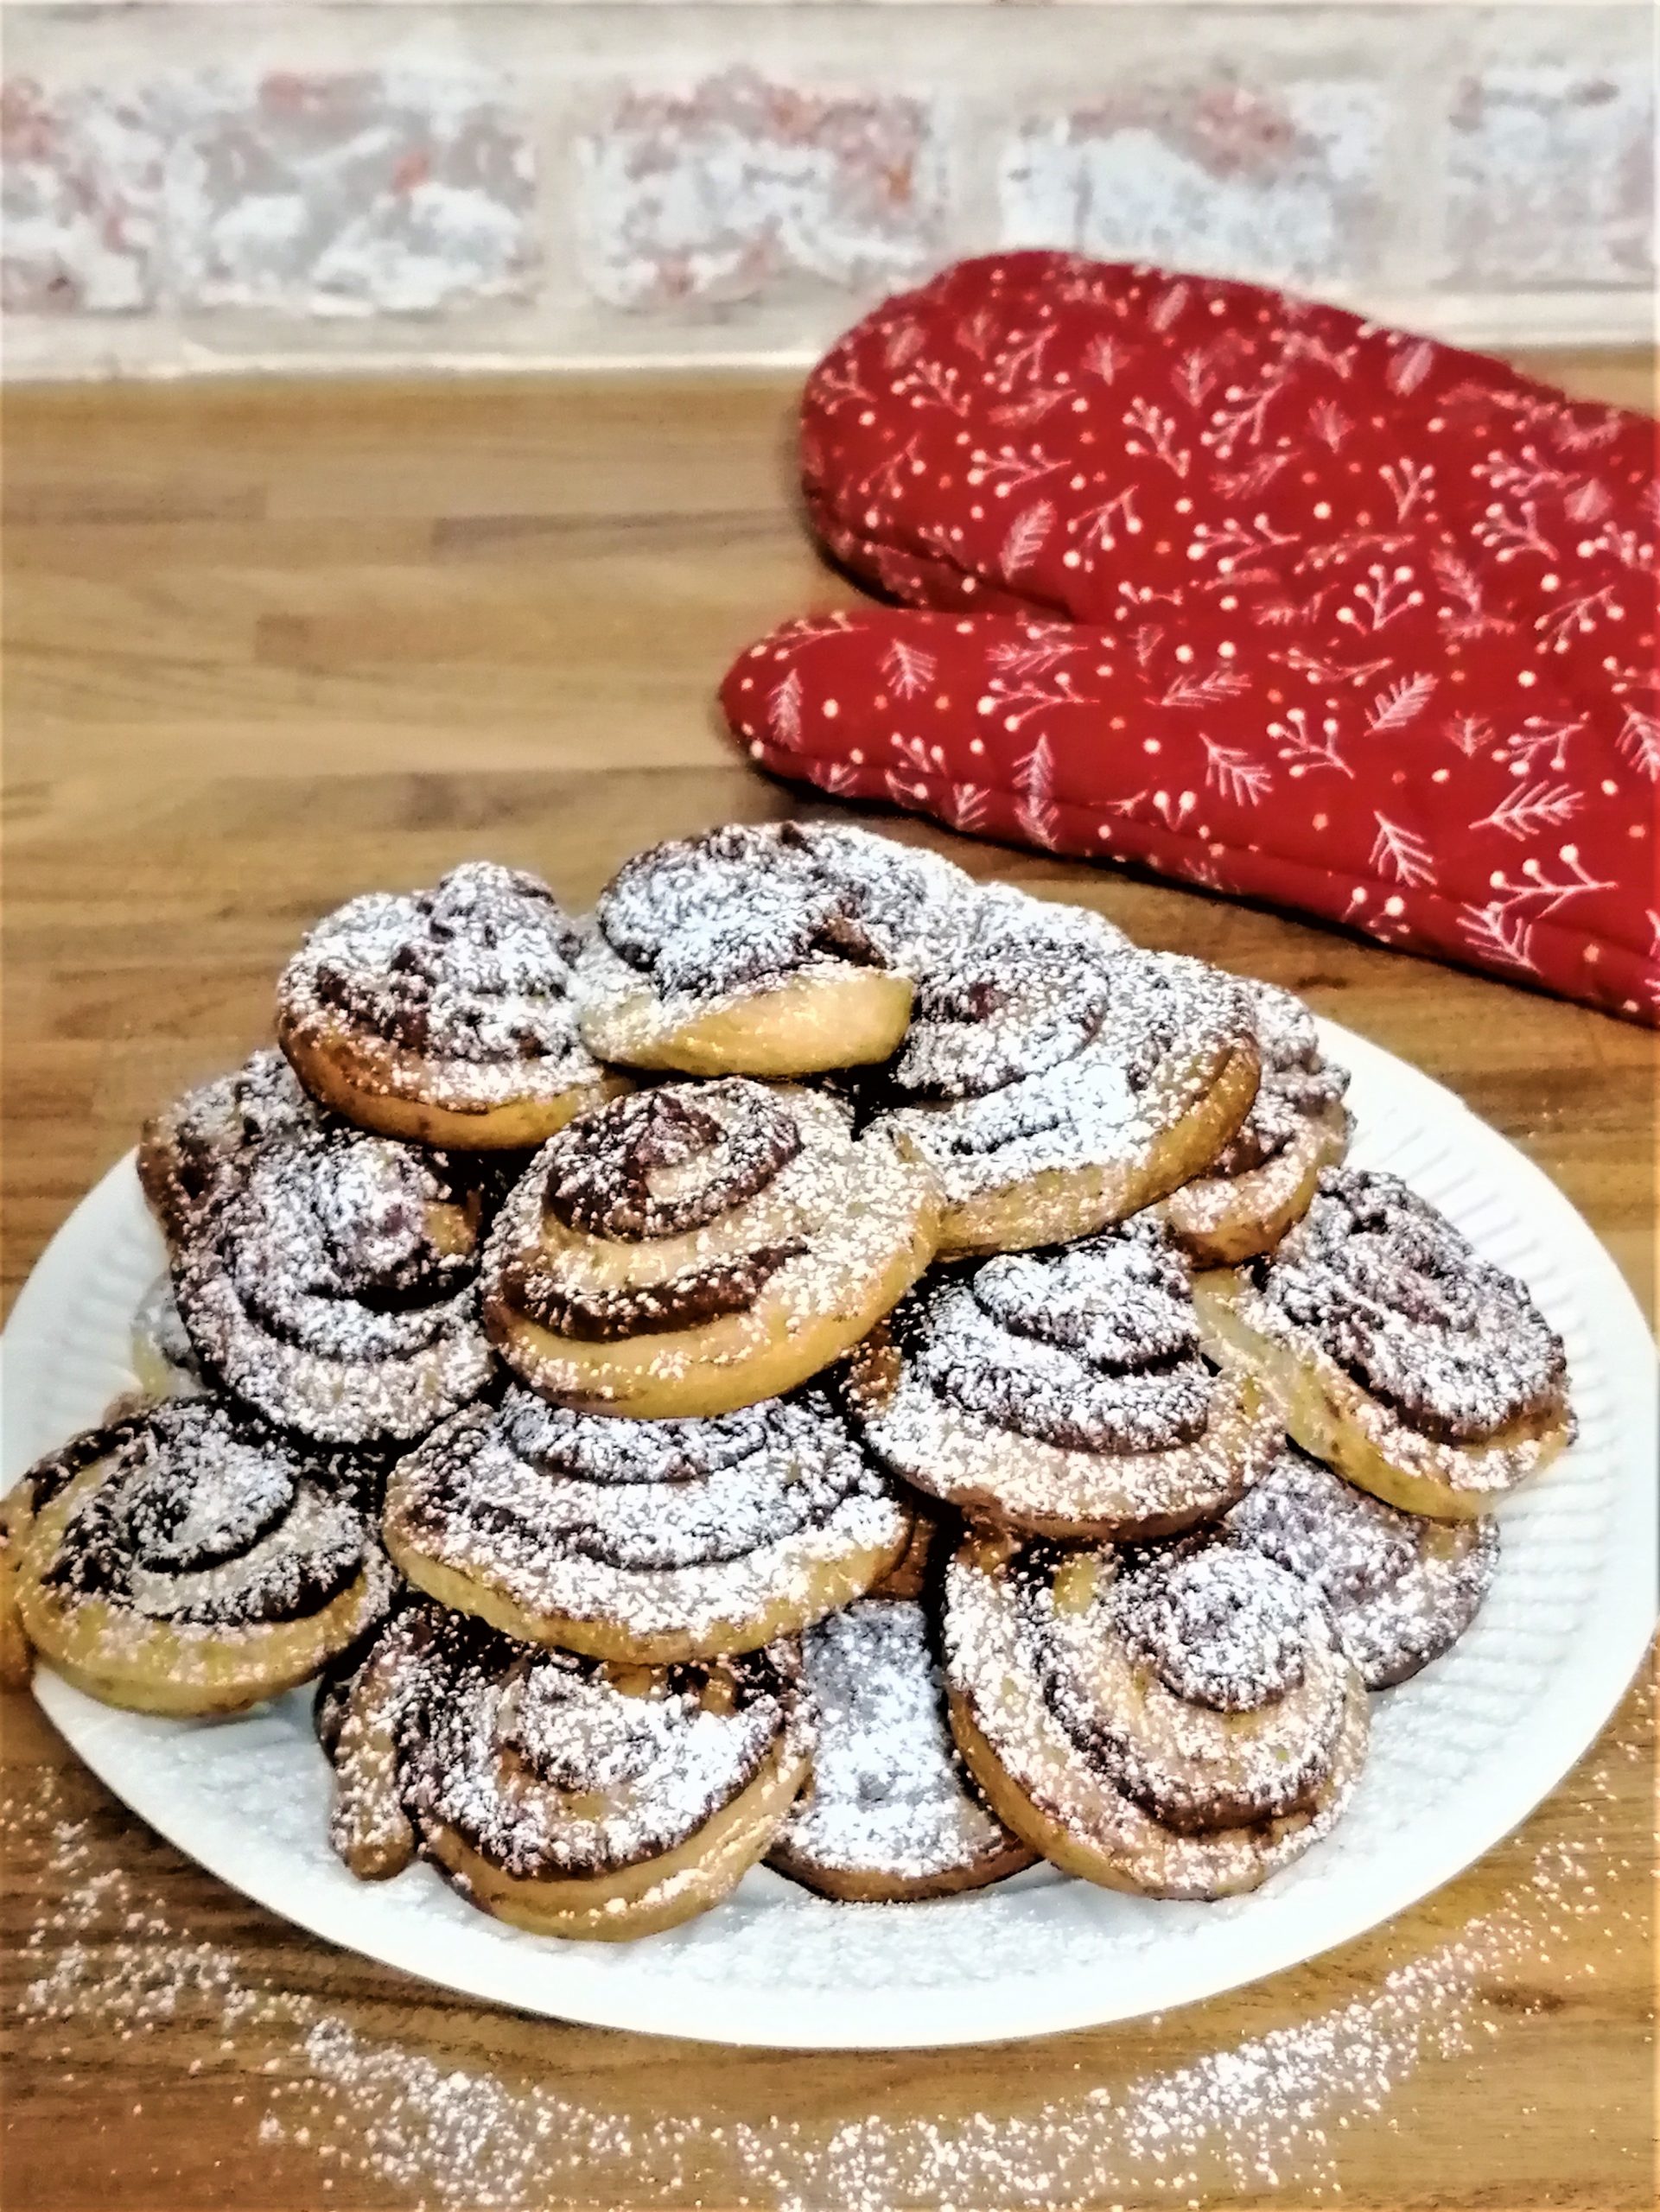
Mom’s walnut snails recipe is an adaptation of the Nussschnecken desert which is basically a sweet bun of Saxon origins, filled with nuts and cinnamon. Schnecken is the German word for snails, which suggests the unique shape of this finger-licking delicious walnut filled treats.
Given Transylvania’s Saxon heritage, our cooking and especially baking have seen a tremendous German influence over the centuries.
When I was a child, mom’s best friend was a German lady who used to bake weekly. She would always invite us to keep her company while she was dancing between the island in her massive kitchen and the oven, mixing ingredients and filling tray after tray. She was not dancing-dancing, but the elegant way she moved, her precision and amazing skills made it look like dancing in my awe-filled eyes.
Of course, the good lady always shared her recipes and many baking secrets with mom, who later shared everything she’d learnt with her kids – my sister and I.
Essentially, my mom had learned how to bake from Frau Francu – that was the lady’s name. Mom filled her first recipe book with mostly German recipes during that time, such as this delicious apple cake, one of my favourite desserts for special occasions.
I used to sneak into Frau Francu’s large kitchen and count the seconds until the first batch of whatever cake she was baking would come out of the oven.
Because I was born without patience, I could never wait for the cakes to cool properly. I would always pinch at least one and run outside to cool it in the wind (lame excuse, I know!)
I fondly remember how Frau Francu would bake four or five different and complex cakes in half a day every Saturday. She would always giggle as I was sneaking in to pinch samples from her trays. The lovely lady had no children and loved to see me around, as impish as I was.
If I regret one thing from those good old times is that whenever Frau Francu wanted to teach me German, I would bolt out the door pretending that I needed to play in her vast garden.
I regretted that the minute the Romanian Revolution of 1989 changed our contemporary history and freed our country of communism. I was very young, still a teenager, but I would have had a chance to move to Germany a few years later and radically change my life.
Now, a few decades on, the only thing that is still preventing me from doing just that is again the fact that I can’t speak German. Although I am fluent in five other languages, I’ve lost the train to learn what should have been the most important foreign language to me.
Ironically, now I have the liberty to choose where I want to live, but the language barrier still makes the choice difficult. Ugh, one day …
Mom’s Walnut Snails Recipe – Ingredients
The adaptation mom made of Nussschnecken means that instead of getting the giant, fluffy snails the size of a dessert plate, she would make them smaller and would not smother them in sticky sirup, so we could eat them the same way we’d eat biscuits.
I would always bake these treats around the festive winter season or at Easter time and all family anniversaries. We can never have enough of it!
Ingredients for the dough
400 g flour (I always use white organic)
100 ml melted organic butter
100 ml melted organic coconut oil
2 organic egg yolks (you will use the whites later, for the filling)
80 g organic coconut sugar (about 6-8 tbsp)
5 g dried yeast (1 tsp)
½ tsp ammonium bicarbonate
3-4 tbsp tepid unsweetened almond milk (to activate the ammonium bicarbonate)
Organic orange zest
A pinch of salt
Ingredients for the filling
150 g ground walnuts
2 tbsp organic cacao powder
1 tbsp ground cinnamon
2 egg whites + a pinch of salt
Rum oil essence
Preparation tips
The dried yeast requires a warm temperature and time to activate. For this recipe, use the lukewarm milk to activate the ammonium bicarbonate first, then pour it over the yeast mixed with sugar and one tbsp of the flour quantity. Cover with a dry towel and leave aside for about 20 minutes. When the time is up, you will observe that the yeast had dissolved and the pre-dough had increased in volume.
Secondly, any dough that uses melted oils needs refrigeration to solidify the oil molecules and make it easier to roll the dough. When your dough is ready, cover it in cling film, press it down to allow a quicker and thorough cooling and place it in the fridge for about 20 minutes. Meanwhile, you can prepare the filling.

As the title suggests, this recipe includes allergens.
Mom’s Walnut Snails Recipe
Equipment
- Large bowl/small bowl
- Baking tray
- Parchment paper
- Roller pin
- Hand held electric mixer
Ingredients
For the dough
- 400 g organic white flour
- 100 ml melted butter (cooled a bit)
- 100 ml melted organic coconut oil (cooled a bit)
- 2 pcs egg yolks (the whites needed for the filling)
- 80 g organic coconut sugar (approx. 6-8 tbsp)
- 5 g dried yeast (approx. 1 tsp)
- ½ tsp ammonium bicarbonate
- 4-5 tbsp tepid almond milk (unsweetened)
- 1 pcs orange zest
- A pinch of rock/sea salt
For the filling
- 150 g ground walnuts
- 5-6 tbsp organic coconut sugar
- 2 tbsp organic cacao powder
- 1 tbsp ground cinnamon
- 2 pcs egg whites (beaten stiff)
- A pinch of salt (for the egg whites)
- 1 vial rum oil essence (or 2 tsp rum)
Instructions
Prepare the dough
- In a bowl, use the lukewarm milk to activate the ammonium bicarbonate first, then pour it over the yeast mixed with sugar and one tbsp of the flour quantity.
- Cover with a dry towel and allow the yeast to activate for about 20 minutes.
- Add the tepid butter and coconut oil, egg yolks, orange zest and salt and mix until all ingredients incorporate nicely.
- Add the sieved flour gradually and keep mixing using your hand.
- Cover the dough with a piece of cling film, press it down and refrigerate for about 20 minutes.
- Divide the dough in two parts and roll each in a 2-3 mm thick sheet.
Prepare the filling
- While the dough is cooling, in a bowl mix the ground walnuts with sugar, cacao powder, cinnamon and rum.
- Separately, add a pinch of salt to the egg whites and whip until stiff. Use a large bowl and start with a lower speed until the egg whites foam, then increase the speed to maximum and continue whipping until they become firm.
- Slowly incorporate the egg whites into the dry ingredients.
Prepare the snail shapes
- Preheat the oven to 180°C/356°F/Gas mark 4.
- Place parchment paper on the baking tray.
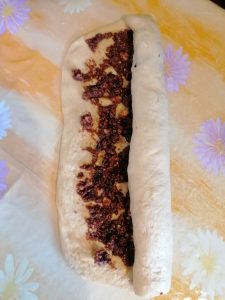
- Place half of the nut filling on the first dough sheet. Spread evenly, leaving about 2 cm filling-free at one edge.
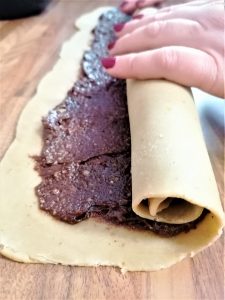
- Roll the sheet and cut 1 cm thick slices.
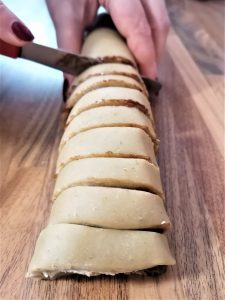
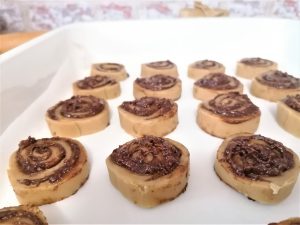
- Transfer the slices onto the baking tray, leaving enough space in between them.
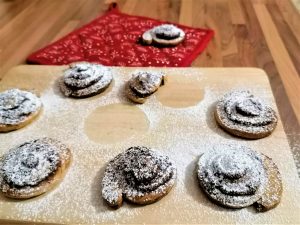
- Bake for 10-15 minutes or until the dough turns golden brown.
- Allow the first batch to cool and repeat the baking process until all the walnut snails are ready.
- Optionally, sprinkle with powdered sugar.
Notes
I hope you enjoyed reading this recipe. If you would like to see more, please check the Savour the Flavour section of this website or follow my Pinterest recipe board. Have fun baking!
How the Walnut Snails Recipe Made It to Mom’s Recipe Book
The post Walnut Snails Recipe Inspired by a Famous German Pastry appeared first on The World Is an Oyster.
]]>The post How to Make the Best Festive Appetizer: Beef Salad appeared first on The World Is an Oyster.
]]>A Romanian Salad, French in Name and Historically Having Almost Nothing to do With What’s in the Title!
If it sounds a tad confusing, here’s the disambiguation:
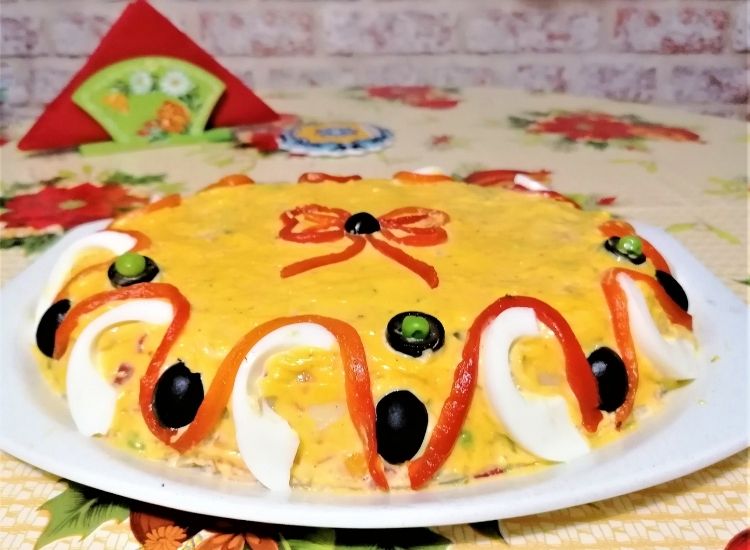
Romanians like many things but absolutely LOVE food; therefore, they create dishes that everybody loves to try and often become traditional foods for holidays. A beautifully looking festive beef salad is an appetizer always present on the Christmas, New Year’s Eve and Easter festive table!
This post may contain affiliate links, which means I will receive a commission if you purchase through my links at no extra cost to you. Please read the full disclosure for more information. Thank you!
The story of Boeuf Salad, as we call it, has been initially a simple “game in mayo” dish about two hundred years ago. In time, the pheasant was replaced with beef and the French name (Boeuf) stack for unclear reasons.
It might have to do with French being spoken mainly among Bucharest’s high society in the twentieth century’s interbellum period. In that era, Bucharest, the capital city, was frequently called Little Paris.
Today, beef salad has any meat in it, and I usually prepare it with chicken.

Now, because Romanians are also incredibly superstitious, there is a strong argument against eating chicken on the first day of the year. Unless you want to be going backwards the entire year, sort of like chickens scratching the ground and thus creating the back-walking illusion!
No, we don’t want that! This is why we eat fish on January first so that we are slick and quick in our endeavours like a fish in the water!
If the argument is not strong enough, you can still use chicken in your Boeuf, but after the year we’ve had, are you really willing to take the risk?
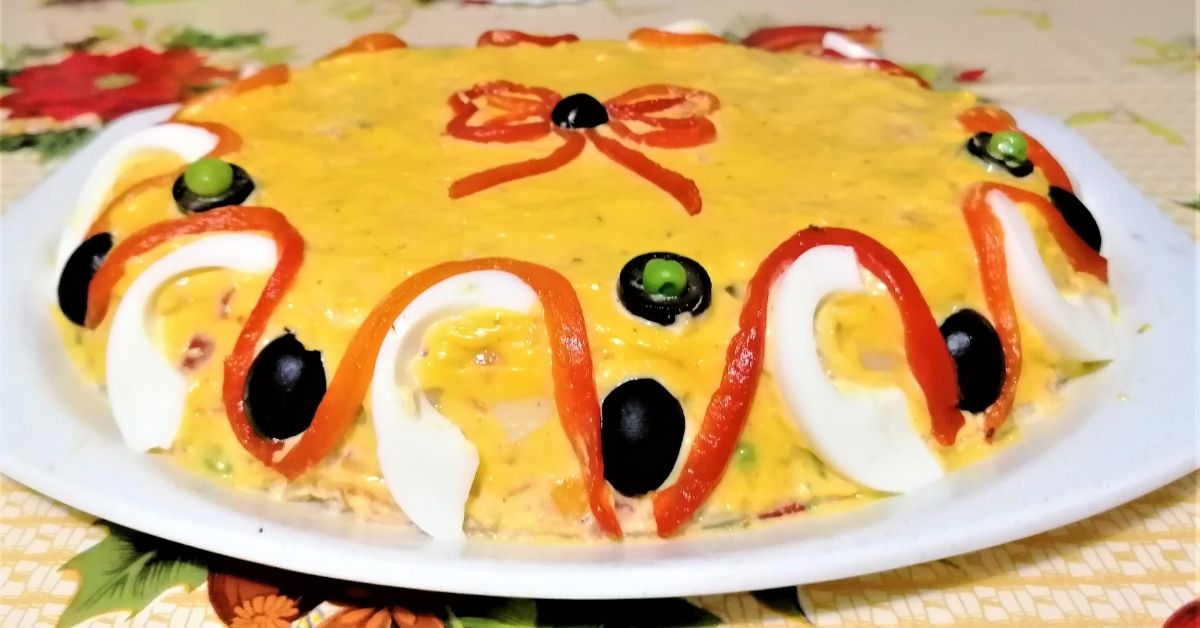
Boeuf salad is mainly an appetizer made with boiled vegetables (potatoes, carrots, celeriac, peas, parsley) mixed with pickles (gherkins, bell-peppers) and a dollop of mayonnaise.
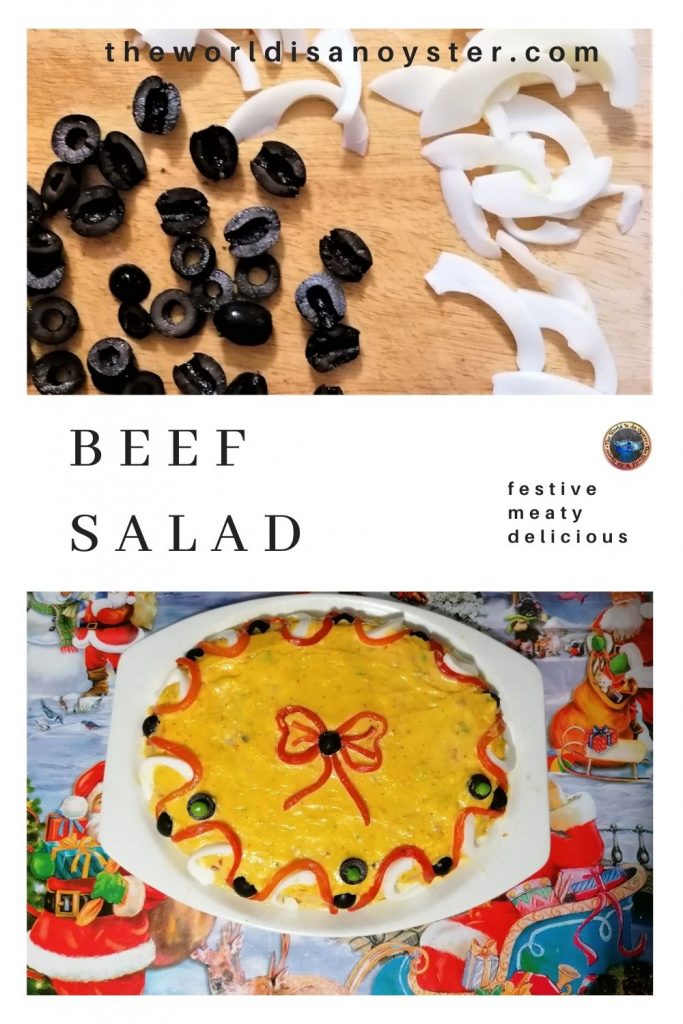
The best part of making this festive beef salad is that anyone can release their inner artist and go crazy with decorations. I like to use halved olives, boiled egg whites, finely cut pickles, but the list does not stop here. Be creative; it’s fun!
What is important is that a large plateau of this unique appetizer is always present on each Romanian festive table, and every New Year’s Eve dinner starts with it. So does the Easter dinner!
Any normal year, Romanians would go crazy partying until the sun would come up on January first. The restaurants, hotels, boarding houses and any other place that can hold festive parties would be fully booked since August.
In the crazy second year of the pandemic, this will not happen for the second time in our recent history. It sounds surreal and completely alien. But it does not mean that we won’t set the table in the evening, imagine we’re at a monster New Year’s Eve party, the music is blasting in the speakers and the fireworks will go any minute above our house!
We better make it be the last time as well! Nobody will forget these past two years, but we should learn something from history and never allow a repeat!
Ingredients for festive beef salad
Potatoes
Pickles (bell peppers, cornichons)
Diced beef
Carrots
Celeriac
Parsnip
Green peas
Mayonnaise
Pitted olives
Eggs
Spices (salt, black/green pepper)
Method
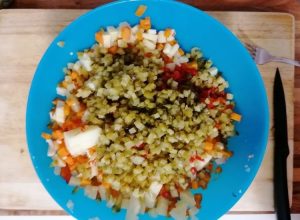
In a large pan, boil the meat first, changing the water at least once. If you use diced beef, the boiling time should be at least 10-15 minutes. If the beef chunk is bigger, it is better to dice it into smaller pieces.
Add the peeled carrots, celeriac (quartered), parsnips and potatoes and boil until ready. Check with a fork that everything is thoroughly cooked.
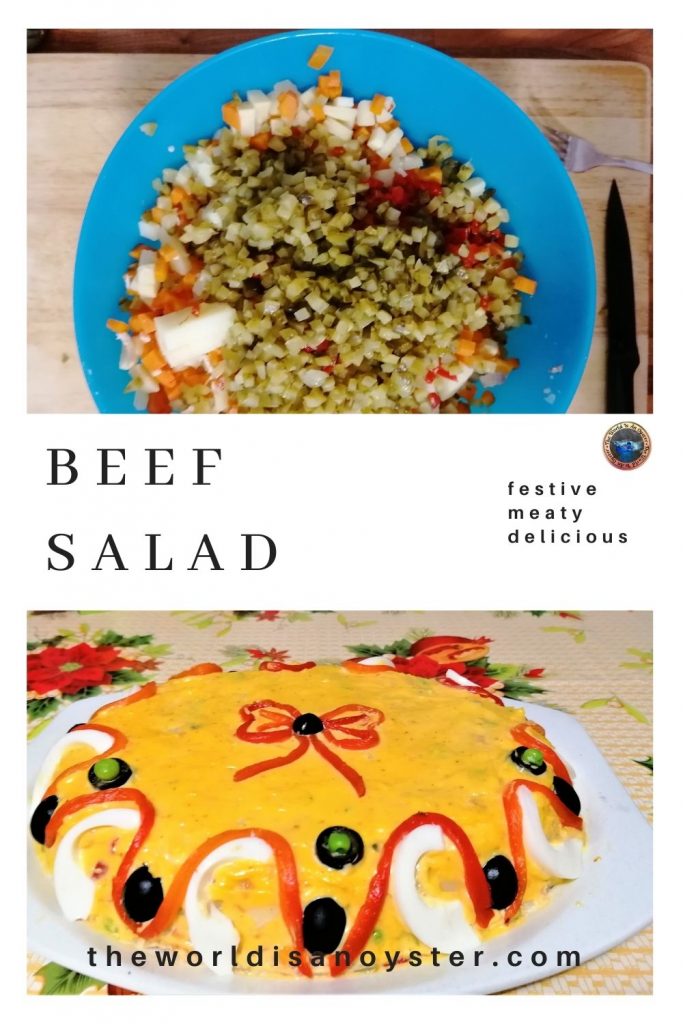
On a large chopping board, chop all the vegetables (after they cool down) and mix in a large bowl (or a large pan.)
For food safety, use a different chopping board to chop the meat. Place the beef into the mixing bowl with the vegetables.
Drain the pickles, save a few for decorating and finely chop the rest. Squeeze out the excess liquid before adding them to the mixing bowl.
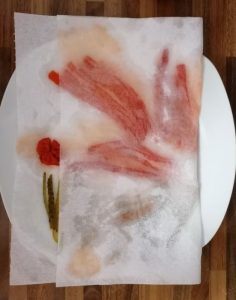
Finely cut long pieces of pickles and place them on a piece of absorbent paper. Leave aside until you get to the decorating part.
Boil the eggs for at least 6 minutes until hard, peel and remove the yolks. You will only need the whites, finely cut, to decorate the salad.
Cut the olives in halves or rings and leave them aside with the pickles.
Empty half of the mayo jar onto the chopped vegetables, add mustard, salt and pepper and mix with a large wooden spoon without crushing it too much.
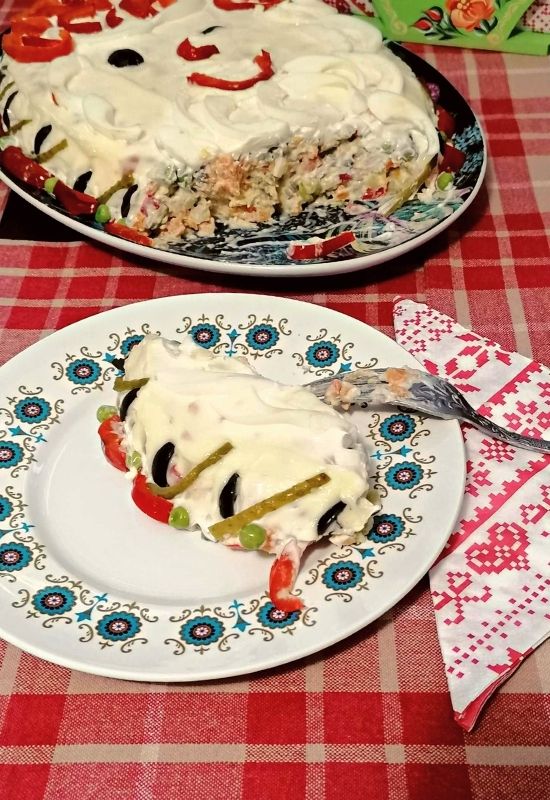
Place the festive beef salad mix on a large plateau and use a knife to give it a beautiful, regular shape.
Use the rest of the mayo to cover the salad, top and side.
Decorate with the finely chopped pickles, egg whites, olives and boiled peas.
Refrigerate before use and serve it cold alongside the main dish.
Enjoy your festive beef salad and have a great holiday season!

Festive Beef Salad
Ingredients
- 6-7 large potatoes
- 4-5 carrots
- 1 celeriac
- 2-3 parsnips
- 300 g peas
- 500 g diced beef
- 1 jar mayonnaise (small, about 250 g)
- 2 tbsp mustard
- 1 jar pickled gherkins
- 1 jar pickled bell-peppers
- 15-20 pitted olives
- 1-2 eggs
- sea salt
- pepper
Instructions
- In a large pan, boil the meat first, changing the water at least once.
- Add the peeled carrots, celeriac (quartered), parsnips and potatoes and boil until ready. Check with a fork that everything is thoroughly cooked.
- On a large chopping board, chop all the vegetables (after they cool down) and mix in a large bowl (or a large pan.)
- For food safety, use a different chopping board to chop the meat. Place the beef into the mixing bowl with the vegetables.
- Drain the pickles, save a few for decorating and finely chop the rest. Squeeze out the excess liquid before adding them to the mixing bowl.
- Finely cut long pieces of pickles and place them on a piece of absorbent paper. Leave aside until you get to the decorating part.
- Boil the eggs for at least 6 minutes, peel and remove the yolks. You will only need the whites, finely cut, to decorate the salad.
- Cut the olives in halves or rings and leave them aside with the pickles.
- Empty half of the mayo jar onto the chopped vegetables, add mustard, salt and pepper and mix with a large wooden spoon without crushing it too much.

- Place the mix on a large plateau and use a knife to give it a beautiful, regular shape.
- Use the rest of the mayo to cover the salad, top and side.
- Decorate with the finely chopped pickles, egg whites, olives and boiled peas.
- Refrigerate before use.

Notes
A Romanian Salad, French in Name and Historically Having Almost Nothing to do With What’s in the Title!
The post How to Make the Best Festive Appetizer: Beef Salad appeared first on The World Is an Oyster.
]]>The post Romanian Cozonac: The Best Treat on Your Festive Table appeared first on The World Is an Oyster.
]]>A Culinary Delight with A Long History
A Word About Romanian Cozonac
Romanian Cozonac is a beautiful festive delight I grew up with as a child in my country of origin.
Each major holiday mom would bake the best treat there could be. Be it Christmas or Easter, our house would smell wonderful, filled with delightful flavours escaping from the oven. And I would wait impatiently for the festive dinner to finally savour the best treat created by humankind!
This post may contain affiliate links, which means I will receive a commission if you purchase through my links at no extra cost to you. Please read the full disclosure for more information. Thank you!
The ladies of Romania, especially in the countryside, would take at least half a day before a holiday to bake lots of cozonaci (plural [cozonach]) for the festive dinner, and mom is still not an exception.
How Cozonac Evolved During the Ages
Based on bread baking and using a raised dough, cozonac (kozunak in Bulgarian, or Panettone in Italian) has seen a long history, going back to pharaohs’ old times.
Apparently, the ancient Egyptians made fermented dough sweetened with honey they would bake in ovens, as shown in some wall paintings.
The ancient Greeks also made honey-sweetened bread they would fill with nuts and call plaukos.
The more advanced and ever so posh Romans have improved the recipe by adding eggs, butter and dried fruits.
In Middle Age Europe, dried fruits would mostly fill the sweet loaves of bread because they lasted longer.
In England, a mention dates from 1718 of a sweet bread filled with dried fruits and baked in long, thin loaves – the shape primarily used today.
In France, the famously infamous Marie Antoinette remained in history with her uninspired advice to the poor to eat brioche if they could not afford bread. The said brioche seems the be our same delight. Unfortunately, she paid with her head for her lack of touch with her country’s harsh reality!
By the nineteenth century, cozonac became a traditional holiday treat around Europe with slight recipe variations.
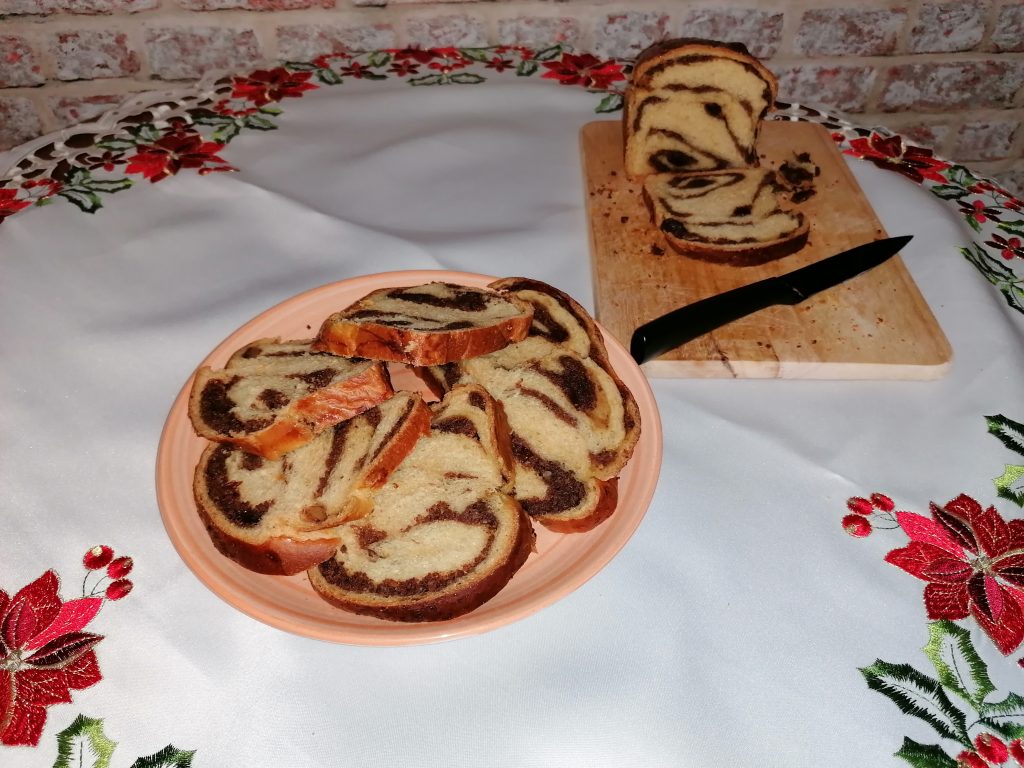
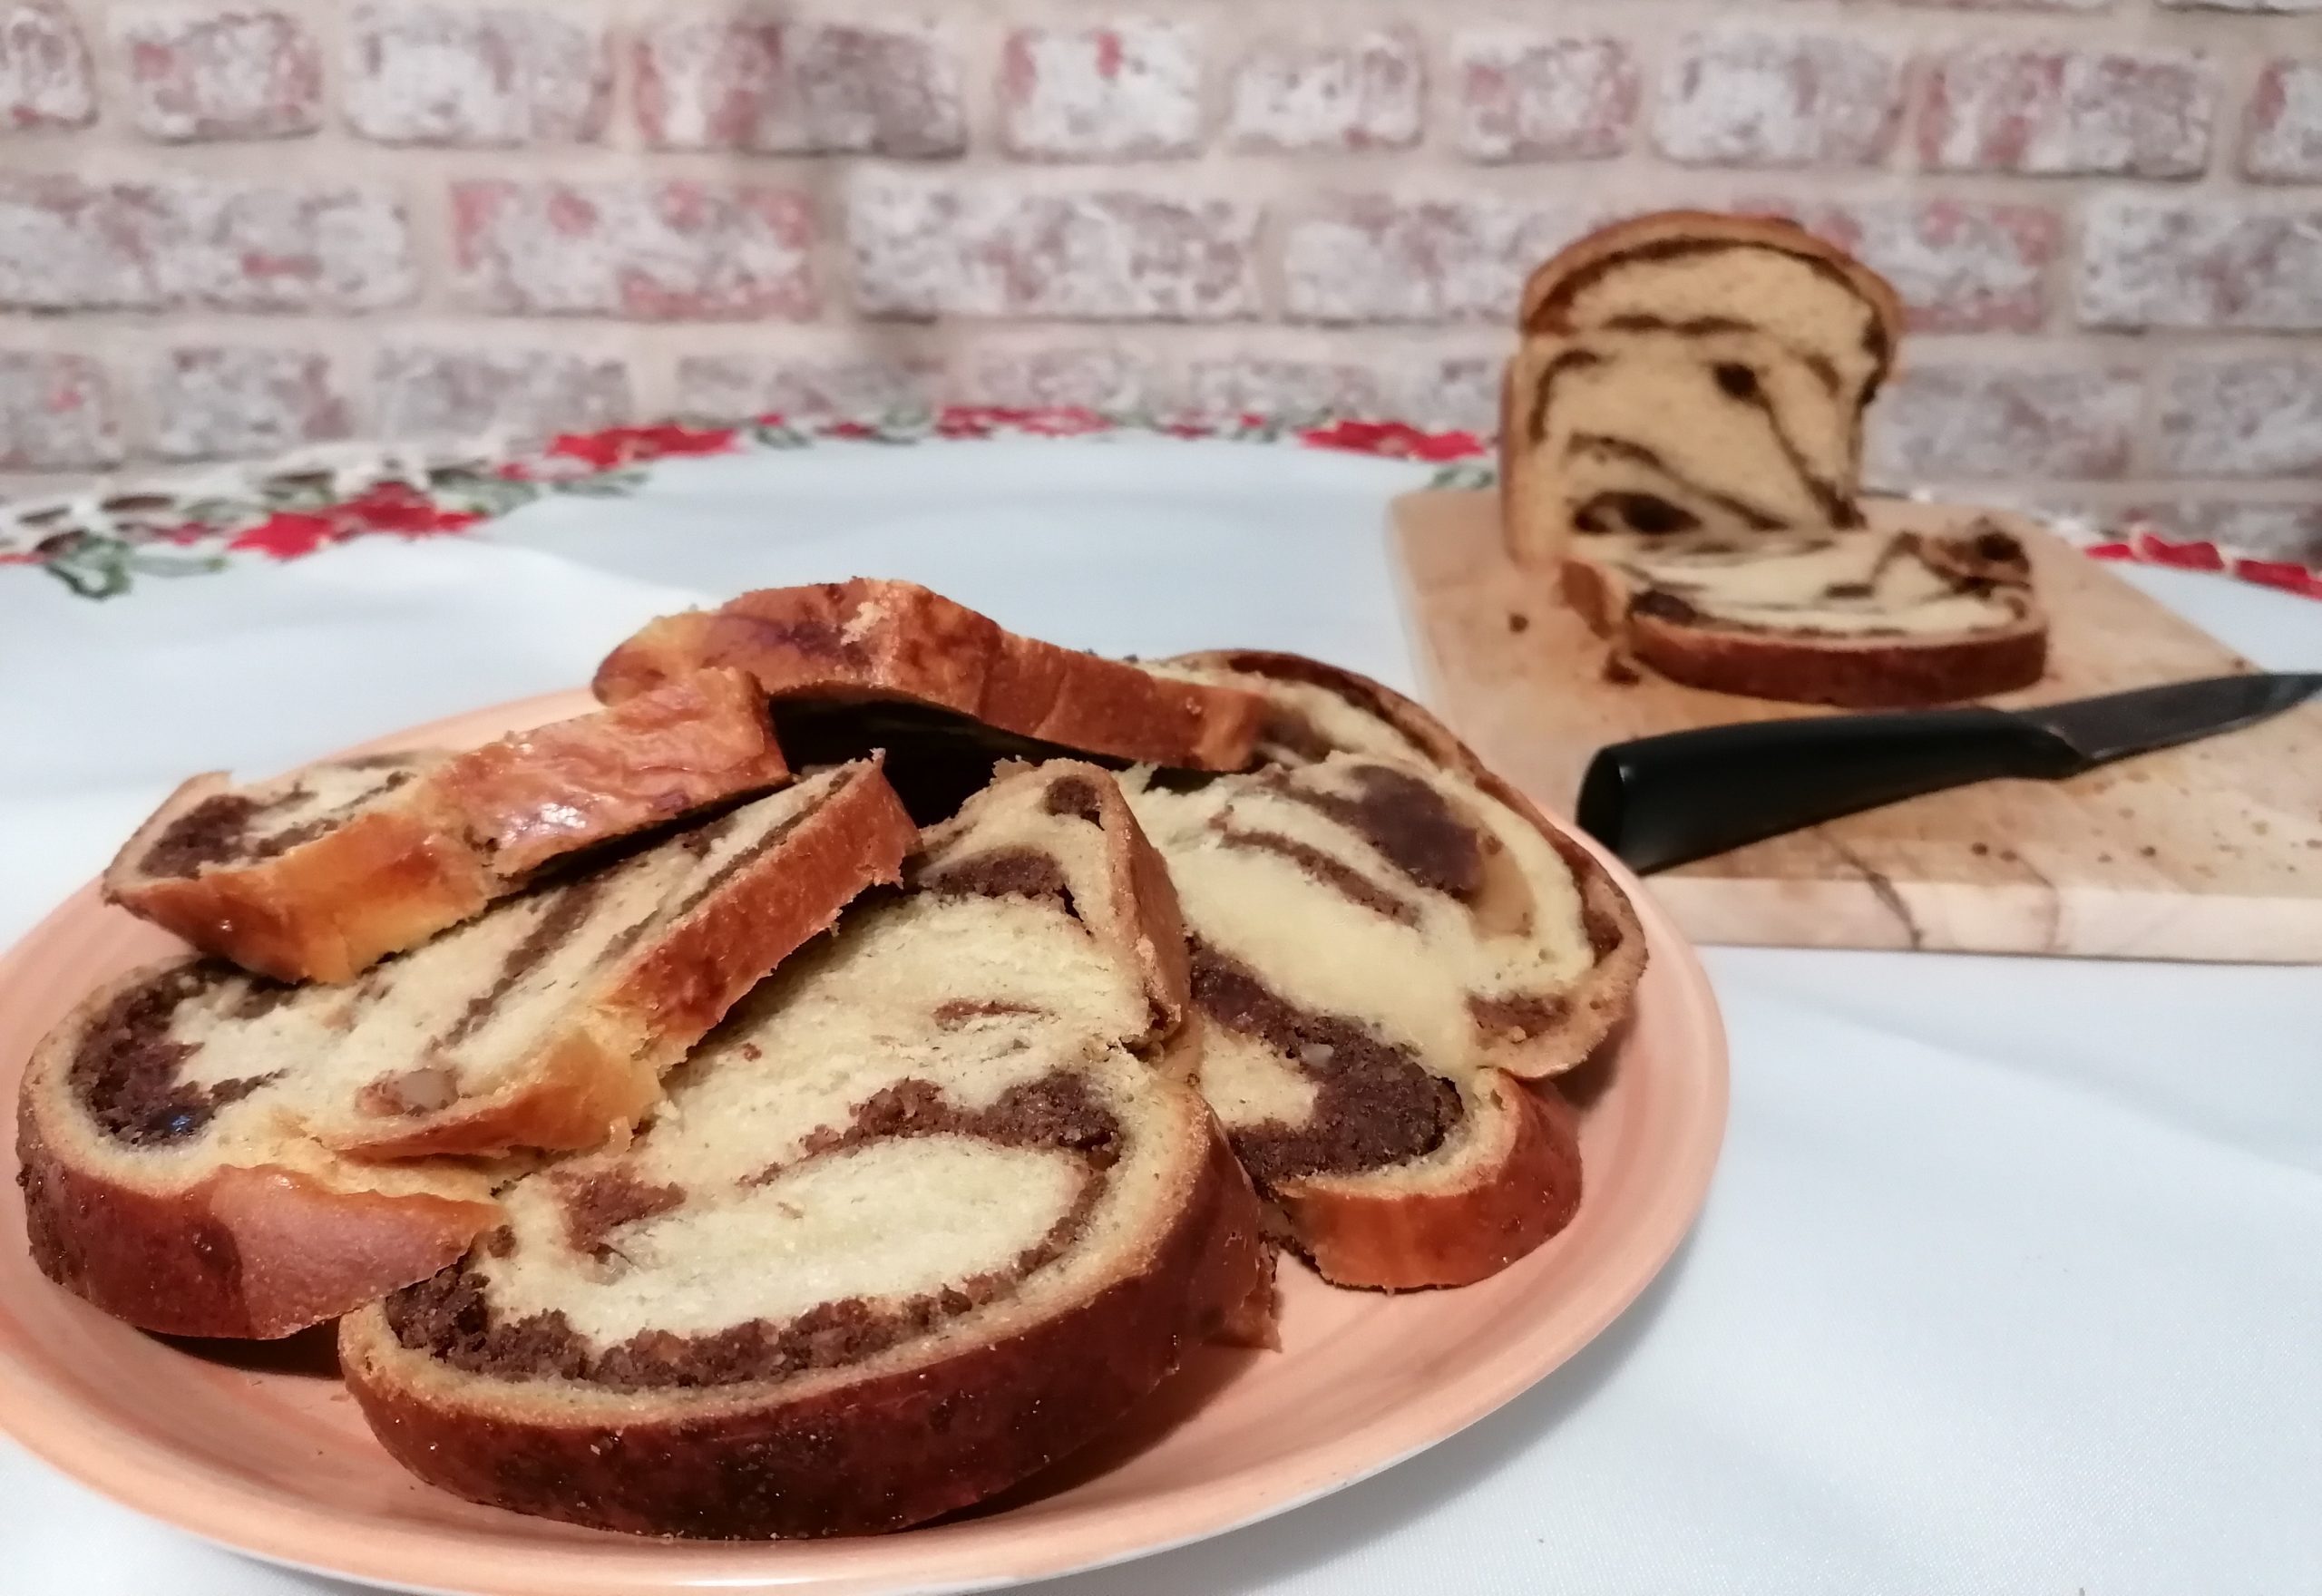
To any Romanian, the presence of cozonac on each festive dinner table is an absolute must.
In recent years, cozonac, like anything else, has become a commodity sold in supermarkets.
But most Romanian ladies would still bake it at home using different types of filling, from walnuts to poppy seeds, Turkish delight or chocolate. These last three ingredients also make a perfect substitute for nuts for persons with an allergy.
To me, Romanian cozonac is the best festive treat there can be, and I can never get enough of it!
You can offer me the most elaborated sweet made by the most in-demand French pastry chef at a fancy king’s court, and I would always choose cozonac! Nothing beats the aromas that fill the air when you bake it and the taste offered by the combination of spices used in the preparation!


As you get in the holiday spirit, may you have the table filled with goodies and your soul overflowed with goodness and cheerfulness!

Romanian Cozonac
Ingredients
- 1 kg plain flour (sieved)
- 4 tbsp coconut sugar (spoonfuls)
- 600 ml (2½ cups) milk (tepid)
- 2 tbsp youghurt (at room temperature)
- 100 g (½ cup when melted) butter (melted and tepid, not hot)
- 140 ml (⅔ cup) sunflour oil (tepid)
- 3 egg yolks
- 20 g (5 rounded tsp) dried yeast
- 1 orange zest
- 1 pod vanilla
- ¼ tsp saffron/turmeric (for colour)
- ½ tsp salt
For the nut filling
- 700 g (7⅓ cups) walnuts
- 100 g (⅔ cup) raisins
- 1 vial rum oil essence
- 7 tbsp coconut sugar
- 2 tbsp cocoa powder
- 1 tbsp cinnamon (ground)
- 1 tsp clove (ground)
- 1 orange zest
- 3 egg whites (whisked stiff)
Alternative poppy seeds filling
- 600 g (4¼ cups) poppy seeds (ground)
- 6 tbsp coconut sugar
- 1 tbsp cinnamon (ground)
- 1 ornge zest
- 1 vial rum oil essence
- 3 egg whites (whisked stiff)
Instructions
- Mix the egg yolks with salt, yoghurt, orange zest, vanilla in a bowl, and leave it aside. Heat the milk in a pan and pour a part of it over the above mix.
- The other part goes in another bowl over the yeast mixed with sugar. Allow 10-15 min to activate the yeast, preferably in a warm place.
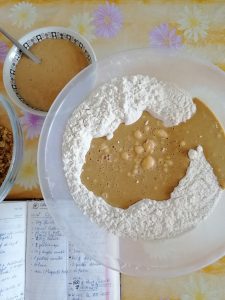
- Place the flour in a large bowl and add the wet ingredients. Knead with one hand. The dough might be soft and sticky at first, but do not add extra flour! As you knead it, the consistency will change.
- Add the tepid butter mixed with oil little by little and keep kneading.
- When the oil is absorbed, you can move the dough on a floured worktop and continue to knead. The whole kneading process should take approximately 20-30 minutes.
- Place the dough back into the large bowl, cover it with a dry kitchen towel and let it rise until the volume doubles, preferably in a preheat oven to 40°C (104°F).

- Importantly, before you cover the dough, you should make a cross sign over it. Believe it or not, it will make your dough rise – so say all the Romanian, Italian or Balkan lady bakers. Since I only made cozonac once in my life and a long time ago, I don't remember if I respected this tradition/superstition. To me, all baking and cooking ingredients, in general, are chemical compounds that produce a chemical reaction at a temperature and mix nicely to result in the food we eat. Try to convince a granny, especially one who lives in the countryside, that cooking is biochemistry! It's way easier to cross the dough and spare a long scientific debate that will not convince the granny in the least! This year, I baked with mom and had fun when we got to this point in preparation, but she still respected the tradition!
Method for the nut filling (makes three cozonaci)
- While the dough rises, prepare the filling by mixing well the dry ingredients.
- Separately, whisk the egg whites until stiff, then incorporate spoon by spoon into the dry mix until obtaining a thick paste.
Method for the poppy seeds filling (makes three cozonaci)
- Place the ground poppy seeds in a pan and cover them with milk.
- Place the pan over medium heat and mix continuously until the poppy seeds absorb the milk.
- Add the sugar, orange zest, cinnamon and rum essence and keep stirring until the ingredients incorporate nicely.
- Remove the pan from the heat and let the content cool before use.
Method for filling and baking cozonaci
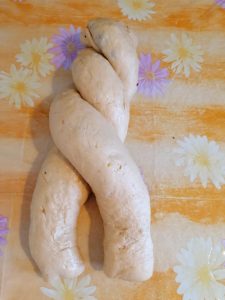
- Oil the worktop, divide the dough into six equal pieces and let it rest for 10 minutes.
- Using your hands, spread each part at a time in a rectangular shape and cover it evenly with 2-3 spoonfuls of the walnut mix, leaving the edges free.
- Roll it and leave it on the side.
- Repeat the process with a second piece, braid them together and place your first cozonac in a loaf tray coated with parchment.
- Because the dough is elastic, you can pull or tuck it to adjust to the tray size.
- Repeat the process with the rest of the dough pieces and nut/poppy seeds filling.
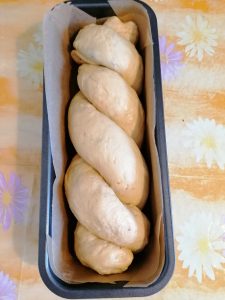
- Preheat the oven to a maximum of 40°C/104°F, turn the heating off and place all three loaves on racks. Close the oven door and let the cozonac rise for about 20 minutes.
- Remove the trays from the oven.
- Beat an egg and use a brush to coat the entire surface, then sprinkle a little bit of sugar evenly.
- Place all three trays back in the oven on the same rack so that they are positioned right in the middle, but leave some space between them to allow hot air to reach the trays evenly.
- Heat the oven to 130°C/266°F at first, for about 10-15minutes, then increase the temperature to no more than160°C/320°F (fan oven) and let the cozonaci bake for another 45 minutes until they turn golden brown.
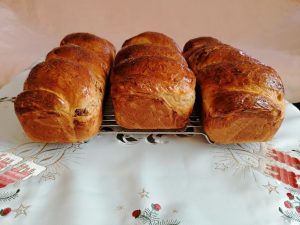
- When ready, remove from trays, place the loaves on a rake and let cozonac cool completely before you slice them.
Notes
The post Romanian Cozonac: The Best Treat on Your Festive Table appeared first on The World Is an Oyster.
]]>The post Sweet Cheese Pies. Easy Desserts from Mom’s Recipe Book appeared first on The World Is an Oyster.
]]>Sweet Pockets

Cheesecakes in any form and shape are widely present in international cuisine. The sweet cheese pies I will talk about today are a traditional Moldavian recipe from Northern Romania.
This post may contain affiliate links, which means I will receive a commission if you purchase through my links at no extra cost to you. Please read the full disclosure for more information. Thank you!
This recipe, as many on this blog, is from mom’s recipe book that was filled with delicious dessert ideas she collected from her friends. If she liked a cake when she was a guest in their house, mom would ask for the recipe, then she baked it herself and improved it or added changes that suited her tastes if it was the case.
Today I own her original recipe book, with countless recipes written with blue ink in her unique handwriting. The pages might be a bit weathered and have some ingredient stains here and there, but the recipes are still impressive, and they still recall beautiful childhood memories every time I bake.
Whether I make her non-bake homemade chocolate, which was the ultimate treat for us kids growing up under a hard to image restrictive communist regime or if I bake her exquisite upside-down apple cake, I always remember with fondness the smell of mom’s kitchen.

I still have lovely memories of how fun it was to watch her bake and lick the bowls of whipped cream when she was not looking (I know now that she was only pretending!)
When I was about twelve years old, mom trusted me to deal with the gas oven and food safety and let me take over from her with the weekly baking. I don’t think I ever stopped since that moment.
Mom’s recipes are easy to make because she never believed in overcomplicating things. Over the years, she made sweet cheese pies or sweet pockets (as we called them) many times – on popular demand.
Since I discovered how easy mom’s sweet cheese pies are to bake, I gave them many a try. My family loves them, and our British friends were incited to learn about these edible pockets’ history (and eat as many as possible!)
A Pie With a Long History

The Romanians have called these pies “poale’n brâu” for centuries. That translates literary to “the bottom of the skirt raised to the waistband”. Why? Perhaps many years ago, women would wear their skirts as improvised bags to carry whatever they would forage in the forest or a small bunch of twigs for the fire. Ever so practical!
When you make sweet cheese pies, you have to stretch the corners and cover the cheese filling as in an envelope or a pocket; perhaps that is visually similar to pulling the rim of the skirt and tugging it under the waistband.
Historically, the great pharaoh Ramesses II, known as Ramesses the Great for his military prowess, seemed to have been addicted to this dessert. So much so that he took some with him in the afterlife. The archaeologists have discovered traces of pies filled with honey in his burial place in the Valley of the Kings. (By the way, the great pharaoh did depart in style, his funerary temple – not tomb! – measures 820 sqm/8800 sq. ft. and included a library with thousands of papyri; if you wanted some non-cheese pies related facts!)
Next in the chronological line of civilisations, the Greeks carried on making pies they filled with fruits.
The affluent Romans, great lovers of lavish banquets, would fill the pies with meats or cheese.
In Medieval Europe, the pies were the favourite dessert of pilgrims and royal heads equally. The latter would have them filled with peacock meat because they could afford it!
The sweet folded pies made it to the Americas simultaneously with the great adventurers who remained in history as the discoverers of the New World (that turned out not to be India, which they were looking for). In fact, the said “new” world had been there for quite a while and was doing just fine.
That is until some intrepid Europeans sponsored by potent kings and queens eager to grab more riches stumbled upon and accidentally “discovered” it. The rest is history, the gift of smallpox and cholera the Europeans bestowed upon the unvaccinated prehistoric civilisations of America set the New World on the road to becoming what it is today.
The filling for the pies adapted to whatever was available on the continent (forest fruit or specific fruit).
To this day, the English fill the pies with meats mostly. In 2018 a large bakery chain that makes pasties at an industrial scale and sells them in many shops around the country was the first to announce a billion-pound profit.
Our pie went a long way from a pharaoh’s table to making someone a billionaire.
I just can’t help a little history dig!
Is There A Time Of The Year For Sweet Cheese Pies?
Traditionally Romanians would bake them around Christmas or Easter time. At our house, mom would bake them often – on popular demand!
Not only do these sweet little pockets make a delicious treat, but they are perfect for a lunch box too or a picnic basket.
Mom made these sweet pockets (as we called them) countless times when I was a kid. Since I discovered how easy the sweet cheese pies are to bake, I gave them many a try as well.
My family loves them, and our British friends were incited to learn about this treat’s history (and eat as many as possible!)
Below is some kitchen equipment that would be helpful in baking sweet cheese pies and not only:
This was the story of sweet cheese pies, now, the recipe. Please give it a go and leave a comment to share your baking experience!


Sweet Cheese Pies
Equipment
- Two large bowls
- Small bowl
- Rolling Pin
- Baking tray/parchment
- Large spoon
Ingredients
- 700 g plain flour (2 ½ cups)
- 2 eggs
- 1 tbsp coconut sugar
- 1 tsp dried yeast
- 400 ml milk (1 ½ cup)
- 10 tbsp melted coconut oil
- lemon zest
- a pinch of salt
For the filling
- 500 g cheese – homemade or similar to cottage cheese (not salty!) (2 pots)
- 3 egg yolks (save the whites for later use)
- a handful of raisins
- orange zest
- rum oil essence
- 1 tbsp semolina (optional/if needed)
Instructions
- Making the dough is similar to ciabatta bread; the main difference is that for the pies, we use milk and sugar. Also, the rising time is a lot shorter for this dough.
- Mildly heat the milk and melt the coconut oil. Mix the wet ingredients and, while still warm, pour the mix over the dried yeast combined with sugar.
- Allow a few minutes to activate the yeast, then sieve the flour over and box it until you obtain a firm but easy to manipulate dough. Let it rise for about three-quarters of an hour (or until it doubles in quantity).
- Meanwhile, prepare the filling. Place the cheese in a large bowl (the cheese has to be dry; remove any excess liquid before use). Add the egg yolks, sugar, raisins, orange zest and rum essence. Mix well until you obtain an even composition.
- If you believe it is too soft, add the semolina (increase the quantity if necessary; it will absorb the excess humidity.) The filling has to be balanced, not too soft, but not too hard either.
- Preheat the oven(180°/356°F/gas mark 4) and place a parchment sheet in the baking tray.
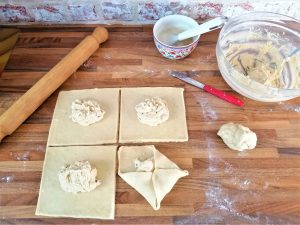
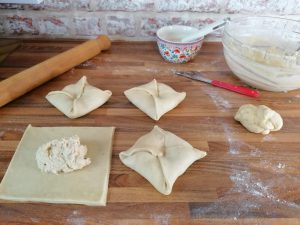
- Using a roller pin, spread half of the dough on the flowered worktop. Cut the dough sheet in squares of about 10-15 cm/5-6 inches. With a spoon, place a dollop of the cheese filling in the middle of each square.
- Gently pull out each corner of the dough and fold it to the middle until you cover the entire filling. I always make sure to pinch the edges softly and glue them together so that the cheese does not spread out in the oven. Also, compress the middle of the pie to help distribute the cheese evenly inside the pocket.
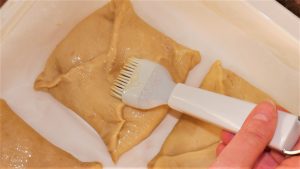
- Beat the egg whites with a little bit of sugar. Use a brush to splodge the top of each pie. The purpose of this step is to create a shiny and sweet film.
- Alternatively, use only the eggwhites for coating and sprinkle powder sugar when the pies are ready to obtain a snow effect.
- Bake for 10-15 minutes – or until the pies turn golden.
- Allow to cool before serving.
Notes
Make yourself a nice cup of coffee to have with a sweet cheese pie; you deserve it after all the work!
Enjoy!
Sweet Pockets
The post Sweet Cheese Pies. Easy Desserts from Mom’s Recipe Book appeared first on The World Is an Oyster.
]]>The post Biscuit Salami. Easy to Make Goodies From Mom’s Recipe Book appeared first on The World Is an Oyster.
]]>The Taste of Childhood

I was eleven years old when I made my first biscuit salami. In the good old days, the parents would go to work, and the children would spend the three months long summer holiday at home doing whatever they wanted.
This post may contain affiliate links, which means I will receive a commission if you purchase through my links at no extra cost to you. Please read the full disclosure for more information. Thank you!
We would mostly go outside to play with other kids (we had a key we wore on a necklace), come back for lunch (yep, we were taught from an early age how to heat a soup without burning the house down) and go back outside until the parents would return from work.
To a tablet/mobile phone/ PC /console owner kid today, it might sound alien, but to us, it was immense radiation-free fun (until Chernobyl happened!)
On one sunny summer day, I announced to my younger sister that we were making biscuit salami for breakfast, but we should not eat anything sweet on an empty stomach. Instead, I cut (butchered, actually) a giant watermelon so we could start with a healthy breakfast.
Then the biscuit salami was ready, and I was quick to skip the refrigeration part. I stuffed my face, as usual with this dessert, to the brink of explosion!
Of course, my pre-teen body did not need much to react to the stupid combination, and indigestion struck.
It was so annoying to hear the other kids playing and having fun outside while I was in bed in agony, close to passing out and with a nasty tummy ache!
I could not eat anything for two days, and I decided the watermelon was the culprit, for being such a heavy fruit with lots of sweet water in it! So I did not eat watermelon for eight years after that moment.
Of course, biscuit salami saw many repeats in those eight years, with perhaps less greedy gulping. What can I say? I was wise from a young age (NOT!)
I’m telling this story more as a precaution: it might be tempting to exaggerate because this dessert is so incredibly yummy, but it would not be a good idea. A couple of slices with a cup of steamy coffee are just heavenly! Luckily, my wiseness level has improved slightly with age…
In my adult years, the gears shifted a bit, of course. I would eat watermelon on any occasion. But I still make biscuit salami at least once a year, especially since a little and enthusiastic helper loves to do the step I find the most tedious: crushing the biscuits.
In time, I made some variations of mom’s recipe. I added butter or milk, which changed the taste a tiny bit. To this day, I still prefer the simpler version.
In my opinion, rum oil extract and cacao are the primary flavours. I always replenish my stack of rum and vanilla oil extract whenever I visit Romania. If you cannot find the same thing, use rum extract or rum essence (perhaps you will need an extra spoon since it is not as concentrated as the oil extract).
This post contains the simple, Romanian version of the biscuit salami recipe, as it was handwritten in my mother’s book. The same book where I found this incredibly successful apple cake recipe.
In Italy, a similar variant of it is called Salame di cioccolato (chocolate salami), and it is the traditional Christmas and Easter dessert in many regions of the country. The recipe is slightly different, and it may include raw eggs.
There are too many health restrictions on consuming raw eggs, and this is another reason I go for the easy method.
Since all the recipes I’m publishing here are specific to a different county, I usually end the article by wishing you bon appetite in the respective language. Today, it’s time for your first Romanian language lesson: Poftă bună, everyone!

This recipe contains allergens! If necessary, replace the nuts with any dry fruit.

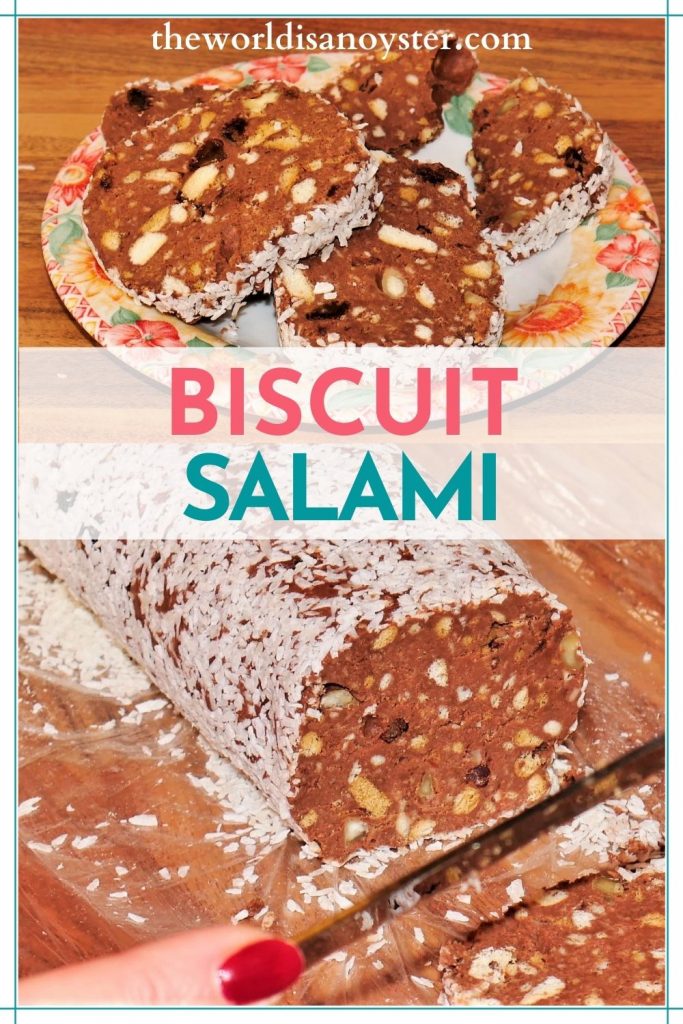
Biscuit Salami
Equipment
- Large bowl
- Tablespoon
- Roller pin
- 45 cm/20 inches long cling film (Saran wrap/plastic wrap) sheet
Ingredients
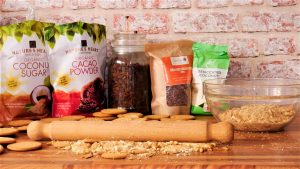
- 2 packs Rich Tea biscuits (600g)
- 2 tbsp coconut sugar
- 3 tbsp cacao powder
- 500 ml water
- 2 vials rum oil extract
- 1 handful raisins
- 1 handful chopped mix nuts (optional)
- 1 tbsp cocoa nibs (optional)
- 100 g shredded coconut (to decorate only)
Instructions
- Crush the biscuits to various degrees using a rolling pin. You could break them by hand, but it will take longer, and your fingertips will get sore easily. I tried the method before I discovered mom had a roller pin in the cupboard!
- Place the crushed biscuits in a large bowl, add all the other dry ingredients EXCEPT the shredded coconut and mix with a large spoon until they incorporate nicely.
- Separately, pour the rum oil extract in the required quantity of water and give it a slight stir. It will not blend, but just do this for the sake of obtaining some even distribution.
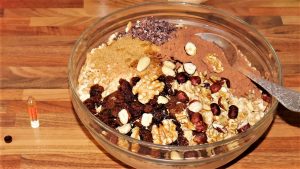
- Pour the water over the dry ingredients in the bowl and mix, using a spoon at first. As the biscuits and the rest of the dry ingredients will absorb the water, it might become too hard to use the spoon. At this point, you can continue mixing with your hands until you obtain an even composition.
- Even if the composition seems a bit too hard or dry, there is no need to add extra water. The biscuit salami needs a certain firmness so that it will not crumble when you slice it.

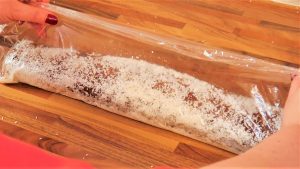
- Cut a 45cm cling film sheet and with a wet hand, spread the moisture over the entire surface. It will prevent the salami from sticking and staining the plastic sheet before you decorate the dessert.
- Transfer the mix onto the sheet and start modelling until obtaining a salami shape you can cover completely with the plastic and roll on the worktop. You might need to wash the excess composition off your hands before this step.
- The last stage of preparation is decorating the biscuit salami. For this, unwrap the cling film and simply pour the shredded coconut onto one side, then lift the other end of the plastic sheet to roll the salami into the coconut. If necessary, repeat, spreading more shredded coconut where needed and rolling the salami to the other side.
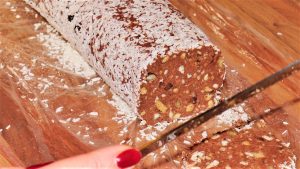
- Make sure the salami has a firm consistency and no air gaps by slightly pressing down while rolling and shrinking from the ends if required.
- Refrigerate it for an hour or for as long as you can wait until you slice it. I rarely manage to respect this step, although the result is much better! Enjoy!
The post Biscuit Salami. Easy to Make Goodies From Mom’s Recipe Book appeared first on The World Is an Oyster.
]]>The post Upside-Down Apple Cake With Whipped Cream – Mom’s Astonishing “Welcome Home” Delight appeared first on The World Is an Oyster.
]]>A Symphony of Scents and Flavours
Disclaimer: This recipe contains allergens! Please use suitable substitutes if you have a nut allergy!
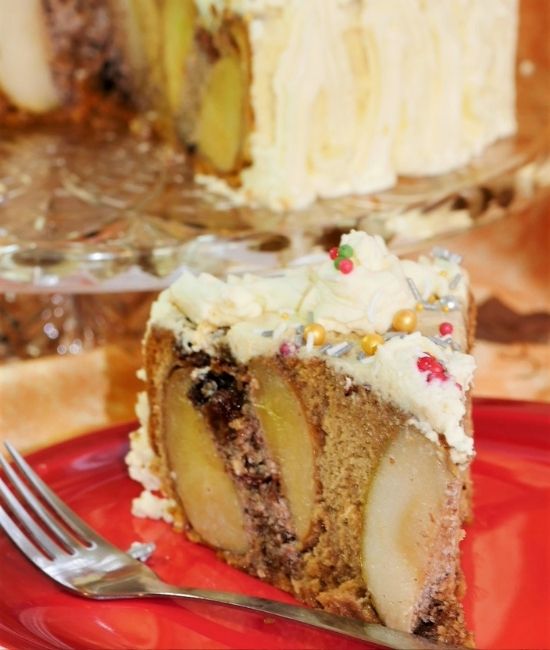
The “welcome home” favourite in mom’s recipe book was always an impressive upside-down apple cake with whipped cream. I can’t call it pie or tart because it is not; it is a soft sponge over whole apples filled with nuts and spices (we don’t have any food allergies).
This post may contain affiliate links, which means I will receive a commission if you purchase through my links at no extra cost to you. Please read the full disclosure for more information. Thank you!
My cruising job contracts were usually six months long. That meant a lot of exploring the ports of call or floating at sea in between destinations.
The job involved some office work (the small Shore Excursions department onboard usually made either the first or the second-largest profit per cruise – after the Casino). It also meant an early morning start to dispatch the tours and send the passengers to see the wonders they wanted to see on their cruise.
Most of the time, though, early mornings finished early enough to allow me to jump on a tour bus and be on my way together with forty-fifty passengers. I would see the same things they saw, probably more if I happened to be a place I had visited before and knew what hidden corners I wanted to explore or (re)discover.
Yep, I was paid to do this and enjoyed it 200%!
It was a lot of hard work and equally fun. Towards the end of the contract, I would experience some wear and tear. The worst was dealing with complaints such as “I went on this Rain Forest Canopy tour, and it was raining all day. I was not happy at all!”
I had to put it on the fact that people were on vacation and left their brains at home. As I provided a service that brought millions to the company, I had to plaster a smile on my face, feel empathic and apologise that it rained in the blooming rain forest! Five-star services require nerves of steel!
As the end of the contract was nearing, I used to feel divided. One part of me wanted to stay longer, visit more of the world, be in the company of onboard friends from all over the Globe. But at the same time, I was looking forward to flying back home, seeing my family and friends who were waiting for my travel stories. And to not waking up before eight am!
After months of repetitive menus, I was craving mum’s cooking. I was dreaming of a proper moussaka, her delicious homemade chocolate or a mouth-watering cozonac. Even if it were not around a holiday, mom would still make sure to have a couple of loaves waiting for me!
But most of all, I missed moms’ fabulous baking. And most of the time, there would be a massive upside-down apple cake smothered in whipping cream in the fridge, waiting for when the jet lag would wear off.
The scent of it, the apples filled with nuts and cinnamon that reminded me of Christmas (which, by the way, I never spent at home in six years of working on cruise ships), everything was marvellous and made the start of my two months-long vacations stellar.
The first glimpse of the cake was reason enough to forget sailing the oceans. After all, the cruise ships will always furrow the seas, and I will get a new contract until I decide it is time to make a career change or settle on firm land. It was time I enjoyed my vacation!
At least it is how it used to be, this still being a memoir an’ all. The moment of writing recalls times other than the doomed years of the pandemic, which managed to halt a prosperous cruising industry among all the bad things that came out of it!
That was the story; let’s get to the recipe I still make today since I now own my mom’s old, handwritten recipe book!

Ingredients for Upside-Down Apple Cake With Whipped Cream:
For the sponge:
Eggs
Coconut sugar
Plain flour
Tap water
Baking powder
Vanilla sugar (or vanilla extract)
A pinch of salt
For the filling:
Organic apples
Nuts coarsely grounded (walnuts or a mix, as long as you don’t have an allergy to nuts!)
Coconut sugar
Raisins
Mulled wine spices: ground cinnamon, clove, aniseed, nutmeg, ginger.
Substitute for nuts
Jam
Sugar+cinnamon or spice mix
Banana (pureed and mixed with little sugar and raisins)
Any dry fruit mix. Be creative!
For the syrup:
Water
Coconut sugar
Rum essence (optional)
For decoration:
Whipping cream (minimum 30% fat)
Icing sugar
Gelatin
How to make the apple cake:
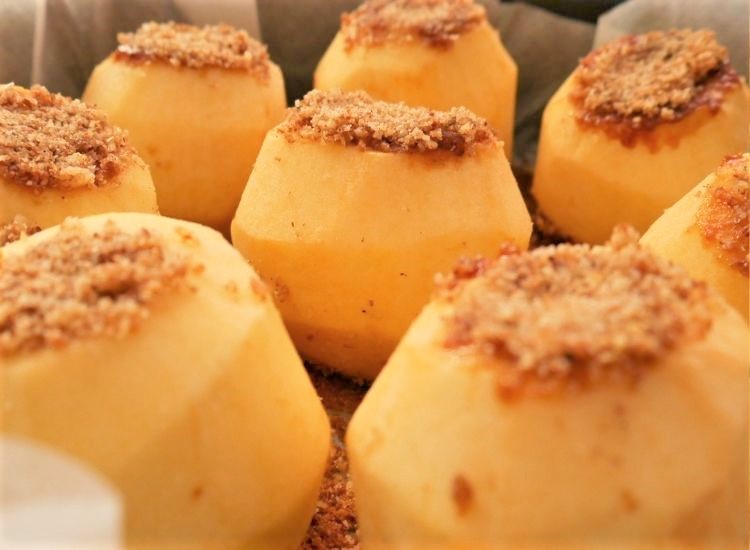
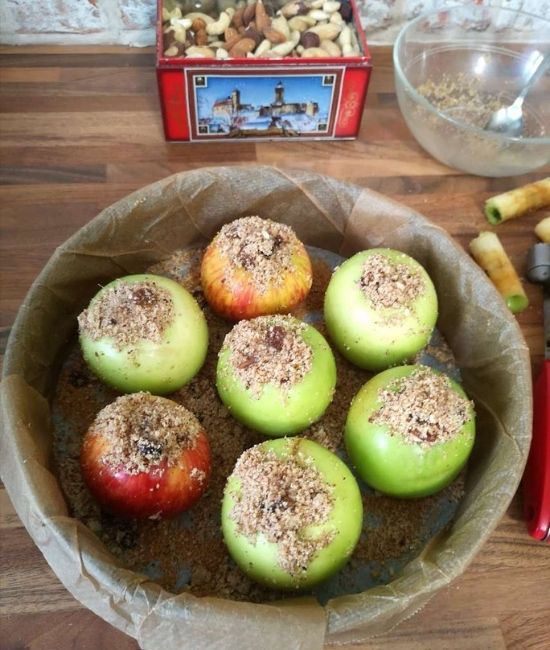
Wash and peel the apples if you buy them. Even organic, they are still waxed, and you don’t need that chemical mix in your body cells. Of course, if you have an apple tree in the garden, skip this step.
Remove the core and pips with an apple corer. Use the mix of nuts, sugar, spices and raisins (or any substitutes) to fill the space thus created.
Line up the baking tin with parchment (I used a round tin with removable bottom, 26cm in diameter).
Next, Mom’s recipe says to sprinkle some sugar in the tin. I made this cake either following or ignoring this step. The only difference was that with the sugar version, the crust had burnt a little. It was excellent without sugar, and I would say it is an optional step.
Place the apples in the baking tin, leaving an equal distance in between them.
Preheat the oven to a maximum of 170°C fan/190°/gas 5.
To prepare the sponge, place the eggs, sugar, salt and vanilla (orange zest – optional) in a large mixing bowl and batter for five-seven minutes with an electric mixer.
Pro tip: if you store the eggs in the fridge, bring them out for at least an hour before starting. Eggs at room temperature whip better, increase the volume at least three times and have a creamy consistency. Using cold eggs will not triple the volume, and the consistency will remain fluid.
Using a tablespoon, add the water spoon-by-spoon (you might not need the entire quantity at this stage) and mix gently with circular motions from the bottom of the bowl up.
From now on, you can use a large silicone spatula or a wooden spoon for mixing and always add the ingredients gradually, not the entire quantity at once. The sponge needs a chance to incorporate everything slowly to remain fluffy.
Sieve the flour (mixed with baking powder) over the bowl in small quantities. Mix gently to keep it airy.
Finish by adding the vanilla and the orange zest if you choose to use them.
Pour the sponge mix over the apples. Even if they aren’t covered entirely, the sponge will rise at a high temperature during baking.
Cover the baking tray with another one (I use a round, shallow pizza tray for this purpose). Place the tray on the middle rake and bake for 20 minutes, then remove the cover and continue baking for another 20-25 minutes or until the sponge turns golden brown.
For food health and safety purposes, do the toothpick test to check if it is thoroughly baked (stick the toothpick in various parts of the cake; the sponge is ready if the toothpick is clean when you remove it.)
Before you flip the apple cake upside-down:
- Allow it to cool a little.
- Don a pair of oven gloves and place a cake stand over the tin (it has to be large enough to cover it completely, like a lid).
- Grip the covered tin securely with both hands and turn it upside down in one swift motion.
It might sound a bit tricky, but it is doable. Be careful not to burn yourself, and ask any audience you might have to take a few steps back until all is safe!
Also, please keep the tin over the table when you perform the turning manoeuvre; I’m not implying that it might happen, but you want to prevent your cake from accidentally flying off your hands and landing on the floor!
Now that the apple cake is safe on the cake stand, you can remove the tin, peel off the baking paper and permit it to cool completely.
Meanwhile, prepare the syrup by boiling the water with the sugar for a few minutes until it reduces slightly. When it cools, you can add some rum essence and mix (the essence is oily; it will not dissolve, but that’s okay).
You can now spread it all over the sponge using a tablespoon. When absorbed, the syrup will make the sponge even softer.

The last step is decorating the upside-down apple cake with a generous dollop of whipped cream.
Prepare the whipped cream with the required quantity of icing sugar until stiff. Add the already prepared gelatine to help the cream preserve a nice decorated shape for longer.
Spread half the whipped cream on the top and side of the cake and cover it uniformly. If you have a piping bag, get creative and decorate upon your heart’s desire!
It is essential to use cold ingredients for this step and cool the icing bag for a while before getting creative. Whipped cream works better if it is well refrigerated.
When you are happy with the results, place the cake in the fridge for at least a few hours. If you can, wait until the next day to slice it (I can’t, and I won’t!)
Your exquisite upside-down apple with whipped cream is ready, and the house is filled with the scent of Christmas, no matter the season. Make yourself a nice cup of coffee (even better, a cappuccino!) and savour a slice.
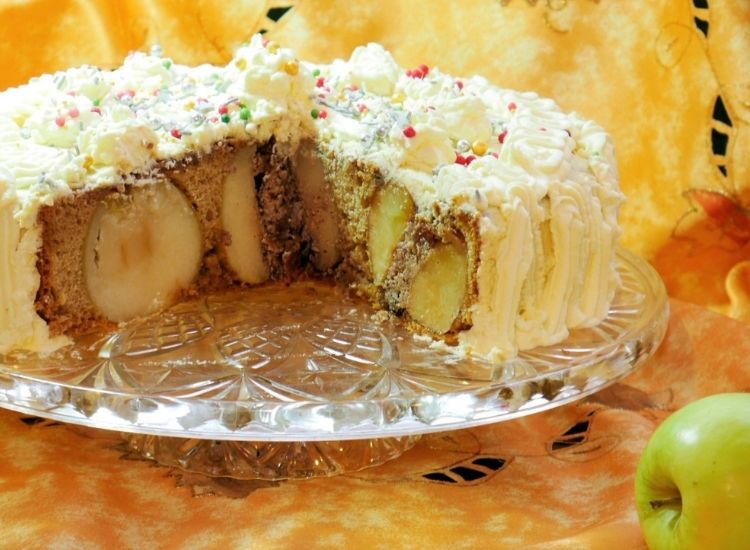
Poftă bună! This is your first step in learning a new language, and it means Bon appetite in Romanian!
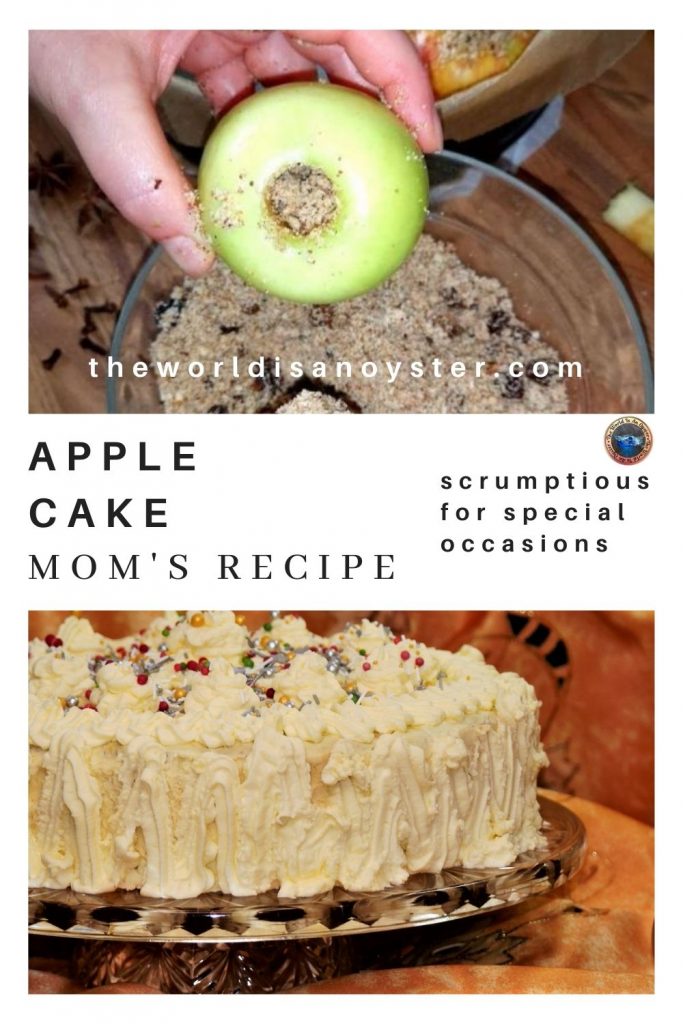
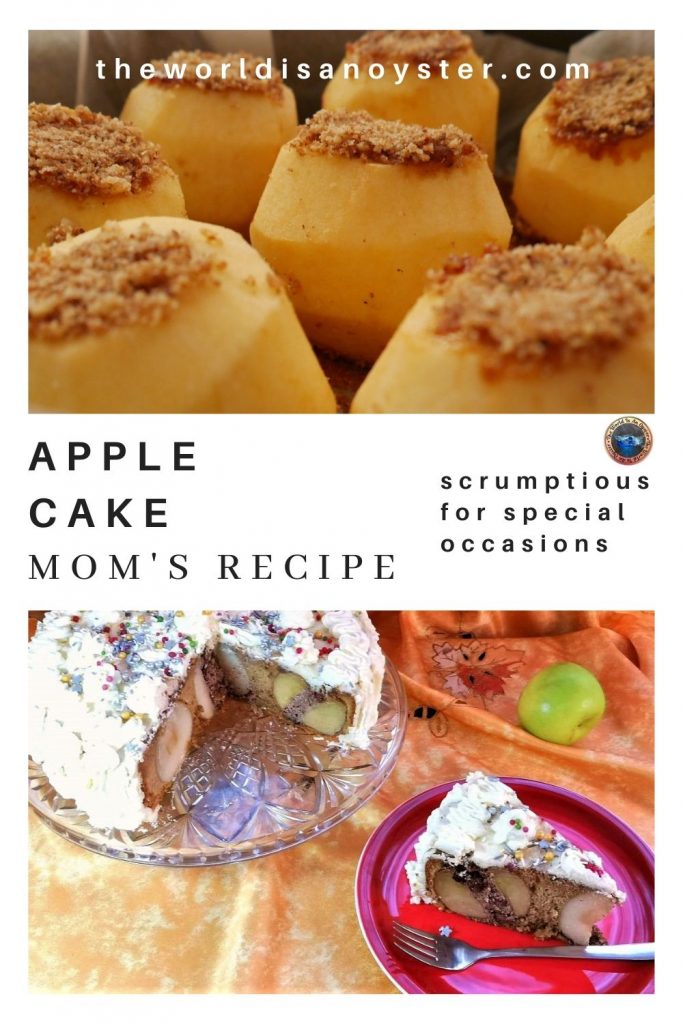
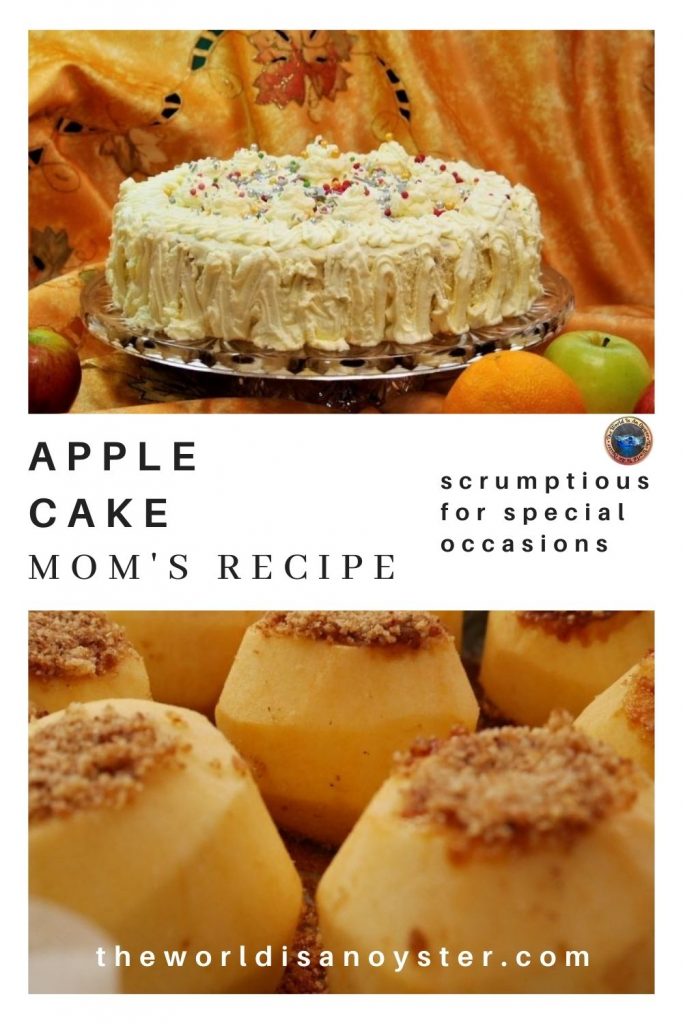
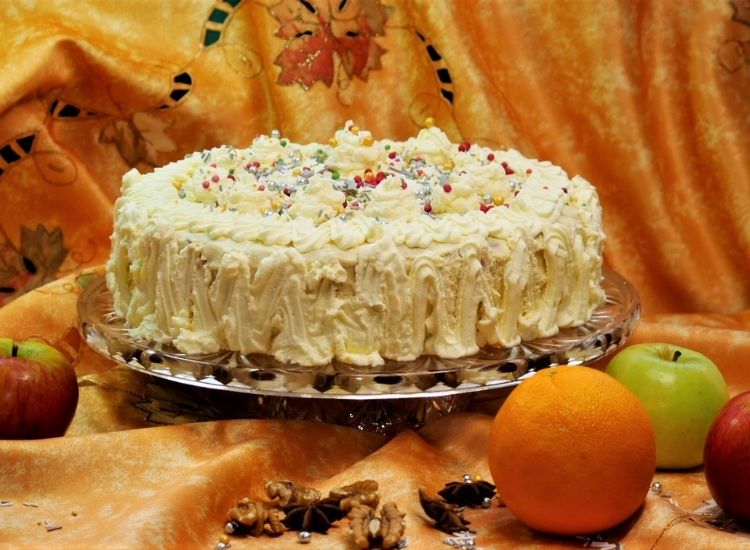
Upside-Down Apple Cake With Whipped Cream
Equipment
- Round baking tin Ø26cm with loose base
- Apple corer
- Large mixing bowl
- Silicone spatula
- Electric hand mixer
- Cake stand
- Parchment paper
Ingredients
Sponge
- 6 pcs egg large, organic
- 100 g coconut sugar
- 8 tbsp tap water
- 300 g plain flour
- 1 tsp baking powder flattened
- 1 tsp vanilla extract/vanilla sugar
- 1/2 tsp salt
Filling
- 7 pcs apple organic, unwaxed
- 100 g walnut or nut mix ground
- 1 tbsp coconut sugar organic
- 1 tbsp mulled wine spice (cinnamon, cloves, aniseed, ginger, nutmeg)
- 1 handful raisins
Syrup
- 100 ml water
- 1 tbsp coconut sugar
- 1 tsp rum essence
Decoration
- 500 ml liquid whipping cream over 30% fat
- 1 tbsp powdered coconut sugar/icing sugar
- 1 tbsp gelatin
Instructions
Filling
- Line up the baking tray with parchment paper.
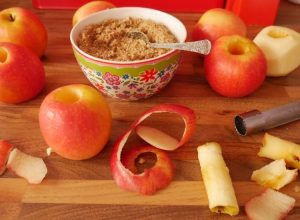
- Wash, peel (if waxed), core and pip the apples.
- Optionally, sprinkle some coconut sugar on the bottom of the lined baking tray if you aim to obtain a caramelized top for the cake. (It might not work perfectly well with the whipped cream decoration, though.)
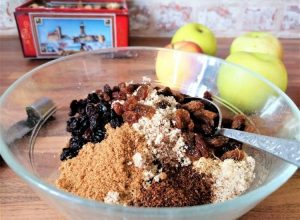
- Using a teaspoon, fill each apple with the nut/raisins/sugar/spice mix or any substitute chosen.
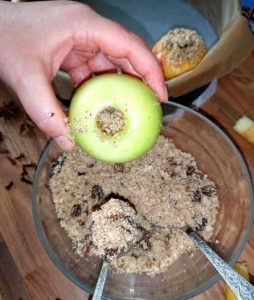
- Place the apples in the baking tray, leaving an equal distance between them.
- Spread any leftover nut and spice mix over the apples.
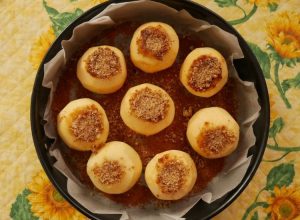
Sponge
- Preheat the over to 170°C/375°F/gas mark 5.
- In a large mixing bowl, place the eggs at room temperature (this is important as it allows the volume to increase when battering!), sugar, salt and vanilla. Batter with an electric mixer for 5-7 minutes until the quantity triples.
- Add the water gradually and mix gently with the spatula. You might not need to use the entire quantity of water.
- Gradually add the sieved flour mixed with baking powder. Only use as much as needed to obtain a medium thick batter that still flows down easily. Different flours absorb humidity differently. If the batter becomes too thick and does not flow nicely from the spatula, try adding a tablespoon of water.
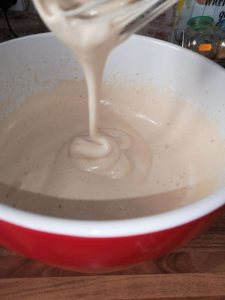
- Use a large spatula to mix gently, from the bottom of the bowl up, in a circular motion to help keep the fluffiness of the batter.
- Pour the batter over the apples placed in the baking tray and allow it to spread evenly. It should cover the apples, and it will rise while baking.
- Preferably, cover the tray and bake for 20 minutes, then remove the cover and bake for the remainder of 20-25 minutes. I use a shallow pizza tray as a cover to prevent the burning of the cake's top.
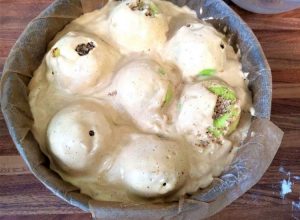
- The baking time is longer for this cake as the apples need extra time to bake.
- Perform the toothpick test to check that the sponge is baked thoroughly and allow extra time if needed.
- When you are happy that the cake is ready, remove it from the oven and place the tray on a cooling rack.
- Allow cooling for about 10 minutes. Meanwhile, prepare the cake stand you will use for your finished cake.
Flipping over the sponge with apple filling
- Always use a pair of oven gloves for this step, and make sure that the area around you is free of young children or pets!
- Place the cake stand over the cake that is still in the baking tray.
- Grip securely both the tin and cake stand on top of it and flip it over, then place it on the worktop.
- Remove the tin and baking paper. Your cake should look brownish and have some caramel on it from the melted sugar if used.
- Allow cooling completely before the next step.
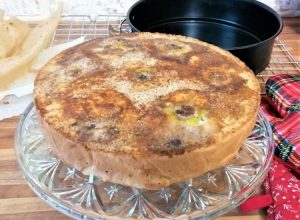
Syrup
- While the cake is cooling, prepare the syrup.
- In a pan, bring to boil the water, then add the sugar.
- Lower the heat and boil for a few minutes until it becomes slightly thick and sticky.
- Turn the heat off and cool completely before use. Add the rum essence and stir.
Preparing the whipping cream
- Use fridge cold whipping cream, and if possible, cool the mixer's battering tips and bowl in the freezer for a few minutes before starting. It will help obtain the right consistency. It is also important that the cream has at least 30% fat. A skinny one will not set and preserve the decorated shapes well.
- Prepare the gelatin following the instructions on the sachet, but use a lot less water than indicated. I use one tablespoon of water for a gelatin sheet (previously soaked and drained). The gelatin should start to set by the time you whip the cream.
- Whip the cream until you get the right consistency. Avoid extended whipping as it can cause the fats to disintegrate!
- Add the sugar just before finishing, then the almost gelatin and mix to incorporate them, but no longer than this.
- Preferably, split the whipped cream in two. Keep half of it in the mixing bowl and place the other half in a pipe bag, then place it in the fridge until needed.
Assembling the cake
- With a tablespoon, pour the syrup over the cake, careful to cover the entire surface.
- Use half of the whipped cream to cover the top and sides of the cake and level it nicely.
- Decorate upon desire with the cream in the piping bag and any other suitable extras you would like to use.

- Refrigerate overnight before slicing.
Notes
I hope you enjoyed reading this recipe! Please share the love by saving this pin to your baking boards; it will help this blog grow and motivate me to write more for your enjoyment! Thank you!
A Symphony of Scents and Flavours
The post Upside-Down Apple Cake With Whipped Cream – Mom’s Astonishing “Welcome Home” Delight appeared first on The World Is an Oyster.
]]>